| ||||||||||||||||||||||||||||||||||||||
| ||||||||||||||||||||||||||||||||||||||
Coolant Filters
1205 Sandalwood Lane Los Altos, California 94024 +1 (650) 968-7017 Gano also offers a smaller filter assembly for a heater hose. This is a good idea, since such a filter could get totally plugged up and the only result would be a loss of heat, but it might be very effective at removing suspended particles from the entire system. It might even serve many owner's interests to have only a heater hose filter, which would not positively prevent radiator clogging but would reduce the number of suspended solids in the entire cooling system and therefore hopefully postpone the need for a radiator rodding or replacement by a few years. Unfortunately, Gano's heater hose filters are brass rather than clear so you cannot readily see when they are full of crud. Hence, rather than buying the Gano item, Palm opted to save money and simply purchased a set of solid brass 5/8" garden hose fittings and a screened hose washer at the local hardware store. The screened washers are commonly used in the hoses that connect to a washing machine, and the careful shopper will note that they can actually be purchased in a variety of screen grids. What's more, the XJ-S owner is thereby provided one more option: he can use a screened washer in the summer when a loss of heat would be no big deal, and then he could install a normal garden hose washer in the winter to allow full coolant flow to the heater. Palm also revised his radiator drain scheme, since he would need to use it regularly to keep these screens clean. The '83 XJ-S comes with an overdesigned drain valve that dumps coolant all over the front suspension when opened. He replaced this with a simple fitting (not easy to find, since it is BSPP thread -- see the book), connected a short length of hose and plugged the end of the hose. When draining coolant, he just unwraps this length of hose out the bottom of the car, pinches it with a pair of Vice Grips, removes the plug, puts the hose into a suitable container, and releases the Vice Grips. After the head rebuild, the car was driven once and the Gano filters were clearly already in need of cleaning, as expected. The heater hose filter was found to be 100% plugged as well. All three were cleaned and reinstalled, and a report was made to the list -- whereupon someone asked the obvious question: What did the crud that came out look like? Too late, the crud had been hosed out into the yard somewhere. A few hundred miles later, and the Gano filters were cleaned a second time. This time the crud was collected and photographed.
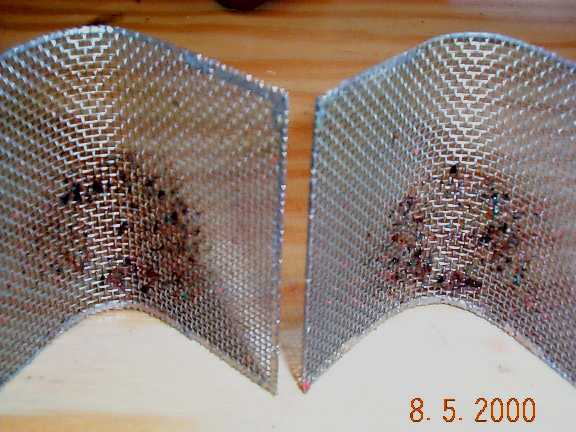
Despite many more hours of operation, the filters were nowhere near as fouled as they had been after the first few minutes after rebuild. Hence, as long as no new crud is being introduced into the system (being refilled with coolant and distilled water only, etc.), perhaps it would be acceptable to remove the filters after a while. The larger chunks were all in the left side filter; the right side filter contained only small particles. This is in contrast to the first cleanout after rebuild, when both filters were pretty well choked up. The large solid black chunks appear to be a dried, crumbling seal --
possibly the old "top hat" seal (C37990) on the water
The large brown chunks appear to be pieces of wood. No idea how those got in there. The smaller particles appear to be large grains of sand or tiny pebbles. The only apparent source would seem to be leftover stuff from the original sand casting of the engine block. This engine has over 90,000 miles on it, so one might question that such grains would still be in there from casting; however, when the heads are off, you can see some excellent little pockets in the block around the liners that hold heavy stuff like this indefinitely. During this rebuild, Palm endeavored to clean these pockets out, and it's understandable that a few grains were left behind but loosened enough to start circulating around. There was one other thing of note that doesn't appear in this photo. The filters also seemed to have collected some "goo" that was circulating around in the system. Best guess: excess Hylomar that squeezed out of joints as the bolts were tightened down. It's not clear if this stuff does any harm in the cooling system -- it washes off the filters fairly easily -- but it certainly doesn't do any good. It might be expected to coat surfaces inside the radiator and impede heat transfer, and it might even crud up tubes and impede coolant flow. Mechanics might want to note that being generous with this gasket sealant may not be a good idea. It should be noted that neither of the Gano filters were significantly plugged this time. Despite the collection of large chunks in the left side filter, the car was running cool. This is because large chunks don't plug the screens very effectively. The screens are more likely to be seriously obstructed by smaller particles, just the right size to get stuck in each opening in the screen. The heater hose filter was only about 50% plugged this time.
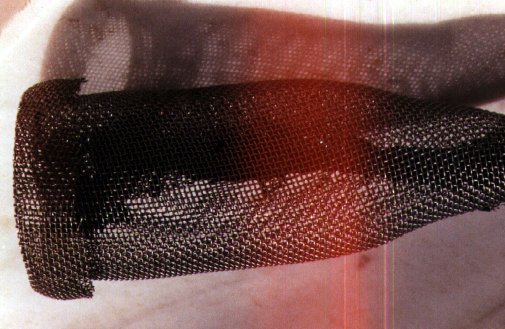
While it caught a couple of large pieces as well, this screen had a collection of "mud" in it; the small grit shown is merely what is left after the mud dries up and the remains are scraped together for the picture. The screen in the heater hose is considerably finer than the screens in the Gano filters; this mud would have gone right through the Gano filters. After reassembly, Palm drove the car only a couple of times and large chunks were visible in the left side Gano filter again. So, that filter was cleaned out once again. This time, not only wasn't the heater hose filter opened up, but the right side Gano filter was not disturbed.
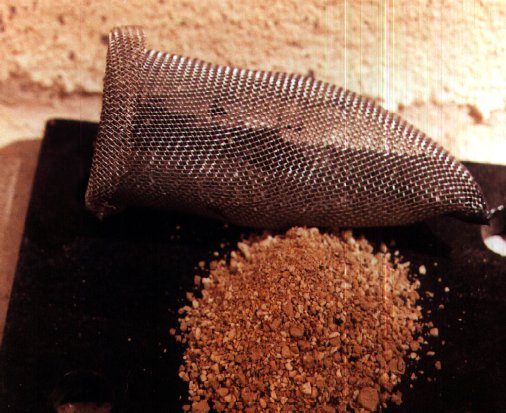
This time, the Gano filter itself was disassembled for the picture. The second screen at the right, with the big gaping hole in it, is intended to allow junk to get into the filter assembly but to prevent it from falling back into the thermostat housing at shutdown. The two large chunks appear to be more of the old top hat seal. Hopefully, there can't be much more of that stuff in there! Some of those smaller particles actually look like thin flakes. Perhaps some of the scale from years of refilling with bad water is coming loose. Again, the car was keeping its cool just fine; these particles did not impede coolant flow through the filter significantly. One bit of bad news to report: The clear plastic housings on
the
Gano filters are showing signs of stress fracture. This might be
due to overtightening of the hose clamps, or it might be due to dynamic
stresses caused by the engine moving around on its rubber mounts and
pulling
on the radiator hoses. Note
that these filters are supposed to be installed with the hose clamps
only moderately tightened and a length of steel wire wrapped from clamp
to clamp to prevent the hoses blowing off. Tightening the hose
clamps hard enough to prevent the hoses blowing off without the wire
would evidently be a mistake. Regardless of the cause, it provides one good reason
not
to leave these filters in place permanently. Tentative plan is to
buy a pair of 1" copper piping couplings (1-1/4" OD) and reconnect the
radiator hoses with these tubes and the screen assemblies from
the
Gano filters. Won't be able to see the crud collecting in the
screens,
but once the system is largely clean and the rate of collection falls
off
this shouldn't be a big deal -- just check the screens whenever the
coolant
is changed. Gano sells replacement plastic tubes, which might be
a good idea if the engine is rebuilt again -- or perhaps find some
Pyrex
glass tubes. Or maybe just continue to use the copper and check
regularly.
Of course, Gano also offers solid brass housings. Palm's '83 spent most of the ensuing several months garaged, coming out only for the occasional weekend romp. But in an effort to sell the car, Mrs. Palm took to driving it to work every day so that it could sit out front of the school where she works with a "For Sale" sign on it. Hence, it suddenly became a daily driver, getting about 40 miles/day. All told, it's had several thousand miles put on it since the previous Gano cleanout report. A cursory inspection with a flashlight indicated that a cleanout was due -- overdue, in fact. Upon cleanout, the collected debris were photographed -- not using a digital camera this time, but rather laying the debris out on the flatbed scanner and scanning it. This results in a much better image of small stuff like this! One might complain that a digital camera doesn't have enough resolution or won't focus close enough, but a flatbed scanner has no such limitations. This image has been left rather large so that anyone who cares can stare very closely at the junk and draw their own conclusions. It'll obviously take longer to load -- sorry.
The stuff to the left of the U.S. nickel (21.2mm dia) is perhaps
half of what came out of the left side Gano filter. It's
not that easy to collect this stuff for pictures -- it'd be much easier
to just hose the screen off and reinstall. When trying to get the
stuff out of the screen onto some paper, some blows away, some falls on
the ground, some stays stuck in the screen until the hose is applied. This Gano filter was at least 50% obstructed. On the bullet-shaped screen, the nose was 100% blocked and the only possible coolant passage was via the sides of the dome. Clearly, Palm should be checking this thing more often! The car apparently was still running cool, although there's no telling how hot the left bank was getting since the gauge sender is on the right bank. There are a couple of black chunks that appear to be pieces of
brittle rubber seals. The vast majority of the stuff, though,
appears to be some sort of film; some rather large peelings plus a lot
of smaller tidbits. The screen looked "furry" with this stuff all
over it. There didn't appear to be any of the sand granules found in
earlier cleanouts, and there didn't appear to be any goo either. 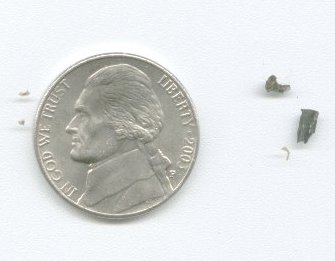 The stuff to the right of the nickel is about half of what came out
of the right side Gano filter. Not even worth the effort to clean
out. Perhaps most interesting, it is black chunks of dried rubber
only -- there doesn't seem to be any
of the film stuff that's plugging the left side filter. All in all, the predominance of junk in the left side filter is
astonishing. Both banks of this engine would appear to be nearly
identical at least as far as the coolant passages are concerned, and if
there's any difference in flow rate one would expect the flow rate in
the left bank to be the lower of the two. Why so much stuff in
the left side filter only? Whatever the reason, it becomes
increasingly apparent that the OEM engine temp gauge sender being in
the right bank is failing to indicate the real problems with cooling in
this car: the upper 1/3 of the radiator getting plugged up long before
the lower 2/3. Interestingly, the clear plastic of the Gano filters doesn't look
any worse off than it did before. It's as though it develops that
"crazing" look in the plastic, but nothing comes of it. Palm is very happy he did not remove the Gano filters after a while. This crud would be in the radiator tubes were it not for those filters. The lesson should be: install the filters and leave them in for the life of the car.
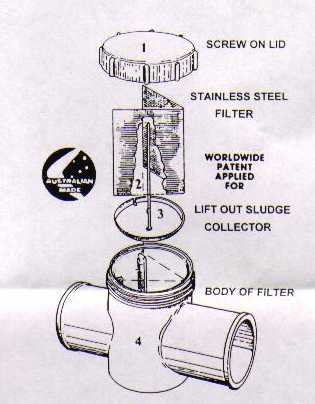
Peter Smith says there’s a coolant filter available in Australia made by:
151 Bushmead Road Hazelmere WA 6055 John Ashcroft says there's a coolant filter made by Tefba in Australia. It's available online from Mako MarketingAshcroft provides an illustration of this filter:
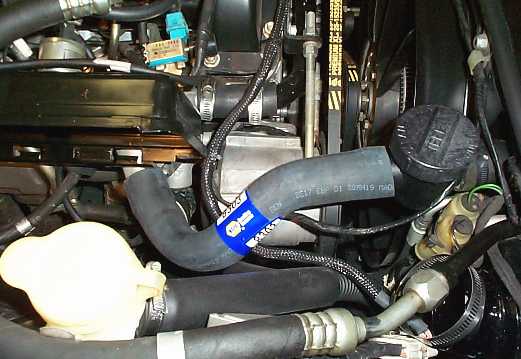
"They are available in 1-1/4", 1 1/2", 1-3/4" and 2"." Al Askevold purchased a pair of Tefba filters for his '90 convertible, and provided the following photos of the installation. "On the right side I used a hose from NAPA, PN 8303, from the t-stat housing to the filter, and a short piece of 1-1/4" hose on the other end."
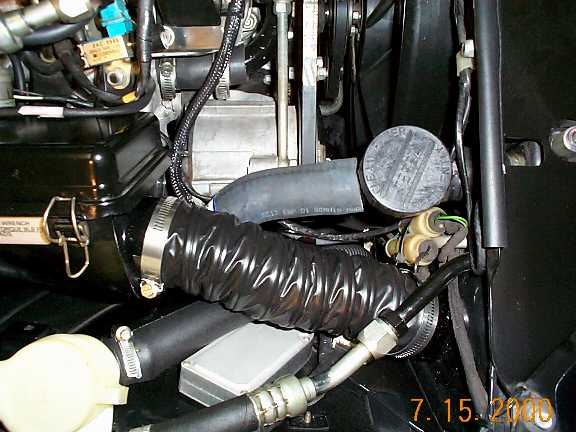
Obviously these pix show a temporary fit-up; the hoses should have clamps at each end. Askevold also has provided a cold air intake scheme on his car, so this particular arrangement of hoses was carefully selected to clear his cold air intake ductwork. Here's what it looks like with the cold air intake hose installed:
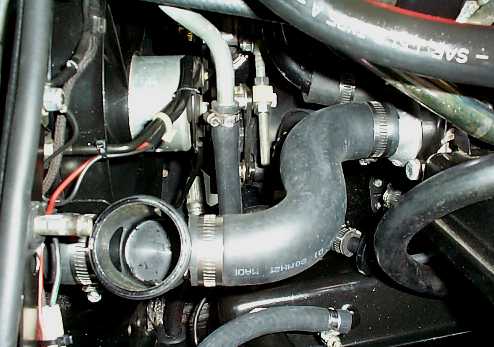
This arrangement obviously allows cleaning the Tefba filter with a minimum of fuss, since it is right there on top. In fact, it probably won't even be necessary to drain any coolant first. Askevold tried to use the OEM hose on the left side. "The OEM hose that I cut to fit for the B bank is not the way to go! I cut 1-1/2" off the short side of the hose and 2" off the long side and installed that from t-stat to filter. After clamping everything together both inside corners on the OEM hose were bent just enough to cause a restriction, not much but not a good thing for the B bank. So back to Napa, this time I came up with a Napa hose pn 7737."
After installation, Askevold ran his car for one hour and then checked the screens.
Remarkably clean, actually; in general, owners would be well-advised
to check the screens far sooner than that the first time after
installation
-- like after five minutes of running after the engine warms up. Palm has the Gano filters in his car but has fondled a pair of the
Tefbas. It is his opinion that the Tefbas are the better choice,
despite being opaque so they must be opened to check. The screen
area is much, much larger since there was no attempt to fit the screen
within the cross-sectional area of the hose itself. And being
able to check and clean them without having to drain coolant would be a
real plus. And they're nowhere near as fragile as the clear
plastic Gano filters. Either will do the job, though. There are several issues that must be addressed regarding the Tefba
filters, however. First and foremost, the diagram of the Tefba
filters above shows the element itself folded into a crisp V shape with
straight sides. As they come out of the package, however, they
are
merely bent into a gentle curve as
clearly shown in Askevold's picture above. The crisp V shape is
actually of considerable importance for ensuring the elements stay in
place rather than getting blown against the outlet port. The
elements should
be removed from the housings and folded in half and then opened back
into a V shape to form a sharp
crease and straight sides, then reinstalled. Second, the lift-out tray has a ledge around the edge. When
the
element is slid into the housing and sits on top of the tray, it
contacts this ledge at three points: the two ends of the element and
the point of the V. The two straight sections of the element are
therefore held above the flat floor of the tray by the thickness of the
ledge. The resulting gaps under the element are unacceptable,
they will allow too much debris to pass through. The easiest fix
here is probably to fashion a flat washer the same thickness as the
ledge that will sit around the lifting post and fill in the space under
the element. The better the washer fits, the less chance of
debris sneaking through. Other ideas include cutting recesses in
the ledge to allow the element to sit down on the flat level, or
notching the element itself where it contacts the ledge. Third, the screen ends 3/16" below the screw-on top. This is reportedly deliberate, so that coolant flow will not be obstructed in the event the screen gets totally plugged. Probably not a good idea here, though; it would be better if the coolant is obstructed and the driver learns that the screen needs cleaning via a rising temp gauge than for the crud to get past the screen and plug up the radiator. It should be easy enough to replace the element with a homemade
replacement
that is 3/16" taller, provided a suitable piece of screen can be
found.
But that is not necessary; Ashcroft says, "On the Tefba filter the
screen
does end about 3/16" below the cap, but the disc is about 5/16" below
the
in/outlet. I just put a 3/16" thick O-ring under the disc, raises
the screen to the cap." This problem has apparently now been addressed by Tefba, and their
newer models include a spring under the tray to hold it up against the
lid. If you have the earlier model, you could make your own
spring -- make sure to use something
that won't corrode into pieces that cause more of the sort of problems
that you're trying to avoid. Ideally, fashion the spring to hold
the filter element just a little high so that it gets pressed down as
the top is screwed onto the housing.
There have been some complaints about the Tefbas being really
difficult to get open after being in the car a while. Auto parts
stores sell some stuff intended to help slip hoses onto fittings, and
they also offer water pump lubricants. Either substance applied
to the threads and gasket of the Tefba cap may help it come off more
easily. Perhaps you wanna take it easy tightening the cap when
you put it on, too. Askevold reports that a strap wrench
helps: "I bought an inexpensive small plastic wrench just for
this job. Shortened the handle and it works verywell." There have also been reports of the elements in Tefba filters being
blown out of position and up against the outlet port when operating the
Jaguar V12 in the upper regions of the tachometer. All of these
reports involve Tefbas without a proper crease in the element; it
is unknown if similar problems will occur with the element creased
properly. If they do, ideas include using some fine stainless
steel wire (such as sold for making fishing leaders) to stitch a
webbing between the flat sides of the element to keep them from pulling
apart. This would make an A out of the V. If all else fails, the lift-out tray could be discarded
altogether. The element itself could then be soldered to two
brass discs to form a one-piece lift-out filter assembly. A
couple of spars could be incorporated to hold the element's shape more
securely.
Bry Schreurs found that Mr. Gasket also makes a coolant filter. It has a machined aluminum housing that apparently unscrews into two pieces for access to a brass screen within. The Mr. Gasket part number for the 1-1/4" size is 4384. You can look at this item on the Mr. Gasket web site.
John Kjallberg points out you don't really need to buy a coolant filter, you can make your own. "I have used stainless steel wire screen for sorting material, has small wire dia to hole size. It's found at industrial supply, McMaster-Carr in USA. This provides the most % of flow for size of screen mesh. Many sizes to be had; I got some sizes smaller than the tubes in the rad, .018 mesh approx. Cut in 3x7 in size and form to look like a cone, fold the end. Insert with point end toward engine. Also added a smaller mesh to the heater input hose, in a 3in cone shape." Tom Bennett did something like this:
and here is "the crap I took out on its first cleanout!"
Another idea may be to simply purchase a tea strainer, cut the handle off of it, and install in in the radiator inlet. |
|
| ||
 |
Improve your Jag-lovers experience with the Mozilla FireFox Browser!
©Jag-loversTM Ltd / JagWEBTM 1993 - 2024 All rights reserved. Jag-lovers is supported by JagWEBTM For Terms of Use and General Rules see our Disclaimer Use of the Jag-lovers logo or trademark name on sites other than Jag-lovers itself in a manner implying endorsement of commercial activities whatsoever is prohibited. Sections of this Web Site may publish members and visitors comments, opinion and photographs/images - Jag-lovers Ltd does not assume or have any responsibility or any liability for members comments or opinions, nor does it claim ownership or copyright of any material that belongs to the original poster including images. The word 'Jaguar' and the leaping cat device, whether used separately or in combination, are registered trademarks and are the property of Jaguar Cars, England. Some images may also be © Jaguar Cars. Mirroring or downloading of this site or the publication of material or any extracts therefrom in original or altered form from these pages onto other sites (including reproduction by any other Jaguar enthusiast sites) without express permission violates Jag-lovers Ltd copyright and is prohibited |
|