| ||||||||||||||||||||||||||||||||||||||
| ||||||||||||||||||||||||||||||||||||||
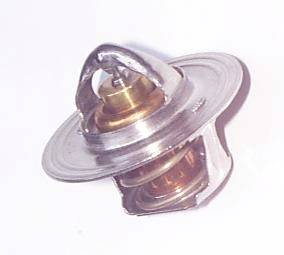
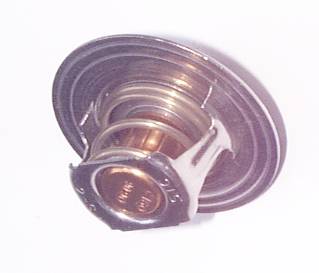
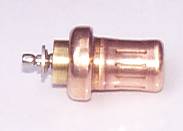
Jaguar V12Auxiliary Air ValveBaseplate Rebuilding Using CarQuest 60206 Thermostat60206 is apparently a very common thermostat, evidently intended for American V8's of several persuasions. It is described as a "54mm" thermostat -- apparently referring to the diameter of its mounting flange. In this particular incarnation, the thermal bulb looks really oversize for the poppet valve.
Disassembly is a cinch. Two quick snips through the struts holding the base of the spring, and the spring falls out. However, a little care should be taken here; while some thermostats -- including the Robertshaw -- have the bulb plunger simply pushing up on the little arch on top, but this one has it attached. If you simply yank on the bulb, you'll pull the plunger out of it -- and in this case it's best if the plunger is never removed from the bulb. So, two more snips to take the arch itself off of the mounting disc, and you're left with a bulb with a valve disc pressed onto it and a piece of an arch flopping around on top of the plunger. Getting the piece of the arch off is a little tricky; a pair of heavy-duty wire cutters chopped it in two adjacent to the little "ball" on the end of the plunger, and it could be finagled off. Then a deep socket was used to press off the two stainless steel parts forming the valve disc.
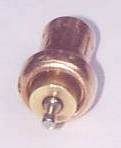
Notice that while the OEM bulb had the seal on top glued on, the seal on this bulb involves a large and bulky brass container. There's no telling why it's so big; let's just hope it means it's really durable! A check of the diameter of this plunger showed that it is considerably thicker than the plunger on the OEM bulb, so it's not workable to swap plungers as it was on the Robertshaw. Hence, it's advisable to never pull this plunger out; there's no need to get air in the system. Fortunately, the fact that this plunger had that attachment scheme to the arch on the thermostat means that it is longer than the Robertshaw's plunger was -- long enough to do the job, actually. The problem: how to get the end of this plunger, with a necked-down section, to push up on the bottom of the AAV piston. Warning: prepare to be impressed! I fabbed up a pair of "keepers" that work just like valve stem keepers from a 1/8" pop rivet. Basically, cut the shank of the pop rivet shorter than the length of that necked down section, then cut the rivet in two lengthwise.
The two halves are then held against the sides of the necked-down section while a 1/8" flat washer is slid down over them to hold them in place. The result was a flange that could support whatever force that plunger could dish out.
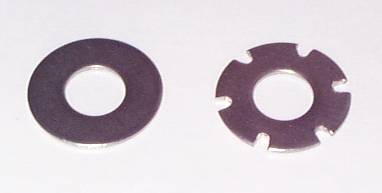
Note that while only a single washer is shown in the picture for clarity, in fact five washers were stacked on this plunger to bring the pushing face up to the comparable height of the OEM plunger. A steel pop rivet was used here for strength, but an aluminum one would probably work just fine. A stainless steel pop rivet would be great if you can find them. I happen to have a box of 1/8" copper pop rivets laying around; in hindsight I should have used those just for cuteness. The rivet itself was cut in half lengthwise using a rotary tool with a very thin cutoff wheel fitted, but if you lack such things you can easily make a pair of keepers from two rivets, grinding one half away of each. Note that while such a collet assembly will work just fine as long as things are moving the way they're supposed to, as soon as that piston gets sticky in the cylinder (likely sooner or later!), the plunger may pull away from a stuck piston during a cooldown and allow the washers to hop off the plunger and the keepers to fall out. Hence, while just stacking the parts will work, a better idea would be to use J B Weld to glue them all onto the plunger. It helps hold those keepers in place while you're trying to fit the washers anyway. You might also consider replacing the collection of five flat washers with a single sleeve with a 1/8" hole through the middle, since such a thing would be less likely to hop off the plunger. Note that the bottom of the mounting flange on this bulb is flat, rather than beveled as on the OEM bulb. The flange is also remarkably thick. When inserted in the recess in the baseplate, this flange protrudes above the surface -- so a flat washer won't fit down flush over it the way it did with the original bulb. The peened-lip assembly method originally used is therefore out of the question. Once the decision to go with a flat washer and six screw retention scheme is made, the thick flange no longer poses a problem. It goes together the same way as the Robertshaw, only this time the washer would remain spaced above the surface of the AAV baseplate. This requires longer screws, #4 x 3/8" long, which are actually a lot easier to find than the 1/4" long ones. Again, a 1/2" flat washer with a 1-1/4" OD was notched at six places around the outer edge. I chose a stainless steel washer because that's the kind of guy I am, but a basic steel washer would work.
Meanwhile, the lip on the baseplate was removed (broken off with pliers, then filed flat). The notched washer was then held against the baseplate to mark the location of the notches. The locations were center-punched and drilled with a 3/32" drill bit, using care not to break through the other side.
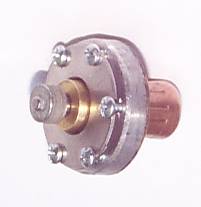
Rather than use an O-ring, I decided to seal this assembly with a gasket. A circular gasket was cut from gasket stock, with an OD that would just barely fit into the opening in the baseplate and a hole in the middle that fit snugly around the bottom of the bulb. If you have suitable hole punches, this is an easy job. I happened to have a suitable one for the center hole, but none suitable for the outer circumference. I punched the center hole then slid the gasket onto the bulb and trimmed around the flange with a pair of scissors. Worked well enough. The gasket was installed on the bulb with a little Hylomar on each side. The bulb was inserted in the base, the notched washer positioned over it, and the six screws started. The screws were all threaded in loosely until the washer was snug against the top of the bulb flange. Then the screws were progressively tightened, pulling the bulb down against the gasket. When done, the flat washer was slightly dished, so it will maintain compression on the gasket as well as tension on the screws so they won't back out. The gasket makes the assembly easy, since it holds the bulb centered in the opening as you're tightening down the screws.
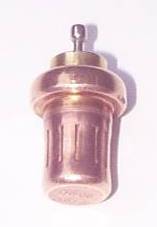
This is the finished baseplate assembly, including the collets and five
washers epoxied onto the plunger. The measurement from the bottom
surface of the baseplate to the contact surface on the top washer is 22mm
at room temperature -- exactly as intended.
|
|
| ||
 |
Improve your Jag-lovers experience with the Mozilla FireFox Browser!
©Jag-loversTM Ltd / JagWEBTM 1993 - 2024 All rights reserved. Jag-lovers is supported by JagWEBTM For Terms of Use and General Rules see our Disclaimer Use of the Jag-lovers logo or trademark name on sites other than Jag-lovers itself in a manner implying endorsement of commercial activities whatsoever is prohibited. Sections of this Web Site may publish members and visitors comments, opinion and photographs/images - Jag-lovers Ltd does not assume or have any responsibility or any liability for members comments or opinions, nor does it claim ownership or copyright of any material that belongs to the original poster including images. The word 'Jaguar' and the leaping cat device, whether used separately or in combination, are registered trademarks and are the property of Jaguar Cars, England. Some images may also be © Jaguar Cars. Mirroring or downloading of this site or the publication of material or any extracts therefrom in original or altered form from these pages onto other sites (including reproduction by any other Jaguar enthusiast sites) without express permission violates Jag-lovers Ltd copyright and is prohibited |
|