|
4 - Carburetors and Fuel System ( Chris Burdo,
June 7, 2005
)
4.1 - Tracking down fuel odors ( Clark Westneat,
June 14, 2005
)
You must isolate where the fumes are coming from. There are
essentially three areas to look -- Boot , bonnet and underneath.
I have had all 3 so here are a few suggestions.
After you run the car and at a point when it smells the worst,
simply stop and open the boot, stick your head in and take a smell.
If it is a strong odor, then this is where you start. If you do
the same to the bonnet area and it is a strong smell than that is
where you start. You must really get into it at this point to try
to isolate it by where the smell is strongest.
If you do both and you don't get the strong aroma then you need
to check the fuel line that runs from the boot to the bonnet as
well as the tank(s). I just found that my line was broken and it
was pumping petrol into the boot where it was soaked up by the carpet.
Because it was soaked into the carpet, I never found the leak until
recently when I lifted the car and shook the line.
If you suspect the boot area, then what you need to do is simply
turn on the ignition and check for leaks. I had two leaks on my system.
One was where the plastic line went into the tanks (I have 2 tanks on the 420)
and the other was the connectors on the SU pumps. I replaced the plastic
line with metal flare stubs into the tank and I replaced all of the lines
with new rubber in the boot. This seems to have eliminated most of the
smell from the boot. Carefully check where the lines connect onto the SUs.
Sometimes the petrol seeps past the Stainless clamps.
In the bonnet, you will occasionally get a stuck float (or a
Saturated float) which causes the smell. When I had this problem, I took
the carbs off and I used sand paper to clean the rod the float slides on
as well as smoothing the inside hole in the floats. I found that after 35
years the rod had gotten a bit rough and I felt this was not helping the
operation. Also check to see if the arm the float contacts is set properly. If
one of the legs is skewed to the other it will cant the operation and the
petrol will not shut off properly. With the domes and pistons out of the
carbs, you should be able to turn the ignition on, have the pumps pump and
the flow of petrol stop at the level of the jets. If this is not happening
tha this may be your problem
The basic operation is simple: you will only get a smell if the
petrol is exposed to the air. You must go over the entire delivery system
to see where petrol is meeting air in an unauthorized place and manner.
Addition from George Camp, June 14, 2005
Do not forget the 3.8 MKX had an extra area to watch.
There is a valve on the rear bulkhead to prevent drain back from one
pump to the other.
I am actually referring to the ''Non-return valve in the
Rear bulkhead. If you look at J32 (parts manual) p 279 item 33 you
will see what I mean. The later external pumps had built in non-
return valves so the part was eliminated but the Lucas E-2FP had no
such valve and indeed the first external pumps also had none. Without
the valve they would transfer fuel to the unused tank. I do not
have time to look it up but there was a tech. or parts bulletin
that covered the change. The point of my post is this valve is
often overlooked and is prone to leaking in its aged condition.
Paul Scott adds on June 17th, 2005:
I would like to add the following possibilities, although I
am not sure if they all will relate to the Mk10:
Banjo fittings on the carbs and fuel pump can weep, they may
need re-flattening (lapping on emery on a mirror), I have
never really been able to get the fiber O rings on these
banjo fittings to seal properly and have had to resort to
adding fuel proof gasket sealer. On the 340 and Mk2’s the
fuel filler cap should not be vented, the tank is vented
through an overflow pipe that comes out of the side of the
filler pipe and is vented out under the car, clipped to the
bottom of the petrol tank. If the cap is vented then the
fumes can find their way into the boot. The Auxiliary
Enrichment Carburetor (automatic choke) is open to the air,
the fuel level is the same as the level in the float chamber
and the petrol sits in the bottom of the air intake.
I converted to manual choke as on the E-types, which has
vastly improved but not eradicated my fume problem, starts
from cold much better though.
4.2 - Unleaded Fuel And the XK Engine ( ,
)
The XK engine has a cast aluminum head with hardened steel valve seats pressed in. Valve seat erosion, which occasionally occurs in older American engines, is the result of the valve welding itself to the valve seat in the absence of lubricating lead, and taking a small chunk of the seat when the valve opens. In these engines, the valve seats were machined directly into the soft cast-iron of the head, and relied on lead additives to provide lubrication for longevity. The original valve seats installed by Jaguar are hard enough to withstand this abuse, and will give years of service.
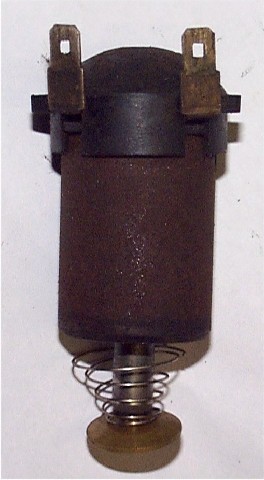
4.3 - SU fuel pump electronic conversion ( Mike Eck,
June 17, 2005
)
One characteristic of switches that most people are not aware of
is that they require a certain amount of current to work properly.
Under normal circumstances a certain amount of oxidation will build
up on the switch contacts which has the effect of insulating the
contacts from each other.
Packing the switch with dielectric grease and designing the
contacts so they wipe each other helps solve the problem, as
does wetting the contacts with mercury. However, none of these
design techniques are present in the SU fuel pump. It needs to
rely on current flow to burn through the oxide layer.
If you put a transistor in the circuit you eliminate the current
flow through the points so they don't burn and wear out but this
creates the aforementioned second problem instead.
The points in the SU fuel pump are perfectly capable of handling
the 3 Amps that the pump draws, but they get burned by the high
voltage arc that is generated when the points open (just like an
ignition circuit).
The solution is simply to install a suitably sized (3 Amp) diode
across the coil. Such diodes are available from Radio Shack as part
numbers 276-1141 through 276-1144. Diodes are polarity sensitive,
so connect the diode lead that is marked with a band to the coil
terminal that connects to the positive side of the battery. Forget
the transistor and just use the points to carry the current.
There's no need for the capacitor if you have the diode.
In spite of the fact that I love to add electronic devices to our cars,
this is the best solution for this application.
4.4 - Flooding SU Carburetors ( Alastair Reynolds,
)
Have you ever had a flooding carburetors, worse still have you completely replaced
the float needles and adjusted the Float Chamber Fuel Level and still had intermittently
flooding carburetors. If the answer is yes then read on.
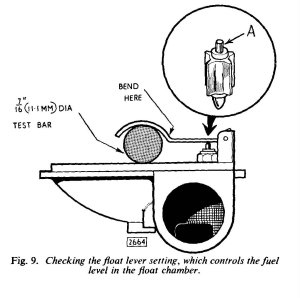
Float Chamber Fuel Level Adjust
The jaguar manual probably reads something like the following:
When the fuel level setting is correct a 7/16" (1 1. 1 mm.) test bar will just slide between the
lid face and the inside curve of the float lever fork when the needle valve is in the " shut-off"
position (Fig. 9). If the float lever fails to conform with this check figure, it must be carefully bent at the
start of the fork section to correct. Ensure that, both forks are level and that the straight portion of the lever is
perfectly flat.
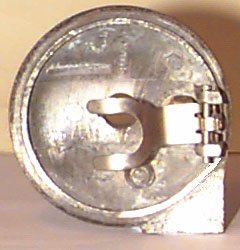
Not Enough
You think this is all you have to do, wrong! You can have perfectly adjusted carburetors
as per the book and still experience intermittent flooding. The cause I found is another
adjustment that is not shown in the any of the books. Have a look at the following
photographs to illustrate what I mean.
This photograph was taken with the top of the carburetors on it's side, after following the
above recommended procedures.
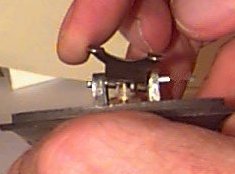
This photograph was taken prodding the fork upwards with very little force!
The real part of the story is told here! Look how you can twist, without any
significant force, the fork to make an angular attitude. This is what causes
your flooding problem in my opinion. The float is not a perfectly balanced item
and this badly adjusted fork can effectively raise the fuel level in the float chamber
enough to cause intermittent flooding. The fuel level can also be affected by uphill
or downhill attitudes of the car in the presence of this badly adjusted fork.
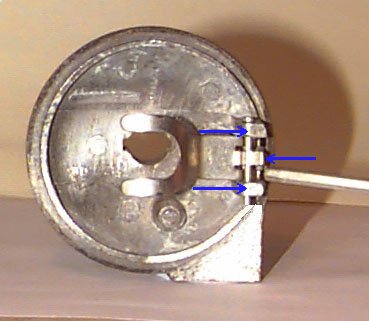
The cure is to take a small pair of pointed pliers and adjust the hinge end of the fork to remove any
lateral movement in the hinged fork. Simple really! Both myself and Alastair Lauener have had this
problem on our 60's S Types!
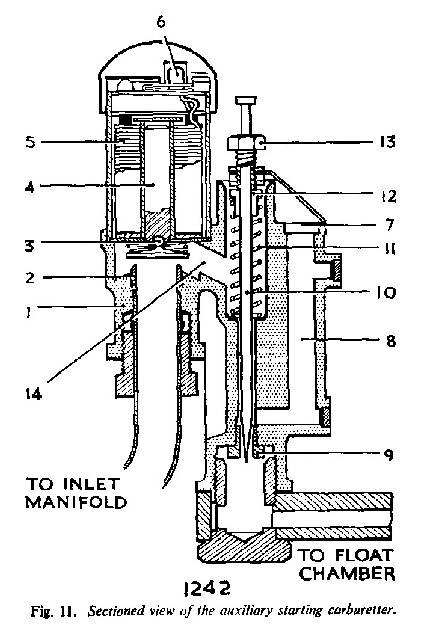
4.5 - Auxillary Starting Carburetor Modification ( Alastair Reynolds,
)
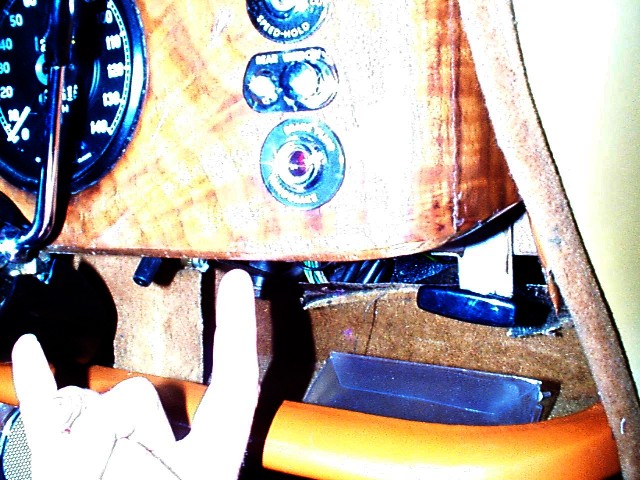
Location of new switch and relay
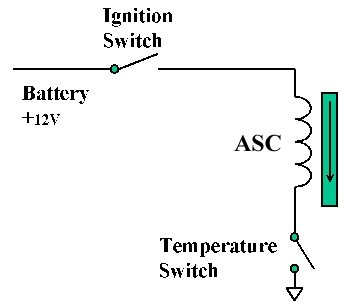
The original circuit before modification
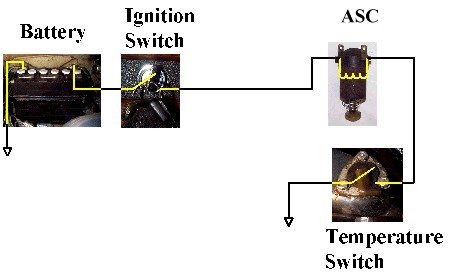
Picturegram
of original
circuit

Modified
circuit
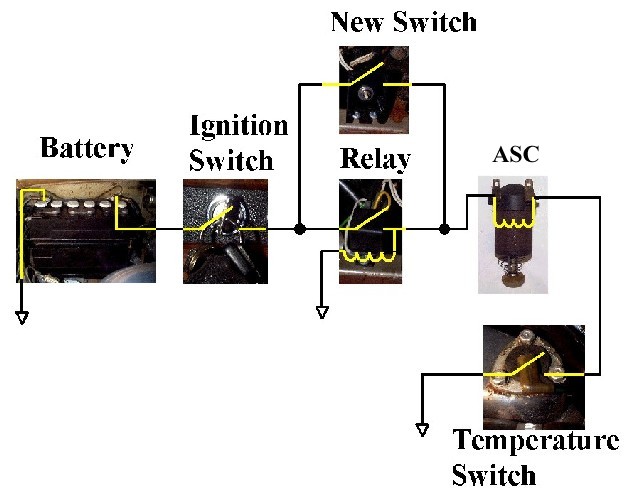
Modified
Picturegram
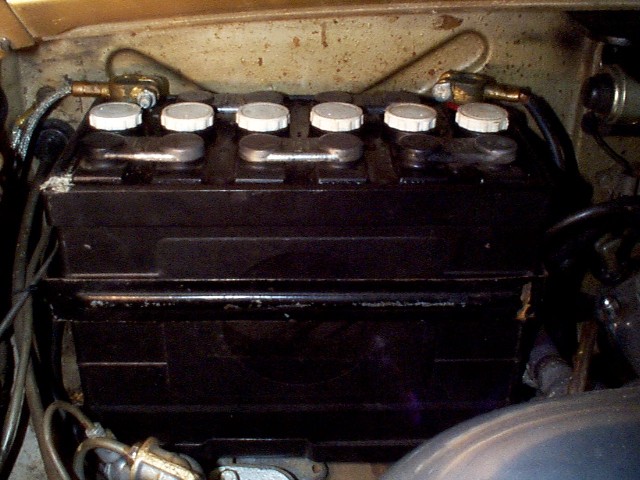
Battery
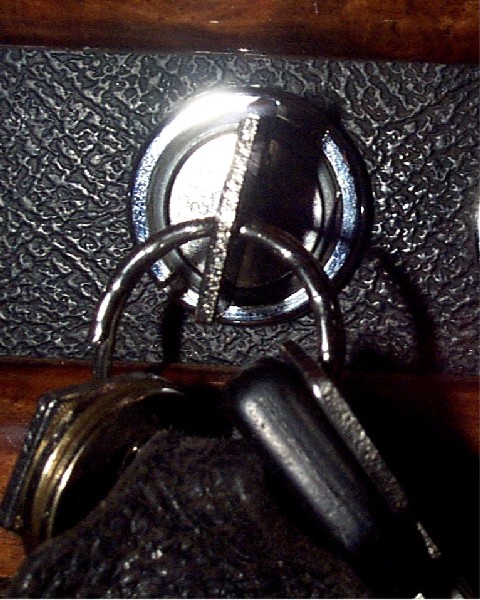
Ignition

Installation
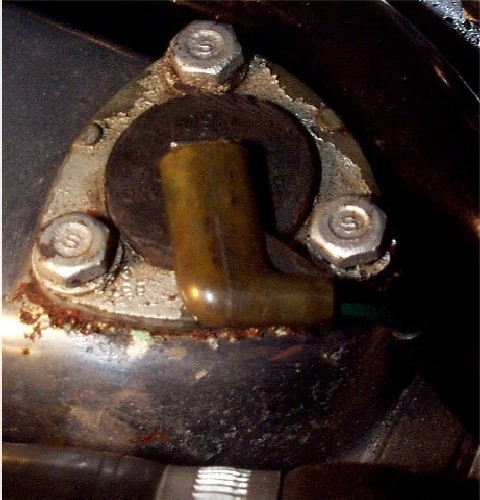
Temperature Sensor
Solenoid
|
The ASC can cause flooding and can come on unexpectedly. A number of Jag owners
wonder at the crude operation of the Jaguar Auxiliary Starting Carburetor (ASC) from the 1960's.
It is meant to cut out automatically when the engine gets hot but invariably stays on too long
or comes on again after a short stop causing flooding when restarting. There are some expensive
modifications on the market but I have a solution that cures most of the problems with the addition
of a push button and a horn relay. I have had this installed on my 1966 S Type for some years now
with satisfactory performance.
This page suggests the addition on a push switch under the dashboard coupled to a latching relay.
Once the button is pressed the ASC comes on till either the temperature rises or the ignition is switched
off. The advantages of such a system are listed below:
* No obvious additional switch visible
* Will not come on till you press the button
* Automatically cuts off when the ignition switch is switched off
* Can be disengaged by flicking the ignition switch without stopping the engine
The following is a pictorial description of the modification. I would suggest the modification is
carried out using Automotive Lucar connectors properly soldered or crimped. These parts can
be obtained from a local car accessory shop including the SPST relay.
Here is a complete set of images to help you with the modification.
The author takes no responsibility for any damage caused by this modification.
You do this procedure at your own risk. No warranties are given or implied.
4.6 - SU Carburetor Tuning ( Westneat/Smith,
July 27, 2005
)
Clark Westneat writes on July 27th, 2005:
The best thing to do is set the base line on the carbs. Always
do this with a warm engine. Like the book says, we have to make some
assumptions that the timing, valves etc are all as they should be. Even if they are not quite up to spec, they can be worked around. The book says that for an 8:1 compression, the timing should be 8 degrees Before TDC. Two experienced mechanics have both told me 10 degrees is more realistic. I figure this gives me wiggle room and is not cast in stone. I set the timing at idle of 700RPM with a warm engine at 10 degrees BTDC.(Admins note: The information is in regards to a 420, other Jaguar Saloons have different timing settings but the timing concepts are the same).
Pull the air cleaner assembly (which probably hasn't been on for
a while now!!) then pull the domes and pistons off the carbs. Back
the mixture screws all the way out until the jet no longer moves (on both sides) Now screw the mixture screw back down until you just start to see movement. Do this on both sides. Turn on the ignition and see if the floats shut off the petrol with the petrol even with the top of the jets. Make the necessary adjustments if they do not. A canted float lever will cause flooding at some point in the future. When you do this, you may get a small bit of flooding until the float bowls fill. Wipe it out with a rag and check the petrol levels. Turn off the ignition.
Check to make sure both butterflies are closing. One of the
major problems I had was that the clamp that held the rods for the butterflies was not returning both sides equally. Every time I tuned the car it would go GREAT!! for about a mile, then it would lug down again. Come to find out, the rear butterfly was shutting and the front was not. It is hard to tell if both sides are clamped properly with the clamp Jag used on the 420. Mine was a brass configuration that would not hold. My S-Type had a steel device which works MUCH better and is now the same as is on the 420. Test the butterflies by sticking your finger in the carb when they are shut and see if you can move either one of them with out the other moving. If you can -this may be your problem. NO matter how much you balance them at idle -- it won't matter once one of the butterflies has shifted.
Now that you are sure the butterflies seat properly, make sure they shut all the way with the spring. I had to put on a new spring to make sure they shut all the way. The tension on the spring can not be too great however because that will cause a new set of problems. Just make sure that when you step off the accelerator, the butterflies return to full closed.
Now go back to your mixture screws and screw them down 3 ˝ turns from the point they first start to move in the jets. Now screw in the fast idle screws all the way and back them both out equally 2 ˝ turns. Replace the pistons and domes making sure the pistons have oil in the dampers.
You should now, because the car is warm, be able to start the
car with out the choke on and with out touching the pedal. Simply turn the key and hit the button and the car should fire up and run smoothly – albeit a bit fast probably.
The first thing to do is make sure they are sucking the same amount of air. I use both a Uni-sys and a piece of tubing. I actually find the tubing to be a bit more accurate in my case. Make sure the mechanical idle adjustment screw between the carbs is not affecting the idle. Run the fast idle screws in equally until the idle is at about 700 RPM. Now continue to adjust each side until they are sucking the same amount of air and they are somewhere between 600-800 RPM at idle. You will be able to tell if the engine is where it should be by the sound.
Check your timing to see where it is sitting. I discovered that the timing is a rather important step that was left out of the tuning – at least in my case. It needs to remain at between 8-10 degrees BTDC at 600-700 RPM. Turning the distributor will change the degrees and the idle as you advance and retard the timing. This must all be in synch.
Once you feel comfortable, you need to start adjusting the mixture. At $2.39+ for petrol -- I like to run a bit lean but not too much. Continue to make adjustments on the mixture equally until the car starts to bog down and stall. When it does this, you are near the right place. Adjust each side until they are at a point that when you lift the piston slightly, the engine speed rises slightly and then settles back down again to where it was at the lower piston level. Do this for both carbs.
Everything from here on is a matter of your own 420. Continue to adjust the idle screws equally checking to make sure the air flow is equal. Keep checking the timing to make sure you are in spec and adjust them all accordingly. Once you feel that you have it to a point it sounds good and does not lug down when you snap the accelerator, road test it(after you have tightened everything down including the dizzy) and see what it is doing. You will need to make more adjustments until you are happy with it.
On July 28th, 2005 Merritt Smith adds:
To get technical, in an SU the fuel is drawn through the jet by a static pressure drop between the fuel in the float bowl and the air passing the jet. The fuel in the bowl is at atmospheric pressure, and not at pump pressure, because the needle valve manages the flow of fuel and the bowl is vented (those long silly tubes that piddle fuel on the ground when your float sinks or your needle valve sticks).
There are two components making up the pressure drop at the jet. The first is the air velocity itself (Ventura effect). Air in motion is at a lower static pressure than still air (if it starts at the same conditions). The faster the flow, the lower the pressure. The second component is from a total pressure drop that is caused by the filter. The filter acts as a restriction to the air flow. At low engine speeds, the impact of the filter is minimal, so the pressure drop across the jet is about the same between the filter and no filter setups. But once you open the throttles, the pressure drop caused by the filter becomes significant. Since the carb was designed for the filter (needle selection), the higher static pressure at the jet for the unfiltered setup means that not enough fuel will be sucked up, and you have starvation.
It was the missing second component that killed your top end, and it's why people who change to a less restrictive intake system need to go to richer needles.
|