|
3 - Engine ( Chris Burdo,
June 7, 2005
)
3.1 - Sports Coils ( Dave Moore,
June 7, 2005
)
Do not expect the temperature gauge to sit still in the middle
like a modern car, it never will. The correct thermostat is 74C,
it is is normal for the running temperature to vary between 74C
and 95C. The engine is not overheating until the coolant boils.
The 3.8S suffers from a marginal cooling system, an undersized
radiator, a packed engine compartment and a small grill. Jaguar
spent a lot of time improving the cooling system in the saloons
because of overheating complaints, but the effective mods didn't
really arrive until the 420. The water pump impellor was redesigned
several times, the intake pipe enlarged, a cross flow radiator fitted
and the speed of the pump at idle increased several times.
It is not "overheating" until the coolant boils. If your system holds
pressure and you use a reasonable coolant mix, it should not boil over until at
least 110C. If your engine is in good condition, 90C or even 100C for a short
time will do no harm. Modern engines of the same construction operate at 120 C
with no engine damage. If you take a look in the archives you will find many
saloon owners whose internal thermostat turns red after 70C because of the
location of the gauge needle. This is a problem with the owner, not the car.
If you think you are having a problem and find yourself staring at the gauge,
first check the accuracy of the gauge, an IR thermometer is one way. The
comments about the thermostat are correct, it doesn't even start opening until
74C and isn't fully open until 85-90C. On a cool day you should be able to see
the thermostat open on the gauge as the temperature momentarily falls back, if
everything is working properly. To properly diagnose the cooling system you
need to first check that the system holds pressure. Then drive the car at a
reasonable speed for at least 10 miles on a hot day. The temperature should
stabilize somewhere between 74C and 90C. It may exceed 90C while sitting still
but it should drop down once you get air flowing through the radiator. If you
find that the temperature slowly climbs above 90C and keeps climbing and
never stabilizes, there is a problem.
The first thing I would do is to check the accuracy of the coolant
and the oil pressure gauges. They are both notoriously inaccurate.
I would remove the oil filter head and clean out the pressure
relief valve, check the seat and spring and fill up with 20/50W
oil. Then I would pressure test the cooling system. The 3.8S was
fitted with both a 4 psi and a 7 psi cap during production, the
limit is the water pump seal, not the radiator. Your radiator could
probably take more, but I wouldn't go above 7 psi. If the system
holds pressure, I would use a 7 psi cap and fit a 1 quart overflow
tank, it gives you a little extra coolant capacity and lets you
identify any internal leaks. A 70/30 water coolant mix with a
bottle of Water Wetter is a better idea than 50/50. The 3.8S uses
a by pass thermostat designed to allow coolant to circulate during
warm up while the thermostat is closed. It is designed to close
the by pass when the thermostat opens, but the manifold is often
corroded to the point where too much coolant by passes the radiator
when hot. If you don't have the correct themostat, try one, but
the solution is to fit a plug with a small hole in the by pass hose
to limit the flow. The factory recommended a 3/16'' hole, I use a
1/4'' brass NPT fitting.
There is no magic bullet for the 3.8 cooling system. The usual fix
for rising temperature at idle in hot weather is to fit an electric
pusher fan in front of the radiator. There are many options, I use
a 14'' Permacool that comes on at 95C and off at 90C. It only comes
on after prolonged idle in summer, but it stabilizes the
temperature. You can also replace the heavy stamped metal fan with
a modern nylon fan that moves more air at idle. Another good idea
is to add some ventilation to the engine compartment, the most
effective short of hood louvers is to vent the triangles in the
wheel wells in the rear lower engine compartment. The ideal set up
is to follow the factory's lead and fit a 4.2 pump with the larger
intake pipe and change the pulleys to increase the pump speed at
idle, but you also need to change the timing cover.
3.10 - Engine Removal ( ,
)
It seems that the workshop manuals suggest engine removal is the first step in every process from replacing the clutch to fixing a scratch in the paintwork. Sadly the manuals are usually correct. There are two ways to remove the engine, out through the top, or down through the bottom. I recommend the second, both for reasons of safety (lots of mass swinging from a chain), and a decreased likelihood of destroying your paint with a rogue tail shaft (been there, done that, fortunately it was a parts car).
Disconnect the ancillary equipment (don't forget the heater hoses, grounding straps, speedo cables and other transmission-related wires), drain and remove the radiator. Remove the front suspension as described above, connect an engine hoist to the lifting strap (or fabricate one from a stout piece of steel angle stock), and take up some load on the hoist. Place a floor jack at the tail shaft of the transmission, and disconnect the engine and transmission mounts (including the stabilizer link at the back of the block), and the drive (propeller) shaft. Lower the engine-transmission combination down onto a conveniently located sheet of cardboard. With a friend pulling on the cardboard, gently lay the engine on its side. Disconnect the hoist and pull the engine out from under the car.
3.10.1 - Timing Cover Removal with the Engine In ( Saltwick/Eck,
November 23, 2004
)
Paul Saltwick wrote on Nov.23, 2004
If you look at the manual you will find ''remove engine'' in the
first paragraph of almost every chapter. Jagaur was clearly in the
business of selling cars, not making things easy for us.
You can remove the timing cover with the sump (and head) in place,
it is just a tricky job, and not the proper procedure, especially
if your goal is stopping leaks. The damper must come of, you can
use an impact wrench to remove the bolt, but not to replace it.
The bolt is torqued to over 100 ft lbs and can put up a good
fight. You usually need a puller for the damper because of the
split cone arrangement, you can make on using the pulley bolts and
a piece of steel. The front seal is shrouded and cannot be removed
without removing the cover or the sump first. To remove the cover
without removing the sump, you need to pull off the inner seal
track, a large bushing on the crankshaft that makes the seal
surface. This requires every tool in the box and some unusual
sounding swear words. With the seal track out, there is just
enough room to pull up the seal to clear the sump.
Unfortunately, for whatever reason, you have chosen a particularly
difficult task. If your goal is to seal up a leak, pull the sump
and do it the right way, or you will be disappointed. I would
never remove the timing cover without replacing the timing chains
and front seal and seal track, you don't want to be doing this
again anytime soon. You may want to read up on the front seal
choices and the oil slinger dilemma before choosing.
Mike Eck writes on Nov 23,2004:
The bottom line is, you can't remove the timing cover without dropping the
pan. Not only are those studs sticking down through the pan but the front
crankshaft seal is set in a groove in both the timing cover and the pan. To
clear the seal the pan needs to be dropped at least an inch, and you can't
do that with the front suspension in place. You'll also need to remove the
damper for the same reason.
With the radiator out, removing the damper is almost trivial. Remove the
keeper and unscrew the big bolt a couple of turns. Wedge a couple of
screwdrivers between the damper and the edge of the pan and give the bolt a
sharp whack with a large (3 lb.) hammer. The damper should pop loose, but
be restrained by the bolt.
Dropping the suspension isn't such a big deal either. I could have mine
completely off in 15 minutes, but you could probably get away with just
removing the 4 bolts that hold the front mounts and jacking the body up
until the front of the suspension drops an inch or so.
If you are capable of removing the head you should be easily capable of
handling this.
3.11 - Champion Spark Plugs for the MK2 ( jaguarjoe,
May 18, 2005
)
Jacques asked:
I've been told that the original Champion N8 spark plugs
listed for all 3.8 MK2's (no matter what the compression
ratio) were ultimately replaced by Champion N5C plugs.
Can anyone confirm this, or suggest a better plug for a 9:1 3.8?
pajtas response:
Hi, actually its been N11YC and N11YCC for the last 20 years or so,
but if you do a lot of city driving its N12YC. that being a bit
warmer.
3.12 - XK Engine Build Information ( Terry Handley,
April 16, 2002
)
Really fitting HD8's to a B type head is not going to do anything to enhance
performance unless a host of other things are to be done, modifications need
to be compatible, go hand in hand to get any benefit, also more power costs
more $ per mile. An easy and economical upgrade for a Mk9 is to fit a 4.2
engine & Type 12 auto from an XJ6, these engines when rebuilt offer much
more grunt & they cost so much less to o/haul then a 3.8, the 4.2 fitted
with B Type head + 2 x HD6's go fine and are extremely torquey, the extra
torque allows a taller diff to be used with no compromise in acceleration or
economy plus the car with taller diff is much quieter than a std. 3.8 MK9.
Good B Type heads are becoming hard to find, look at the forgotten 2.4
engines as a source,it need to be taken out a little in the ports but
generally they are in better cond then B type heads from 3.4,3.8, engines,
sO many S/Port heads around & cheap.
It's 3 x HD6's or similar 13/4" SU's that will suffice for 350 +hp.
2 x HD6's will suffice on either a modified B type or S/Port head different
camshafts, better exhaust, modified inlet manifold, etc. enough flow for
maximum of about 260 real HP.
Only in the high rev range will there be any performance gain from fitting 2
x HD8's in place of HD6's and then it's marginal and not really measurable
by a stop watch, I suppose the larger 2" SU's look more tough, give more
muscle look.
I can't recommend any upgrade needles for HD6's with pancake air cleaners
firstly the filters differ in flow/resistance from make to make & also the
size of the Pancake Filters .
Really the MK9 filter works fine, however I realise why you wish to fit more
Sporty looking Filters.
I do have some old notes on needles that worked for me with std. XK
engine, pancake filters, B /type head etc, memory tells me they were what
was
suggested for the paper element or the XK ,3.4, 3.8 with the std. pancake
filters I will dig around on Monday for you, there would be some listers
that can suggest what has worked for them, I see SM needles have been
mentioned.
The adv. curve needs to be changed for pancake filters, see suggestions from
Jaguar/Lucas distributors, there is dist. specs in the older W/Shop manuals.
Treat the recommendations for Adv. Curves as a starting point only as new un
leaded fuels require some additional fiddling to get it all right, good idea
to use the highest octane fuel you can find, the higher octane un leaded
gives better economy so the few cents more at purchase is rewarded with
more MPG and usually better starting, smoother idle and more power.
Many people are finding after stripping engines that have been run for a
time on un leaded that their has been Detonation happening . scuffing of
piston skirts is often caused by detonation, broken rings, mouse eaten
piston crowns, worse holes in pistons. Detonation is a silent killer and
it's happening more often since un leaded introduction.
What's been required of late is to give more piston to cylinder clearance
and up the running temp of engines this necessitates also a higher poundage
radiator or header tank cap, the radiator needs to be able to cope with
extra poundage cap all new alloy radiators will cope.
Un leaded works better with engines that run at higher temp. then as for
std. XK engines, this sounds counter productive but in real time & for road
it works.
Early XK engines had differently made Alloy pistons and the alloy was of a
different mix, modern high silicon content low expansion pistons are fine
for most engines but with the XK engine despite newer composition pistons
being of a low expansion alloy etc. the pistons need more clearance this is
partly because the cam grinding of the pistons made to day is different.
Without going into the different pistons makes and designs of pistons used
in all the XK engines in real time they all mostly needed different
clearances then suggested in Jag W/Shop manuals, there was technical service
bulletins and news letters, telex's getting about many years ago with some
alarming at time advise as to piston clearances for some XK engines.
The biggest most common stuff up was & still is, people fit 3.8 Powermax
Pistons with 9-1 Compression in place of the std. 8-1 Compression piston
made by Brico, the results are not so nice with the skirts being damaged by
too tight a fit, not enough clearance.
Example of the mishaps happening now ,4.2 pistons are often given too little
clearance for the conditions the engine is to endure, also the engine blocks
are rusted in places that can not be attended to unless the cylinder sleeves
are removed, the said rust causes hot spots and too little clearance makes
matters worse, there is often then partial seizing and the engine is spoilt.
( no amount of hot tubbing will remove the said rust)
W/shop manuals and reco engine shop books have piston clearance for 4.2
engines as .0015",many give .002" ideal/preferred by me is .003".
Std XK engines from factory could have graded pistons & bore sizes varying
from std. to F to K =.005" to +.010" so each bore in an XK engine needs to
be measured and after hone a suitable piston used, problem is that only std.
sizes are now available, that is std. to .030" some .040" for 4.2, but then
with the latter one has a severe H/gasket overhang problem, all overhang is
severe but with the larger bore sizes the problem gets worse.(copper
h/gakets finished by hand is a good move)
3.8 engines are to be looked at very carefully, the new pistons around are
often 30 years old & they have gone off sitting on the shelf, a fired piston
from 30 years or more ago will retain it's shape & size much better then
some of the
said old but new pistons, furthermore as for the 4.2 engine blocks the 3.8
engine blocks rust inside & between the sleeves, one must do some careful
appraisal of the new 3.8 pistons to be used, then give as rule of thumb
extra piston to bore clearance how much more is dependant on a few things
but generally it's .002" more then recommended.
When one has the sleeves removed from either the 3.8 or 4.2 engine block and
new sleeves are fitted, pressed home to a machined stop at botton of
prepared, honed to size engine block cylinder, a torque plate is used for
boring/honing & the main bearing caps fitted & torqued then one could run
tighter clearances. ( by stepping the cylinder block & pressing the new
sleeve home ,the sleeve can not move down & away from the top of the block)
Jaguar never stepped the cylinder block, if they had some XK engine
problems would have been fewer, Jaguar however went to great lengths to
have fit the sleeve parallel with a good interference fit, this can not be
done as easy to day , cylinder sleeves now have too rough a texture on
outside of sleeve, like a big thread all the way up the outside of the
sleeve, this means that the sleeve only locates on the highs, engine shops
then use gunk to seal off, stick the sleeves, the latter does not give a
good heat sink & also the sleeve is prone to move down, settle and the
latter allows for the head gasket to leak.
Furthermore, Engine shops do not hone the block to size to receive the new
sleeve, they generally use an off tool finish, this with the said new
sleeves makes for a bad fit that with the gunk used causes hot spots.
The best engines cost more but it's worth doing the job properly, have the
new sleeves ground on a centreless grinder to give a smooth surface finish
, have the engine block honed to correct size to enable a true parallel
interference fit, step the block, use a B or C section sleeve ( this gives a
stand alone seal onto the h/gasket, C is better) flanged sleeves take lot's
of extra work to fit properly and mostly they don't get fitted properly, one
can not see how they are fitted because the flange hides it, I don't like
flanged sleeves.
There are some excellent forged pistons for XK engines, they do not have to
be for race work and can be as low a 8-1 compression, Venolia make nice
pistons and they will give you the compression you ask for, 8.7-1
compression is Maximum I will now use for XK engined road cars, always take
into account the amount of metal that has been removed from head & or engine
block, use 8.1-1 and you will be safe.( Forged Piston to bore clearances are
not mentioned in this Post)
When extra piston clearance is given depending upon the make & type of
piston rings mostly std. recommended ring end gap must be adhered to, I use
file finish compression rings in all top line engines, this insures better
compression & better longer engine life.
Oil control is made easier by multi segment oil control rings, Noah's cast
iron one piece oil rings can not cope with the oil control job within an XK
engine.
I like to use a Single Moly top Comp Ring, not a Chrome ring, 2nd ring I
like a plain cast iron ring.
For engine with doubtful bores I like to use a barrel shaped Ductile Iron
Top Ring & a square face torsional, cast iron 2nd ring, multi segment oil
control rings.
I don't ever now use the gapless type compression ring as it's a nonsense as
static blow by has no affect on real time engine operation, the ordinary
torsional ring with square face is fine for good bores. (gapless rings are
when used, fitted to second ring land only)
There are many types of piston rings & it can be a confusing job to select
the type of ring to use, best known brands are the safest bet, Hastings,
ACL, are just 2 I like to use, in OZ there are probably more piston ring
types made by OZ, ACL that suit Jaguars then any other maker, the ring is
selected by bore size and piston ring land sizes. 4.2 engines are lucky as
they have a bore size the same as Holden inline 6 cylinder & the 253 V/8,
ACL
makes excellent piston rings for these engines as the said GM engines are
used for many Race Cars, such as HQ classes ACL makes File finish rings
suitable for 4.2 XK engines, also have good variety of rings suitable for
3.8.
ACL does not make a good fitting h/gasket for 4.2 engines it fit's badly
like the
Payen Gaskets, overhangs into the cylinder causing firstly hot spots, then
the dam things come apart & leak.(overhanging gaskets can cause detonation)
at least the fire ring cracks & the gasket blows & or leaks.
Payen have now identified that my complaint for the last 30 years is factual
&
they are currently looking into a new or modified gasket, believe it when I
see the gasket.
Well we are a ways from HD8's but one thing leads to another and there is
plenty more that can be discussed about XK engines on this great list.
I have hoped for many years that there would eventually be some excellent
quality engine parts available for XK engines that enhanced longevity &
performance but after many years we still have inferior h/gaskets for 4.2
engines. There is one good thing that is often sadly overlooked that is the
US made Gran Turismo Oil Pump, the said is about the best thing one could
ever use in an XK engine. Saddens me that in 2002 there is still not a
proper fitting composite h/gasket for 4.2 engines
There has/is been some rubbish parts dished out for XK engines & many
unfortunate recipient XK engines never have a chance to show their true
potential, engine shops & Jag repair shops mostly just keep on using crap
with the mentality of it's just an old Jag or worse the thing will never be
driven very hard.
One can make a good serviceable engine from a pile of s/hand parts it's just
care & fit that make the engine work but realistically an engine assembled
with good components is going to be a much better thing, where to get the
good bit's is still the problem it was 30 years ago, pity that after all
this time that atleast one could have 25% of what's available for say a
given Ford engine, guess it's that Jag owners are not too fussy or they
don't really know too much about engines.
There is enough XK engines being played with around the world to
substantiate investment by component makers but there is still not enough
good gear, good quality parts being made, Rob Beere is one person who knows
only too well what I'm saying, he does good work and hunts around to get
things made to enhance reliability within the XK engine T/chain Dampers made
for last few years are generally crap, Rob realised this and now gets them
made to his exacting specs, however it's a tough job to get better things
made for XK engines if people don't get wise & it's a near impossible task
if there is no push from Jag owners.
3.12.1 - Fitting a 4.2 Engine in a MK2 or S-type ( Terry Handley,
November 25, 2003
)
"Fitting a 4.2 engine to a Mk2 and or an S Type makes some sense,
firstly 4.2 engines cost less to overhaul and because of the vast amounts of 4.2
engines made there is a lot in wreckers, breakers and even in Jag Lovers back
yards to choose from, some model 4.2's are better then others and the
differences between different models are vast, at the end of the day they are all
good enough for all but the fastest race cars, then there is some things in
favour of just a couple of engine blocks & it's not the short stud
variety.
Whichever 4.2 engine is chosen to fit to a Mk2 there is only a few
differences that can make fitting to a MK2 from very easy to a little
tricky, the only real snags are the Generator Mount, alignment of the
Pulleys for w/pump, harmonic balancer, always use the 4.2 Harmonic
Balancer and figure out the alignment problems, the 3.8 balancer is not good
enough even for a 3.8.
If one takes a 4.2 Harmonic Balancer & Split Cone to say Ross Balancers
in Sydney they should be able to quickly mod a Balancer from another
engine, the Australian Designed and made Cyco Industries marketed as a B&M
works fine but is now too expensive as it goes from OZ to the US and comes
back here too expensive, there maybe some stocks in OZ but generally too
greedy stockists bung to days prices onto it even though it has been sitting
around for a few years.
The one thing to keep in mind is the early 4.2 as fitted to the 420
sedan & Mk10 4.2,ser 1 E Type has the larger casting for the water pump but
retains the same size w/pump impeller, the advantage is the larger dia intake.
I have built many 4.2 engines with the 3.8 pump and timing cover, 420
timing covers will fit, same pump impeller size as a 3.8 , see my cooling
system post.
The B type 3.8 cylinder head can be fitted to any 4.2 engine, when
fitting to the later 4.2 engine blocks the 2 water ways at the back of the
engine block need to be tapped out and plugs made from threaded bar or bolts
screwed in by a slot hack sawed ontop, use a loctite product, if ever
theyneed to be removed a small amount of heat in that area softens the
Loctite.
A B Type head with the ports taken out and metal removed from under
the valve seats works very well, but good B Type Heads are getting hard to
find, don't discount a 2.4 head it is usually in better condition then a 3.8
and there are many sitting around on 2.4 engines digarded many years ago,
only the ports need to be taken out or run it as is for torque like a Mack
Truck.
A S/Port Cylinder head from the many jag model sources can be fitted to
any 4.2 engine.
For most uses the 420 or XJ6 engine inlet manifold is easiest ,a 240,
XJ6 Ser 1, 420 , 2 x 2" SU's work well enough for all but the Cars that
owners are looking for the mostest, a good 2 x 2" SU set up can beat an
ordinary 3 x 2" SU set up.
Proper porting of the 2 X SU Manifold can flow more then enough.
One little snag that's found out often at the last hour of the
conversion is the Water Outlet from any S/Port Inlet Manifold does not match up to
the MK2 radiator,when one looks at the problem it can be sorted out relatively
easy.
The down side of fitting the 3 x SU's to a RHD MK2 is many, one has
to overcome the fact that the Clutch & Brake M/Cylinders are right in way
of the Inlet Air Cleaner, that is a Filter system needs to be used and the
rear most carby is so close to the Clutch M/cylinder.
The other major problem is the inner guard needs to be modified to get
the needed clearance to fit a proper effective air cleaning system.
The beating cutting of the inner guard area causes warping of the
mudguard unless real care, expertise is used. the gap between the bonnet and
the guard becomes greater as it's pulled down once the inner area is
played with, it's usually bent down bad enough from years of mechanics leaning
over top of the mudguard.
Use the 420 Air Filter assembly it works well enough, there is nothing
to be gained but noise using anything else.
One can duct cold air through the N/S inner guard and hook it upto the
420 air filter, early Mk2's had the hole there for the fitting of a Tube to
the under N/S Air Filter that was used on some export models, many MK1's
had the said, make sure you continue the pick up to a position up front rather
then just picking up air from under the mudguard.
You can see the proud area of the inner guard where the connection was
made, it was blocked by Jaguar on some early model MK2's & then later
pressings, the hole was not included.
Obviously I have only touched on the surface of fitting a 4.2 engine
and the possibilities are numerous many listers have done and are doing this
conversion.
I have found that a well prepared, slightly modded 4.2 engine with 2 x
2" will still to day surprise many a modern car driver, recently I had
the occasion to let loose a Slightly modded 4.2 MK2, it was only the aged
tyres that made me back off & let an XR8 Ford Falcon go buy.
Make no mistake a modded MK2 4.2 is still today a very fast car that
can embarrass even GM & Fords supposed Quick Road Cars, you can see this
when Normie turns up at Oran Park with Holden.
A 3.8 engine needs to be modded a lot to perform as well as even a
standard 4.2 engine performs in a MK2, the extra torque of the 4.2 means a lot
more grunt without the down changes, quicker acceleration more power up the
hills, near forget 1st gear.
A 4.2 engine with a safe low compression of 8-1 goes harder then a 3.8
with 9-1 + Compression and it will run nicely on lower grade fuels.
A lightened Steel Flywheel & a 9.5" Clutch on a 4.2 livens the engine
considerably without affecting tractability.
The later XJ6 Engines are heavier then the early 3.8 engines and the
extra weight can be felt at kerb speed, however the standard MK2 Springs are
really too light for even a standard 3.8 engine so an update to at least
1000lb Front springs is needed for a MK2 that does other then sit around.
In a Racing MK2 you need 1600 lb front springs, I like 1200 lb front
springs for my road Mk2's and use a Front Anti say Bar from a 420, a heavier
bar gives too much understeer for a road car, that is unless some other
thingsare not done to make the MK steer & handle better.
A MK2 with heavier springs suprisingly does not ride too hard, most
new sporty cars with the low profile tyres ride more harshly then a modded
MK2.
Obviously there are many aspects of a 4.2 engine conversion that can
be talked about on the List but simplicity for most is the key to a good
reliable fast MK2, often lot's of money can be saved by buying
scrapped 4.2 engines and pulling them down and building one nice engine.
Mod the head & inlet manifold, fit the exhaust headers that allow the
fitting of 2" od primary pipes some Headers are not large enough inside
to realise the benefit of the said primary pipes.
Avoid fitting Tube Type Headers with larger then 13/4" OD Primary pipes
you will gain nothing but heat and lose plenty of power, biggest is not
always best.
One can use the standard MK2 exhaust and a 4.2 engine , still gives
more useable power then the 3.8. Don't believe the myths about a 3.8
engines being faster, those early 3.8 E Types when compared to later
Ser 1 4.2 E Types had gearing advantages and lighter flywheels the
4.2 engines usually had the heavier flywheel.
Bring the primary pipes into one 2.5" pipe from about central position
of the g/box through to a Walker or Lukey Free Flowing 2.5 in & out
muffler and on the outlet siamese to 2 x 17/8" Tail Pipes, this set up
gives a nice note and flows enough & better then a standard MK2
twin system and it's not too noisy.
3.13 - 4.2 head swap to an early engine ( Paul Saltwick,
December 17, 2005
)
Are you aware that the MK2 intake manifold cannot be used on a
straight port head ? You will also need a 340, 420 or XJ-6
(Euro) intake manifold for this swap.
The problem is the rear intake cam bearing cap, the S3 version
Is not made for a tach generator. The cam bearing caps are line
bored and generally should not be swapped around. The rear of the
head is also not machined or drilled and tapped for the tach
generator bolts. If money is no object, swap the cam bearing cap, and
have the head line bored, spot faced and drilled and tapped. You
could try to shim the rear cap underneath or underneath the bearing to
come close to the proper clearance and alignment, but I don't
recommend it.
The best compromise for the benefits of the S3 head is to change
the tach to a 420, S2, E, or XJ-6 S1 electronic tach.
Using the later cams in an early head is not a problem. The
rear of the intake cam is plugged with an aluminum plug. Drill a
1/8'' hole and pull out the plug with a screw. Tap the cam for the
tach drive thread, then increase the angle of the chamfer to match
the tach drive. Unplugged both ends and rod out the cam while you
are in there, it is the oil galley for the bearings. Assemble
the head without the rear bearing and shim the tach drive to the
same clearance with the factory ''C'' shaped shims.
The early cam covers are easy to fit. One of the factory half
moon plugs will fit the exhaust side. Make a plug for the rear
opening on the intake from 1/2'' Buna rubber using a 2'' hole saw, then
split it in two. Use the later S3 gaskets, they are much thinker.
3.13.1 - Fitting a XJ6 4.2 water pump to a 3.8 ( Paul Saltwick,
March 11, 2004
)
I know this has been covered before, but can someone remind me which version XJ6 timing cover do I need to get to use an XJ6 water pump on my 3.8?
Hello Niels,
As usual, it depends. There are at least four different XJ-6 pumps, so you are better off getting a timing cover that matches the pump, all the timing covers will fit the block. The problem will be the radiator clearance and the fan. I think the last pump with the final improved impeller and larger bearing (S3) is too long for a small saloon and the pulley shaft is larger so you can't refit the original pulley. For the XJ-6, Jaguar increased the impeller diameter and thickness (3.04" vs 2.75" and 0.625" vs 0.5312"), improved the seal to allow higher pressure and increased the pump speed from 0.9 crank to 1.25 crank speed. Apparently, problems persisted and they improved the impeller again
and uprated the pump bearing and seal again and used an even smaller pump pulley. The best compromise for a 3.8 may be a mid XJ-6 pump and timing cover with the S3 crank damper and pulley. An old timing cover can be milled out, the dimensions should be in the archives. You also need to make a hose pipe adapter for the lower hose.
3.2 - XK Engine Timing information ( Paul Saltwick,
June 7, 2005
)
Jaguar's ignition timing settings for Saloon's are static numbers,
so there is no vacuum when the engine is off. When you check
the timing dynamically with the engine running using a timing light,
you have to disconnect and plug the vacuum line and make sure
the idle speed is not higher than 500 rpm (usually not the case).
If the idle is high or the springs in the distributor are weak,
(they usually are), the advance will affect the idle setting and you
will wind up with retarded ignition timing. It is better to look up
the Max advance number, in your case 5 + 26 = 31, and have someone
rev the engine to 3000 rpm while you check the timing with a light
(vacuum disconnected). You can use an advance light or mark the
damper by measuring the 10 degree mark and doubling and tripling
it. After you set the Max advance, if it is showing more than 5
BTDC at idle, say 12-15 degrees, then your springs are worn. You
will often hear people on this list saying their car doesn't run
right unless you set the timing 10 degrees advanced, it is usually
because the distributor is worn out and the idle is high enough
to bring in the advance.
There is 4 crank degrees of slop in the spec for a ''new'' Lucas distributor, so the spec is really 27-31 BTDC.
I can tell you from experience a hemi head does not make best power at 27 degrees.
If your engine runs hot and you can only get lousy fuel, you may not be
able to run the optimum timing.
The XK engine is a knock limited design and the optimum advance
figure varies with engine temp, air temp and octane. The engine
will keep making more power if you advance the ignition, but you
will more than likely run out of octane before you get there.
The E-Type used the same 13 degree (dist) advance mechanism with a 10
degree static setting. I have used those cams in the past and
they have a little more duration, which in theory should allow more
advance because they bleed off low speed compression. If you
have 180 psi of cranking pressure, your milled head may be offsetting
this a bit. Cold air to the carbs is the best modification you
can make to allow you to run the best timing.
3.3 - Dorman Freeze Plug Replacement ( Paul Saltwick,
May 6, 2004
)
The part number is DC-11, 1.75" expanding copper core plug.
Yes, Dorman has a website that lists distributors.
NAPA is one that sells over the Internet.
The plug should be a snug fit in the block and not driven in.
They can be turned down with a driven socket against Emory paper.
If you need to do this for a blown out plug, make another the same
dimension as a spare.
I use epoxy sealant on the edge.
You only turn the nut 2 turns. Directions are on the bag, however
they are often sold in bulk.
You may need to grind down the acorn nut crown on the rear plug
to clear the throttle linkage.
Installed correctly they will hold a 7 psi radiator cap.
Joel adds on Jan. 25th, 2005:
NAPA has them, part #600-4029. Cost is around $4. You can also
buy them off NAPA's website: www.napa.com.
3.4 - Main bearing replacement with engine in ( Nigel Roskilly,
June 13, 2005
)
Jaguar's ignition timing settings for Saloon's are static numbers,
so there is no vacuum when the engine is off. When you check
the timing dynamically with the engine running using a timing light,
you have to disconnect and plug the vacuum line and make sure
the idle speed is not higher than 500 rpm (usually not the case).
If the idle is high or the springs in the distributor are weak,
(they usually are), the advance will affect the idle setting and you
will wind up with retarded ignition timing. It is better to look up
the Max advance number, in your case 5 + 26 = 31, and have someone
rev the engine to 3000 rpm while you check the timing with a light
(vacuum disconnected). You can use an advance light or mark the
damper by measuring the 10 degree mark and doubling and tripling
it. After you set the Max advance, if it is showing more than 5
BTDC at idle, say 12-15 degrees, then your springs are worn. You
will often hear people on this list saying their car doesn't run
right unless you set the timing 10 degrees advanced, it is usually
because the distributor is worn out and the idle is high enough
to bring in the advance.
There is 4 crank degrees of slop in the spec for a ''new'' Lucas distributor, so the spec is really 27-31 BTDC.
I can tell you from experience a hemi head does not make best power at 27 degrees.
If your engine runs hot and you can only get lousy fuel, you may not be
able to run the optimum timing.
The XK engine is a knock limited design and the optimum advance
figure varies with engine temp, air temp and octane. The engine
will keep making more power if you advance the ignition, but you
will more than likely run out of octane before you get there.
The E-Type used the same 13 degree (dist) advance mechanism with a 10
degree static setting. I have used those cams in the past and
they have a little more duration, which in theory should allow more
advance because they bleed off low speed compression. If you
have 180 psi of cranking pressure, your milled head may be offsetting
this a bit. Cold air to the carbs is the best modification you
can make to allow you to run the best timing.
3.4.1 - ARP Con-Rod Bolts for the XK Engine ( Terry Handley,
September 19, 2001
)
The XK Jaguar has a nice long Forged Steel Con Rod & if your Shop say's
that to use the old bolts is OK, they are D...H.... & obviously don't know
much about building good engines, you do want a good engine ?
This is not some engine your building in your backyard to just go ticky
ticky down to the Supermarket, your paying a shop to do the job ?
There are bolts available from various sources but they don't fit XK Con
/Rods so well, they are generally too loose, some are ARP & or Similar Bolts
that have been Linished down so as to be able to be fitted by the DIY
backyarder or the ill equipped shop to an XK Con Rod.
I warned Listers about those bodged bolts some 2/3 years ago.
Don't be fooled tricked or conned, after building testing, racing XK
engines for over 35 years I believe the BEST BOLT FOR YOUR XK ENGINE is an
Ford 351/400 M V/8, ARP Part Number, AR154-6001. & it costs much less then a
Standard inferior Jaguar Bolt & much less then a Bodged Linished ARP Bolt.
There is some good information on ARP's homepage and also other places, read
about floppy fitting bolts and you will realise the advantages of using a
properly fitted ARP Bolt, it should not be hard even for the DIY Back Yarder
to deduce that a Bodged ARP Bolt is not going to be worth a Cracker & of no
advantage over a standard from Ford or Jaguar Con Rod Bolt.
OH! Yeah Get this for the record Ser,3 XJ6 Con Rod Bolts need to be torqued
to 45 Ft lbs, otherwise they do not clamp.
37 Ft lb torque is for earlier xk con rod bolts.
3.4.2 - Head stud replacement ( Paul Saltwick,
July 10, 2002
)
Question posted on the Saloons list:
Listers, the rebuilding of the engine on my 3.8 S-type is getting
close to being completed. The question to you all is, should I
replace the head bolts? and if so, should I go for the Racing
Quality Stud and Bolt kit on sale at XK's unlimited.
Paul’s response:
The head studs can be reused, but I recommend replacing them, especially if
there is any sign of corrosion. This is more important on the later 4.2 to
avoid serious disappointment. I haven't tried the XKS studs, but if they are
made by ARP, they should be good quality. Terry's also has uprated studs.
At this point, "new" 3.8 studs are probably made in someone's basement and at
least one vendor has sold studs with cut, rather than rolled threads, so ask
where they came from. Your engine should be fitted with four longer studs
for the lifting brackets, one of which (second row, exhaust side) is a
locating dowel with a thick waist. Some of the aftermarket studs do not have
this feature, which keeps the head from moving around. If you go for high
performance fasteners, you also need to increase the torque (usually up to
70ft/lbs) to take advantage of them.
3.5 - Valve Adjustment ( Paul Saltwick,
)
These notes are only intended to supplement your repair manual. A valve clearance adjustment on an XK engine is time consuming and hard on your back, since you must remove the camshafts each time you change shims, and it sometimes takes several attempts to arrive at the best settings. The job is much easier with the head on a bench and it is worth putting the job off if any major engine work is considered.
If the clearances are too tight (small), you run the risk of burning valves, if they are too wide (large), noise is the primary problem. A certain amount of valve noise is inevitable in a mechanical system, especially when cold.
Some of the risks of doing this procedure are; bending valves by striking the opposite valve or piston, bending or breaking camshafts, and burning valves that have been tightened too much.
XK engines primarily had two different valve clearance settings, 0.004 IN-0.006 EX for pre-XJ-6 engines and 0.012-0.014 (Both) for post 1968-69 engines, so check your manual. If your engine is fitted with later cams, high performance cams, or a later head, you may need to use the wider settings, which by the way, were designed (with the cam) to quiet the valves. Later cams can be identified by having four taped holes in the front sprocket mounting plate and no holes in the lobes for oil distribution.
Some things to remember:
* Do not rotate the cams independently when they are both installed in the head. First remove both cams or slacken all the cam bearing caps. Do not rotate the engine with the cams installed and the timing chain disconnected.
* Tighten down the cam bearing caps a little at a time to avoid bending the cam or stripping the thread on the studs.
* Keep accurate records of the initial clearance, initial shim, new shim and new clearance.
Tools:
Feeler gauges
Jaguar cam timing plate
Jaguar timing chain adjuster
Torque wrench
Magnet
Micrometer
1-1/4" or 1-15/16" wrench for crankshaft bolt
1/2" and 7/16" sockets and open end wrenches
3/16" Allen wrench or driver
pliers
wire cutter
Paper towels
Parts:
Cam cover gaskets
Gasket sealer
Tach drive and plug O rings
Half moon seal
Shims
Safety wire
Optional: Stat-o-seal washers
Testing Procedure:
Do back exercises
Clean engine
Clean crankshaft damper and mark the TDC, 5 and 10-degree BTDC lines
Mark and remove spark plug wires and spark plugs
Remove cam covers and sop up any oil
Measure and record clearances by rotating the crankshaft until the cam lobe is opposite to the cam follower (pointing up toward the center of cam bearing cap) and sliding the feeler gauge between the heel of the cam and the cam follower. The feeler gauge should feel snug and sometimes you have to work hard to slide it in place.
If any of the valves need adjustment:
Rotate the crankshaft to TDC compression for #6 cylinder (front). Since the cam rotates at half crank speed you may have to go around twice. The timing notches in the cams will be pointing up along the cam centerline when you have arrived at the proper point. Note that the cam lobes for #6, intake and exhaust, will be pointing in opposite directions (toward the outside). This may be helpful if you ever mix up which camshaft is which. Check the cam timing with the plate placed in the notch of each cam.
Remove the front breather. Remove the tach generator. I have found that the best tool for this is a small 1 inch long 3/16" socket head (allen) driver bit which you can turn with a 1/4" open end wrench , but a ratcheting bit driver may be best. I have not had much success with L shaped allen wrenches. Remove the sealing plate on the exhaust side.
Set the crankshaft at 20 degrees BTDC so that all the valves can be fully opened without hitting any pistons (timing slots near center). You can approximate this by setting the crankshaft double the distance from the TDC mark to the 10-degree BTDC mark on the damper.
Loosen the timing chain by loosening the lock nut (not too much, it can fall down in the sump), pressing the plunger and rotating the plate clockwise with the timing tool. Cut and remove the lock wire on the camshaft retaining bolts and remove the bolts. This can be tricky and you might want to put a rag in the timing chest to prevent anything from falling down. Pull the sprockets forward away from the cams.
Remove both cams by alternately loosening the cam bearing nuts a few turns at a time (note whether the caps are numbered or marked, if not, mark them to ensure getting them back in their original places). Pay attention to which lobes are pushing open valves and try to relieve the pressure evenly to avoid stressing the camshaft.
Use a magnet to remove each cam follower and shim. Inspect each cam follower and tappet guide for wear marks and corrosion. If a tappet guide is loose, it may have hit the cam lobe and marks should be evident. This apparently is a problem in later engines, mostly on the exhaust side, and there are several methods to anchor the tappet guide.
Do one valve at a time and record the shim thickness on a chart. Add or subtract to the shim thickness the amount needed to bring the clearance into spec. and put the required shim back in place completely dry. There are several theories on re-using old shims. Some say don't do it, others say OK if there are no indents, and still others say flip 'em over. I have reused them with no apparent problems.
If any of the clearances cannot be brought into specification with the minimum shim (0.085 ) recommended by Jaguar, the proper solution is to remove the head and fit new valve seats or grind down the valve stems .010-.015. If you use shims of less than 0.085, the shim may sit so low in the spring retainer that the follower will open the valve by pressing on the spring retainer (bad idea).
If you are getting your head rebuilt, make sure that the machinist does not grind down the valve seats too much or you will not be able to get the proper valve clearances. This is especially true for heads that have previously been reconditioned. This is one time when it pays to have one individual replace the valve guides, cut the seats and set up the cams. This way if the seats are cut too much, he will have to disassemble the head and grind down the stems until the proper clearance can be obtained. You don't want to first realize this after you have paid and assembled the head. If you go this route, be sure to discuss the minimum shim thickness to avoid the possibility of someone grinding down the shims. Another alternative is to fit undersize followers which will give you more clearance to use thicker shims and avoid taking your head off (a good thing).
After you have finished one side, re-install the cam by alternately tightening the cam bearing caps. Torque the cam bearing caps to spec. (9 or 15 ft/lbs.). Rotate the cam and remeasure the clearances. If everything is all right, remove the cam again and move onto the other side.
While you have the cams out check the condition of the cam bearings. You will probably notice that most of the wear is on the top bearing shell. I have heard it is acceptable to swap upper and lower bearing shells, but I have never done it since new ones aren't too expensive.
After both sides are done, reassemble both cams, with their timing slots pointing up, after lubricating the shims and followers. I like Moly paste for this especially if the cam or followers are new. Torque the cam bearing caps. Reset the crankshaft to TDC and reset the cams with the timing plate. Reattach the sprockets and safety wire the bolts. Adjust the cam chain tension according to the manual, it should not be "dead tight" and some slack should be present. This can be tricky, so you may want to rotate the engine back and forth and check it again. Recheck the valve timing with the timing plate.
Sealing things up:
Several times I have found that, when I thought an oil leak was coming from the crankshaft or transmission, it was really coming from the cam covers, rear seals or the oil line. The covers are long and the gasket is not held in place by studs and people have a tendency to keep tightening the nuts to solve leaks. The rear of the head is a mess of oil lines, coppers washers, O rings , silly seals, and through bolts, all of which can cause leaks down the bellhousing. It pays to get all of this set up properly.
I have used Hylomar, Permatex and Permatex "Right stuff" and have found "Right stuff" does the best job, but I'm sure you can succeed with many different products. "Right stuff" is expensive, messy and slippery, so you have to be careful you don't squeeze out the gasket when tightening down the cam covers.
Another product I like are "Stat-o-seal" washers. They are aluminum crush washers with an imbedded O ring and placing one under the copper cam cover washers and on the rear through bolts will guarantee against leaks. They are available from most discount race supply shops.
An obvious (not to me) thing to check is the height of the cam bearing studs. Since the cam cover nuts are acorn nuts and have a fixed range, if the stud protrudes too far above the cam cover you will not get an effective seal on the gasket or the stud hole. Measure them or try to move the washer side to side after you've tightened the nut. If the stud is too high, you can add another washer.
All that remains is to hook everything up and start the engine. If you have a new cam or tappets follow the recommended break-in procedure, usually 2000 rpm and no idling for the first 20 minutes.
3.5.1 - DIY Valve Spring Compressor ( Paul Saltwick/Andrew Waugh,
February 11, 2005
)
From Paul Saltwick, Feb. 11,2005
The JEC will sell you one for +$200. I made up something similar
with a seal puller handle and a threaded block, but I prefer to
use a C Clamp type with a home made adapter when the head is on the
bench. The adapter is a 3/4'' pipe nipple with the thread cut
off (1''OD X 1.75'') with a window cut in the side to get at the
keepers. It is wrapped in plastic tape to avoid scratching the tappet
guide.
From Andrew Waugh, Feb. 12, 2005
If you take 3 hockey pucks and cut them along the
diameter, and screw them at the cyl. spacing onto a board
you'll have about the best tool for holding the head.
Years ago my dad made, as well as the board, a spring
compressor out of a bit of ''T'' angle to bolt to the head, a
cranked handle pivoted to the ''T'' and the compression bit
was a 1'' waterpipe fitting with a slot cut in it (to get at
the keepers) and an extension bar welded to the top of the
pipe to reach the handle.
3.6 - Head Gaskets ( Chris Burdo,
March 25, 2004
)
From Tom Carson, 2004-03-25
If you don't yet have a factory shop manual, get one before doing the job.
Remove the bonnet, making sure it already has aligning holes drilled in the hinge plates before doing so. You use a pin in the holes to line up the hood when you reinstall it, thus regaining the current alignment. It's extremely easy to remove the bonnet.
Be prepared for a couple of tough spots:
1) It is quite common for the upper timing chain adjuster to be stuck fast. You need to free it up so you can release the tension on the upper chain. Get some PB Blaster, and think about buying an adjusting tool. The factory tool is not essential, since many others have talked about homemade versions...or cobbled together get-ups that have worked. I bought a tool, and almost trashed it trying to get that blankety-blank adjuster to turn. That little adjusting wheel in there is easy to trash as well. Remain calm. There are some pretty effective techniques for ultimately loosening the adjuster...which you will no doubt hear about. One good one is to get an already trashed little adjuster wheel, cut a notch in it, and use a cold chisel and hammer to tap it back and forth.
2) The head may well be stuck fast to the block and studs. I've experienced it both ways (stuck and not stuck). Anyway, I used a cherry picker engine hoist to lift the head (and on the stuck head, the entire front end of the car!). The cherry picker is very easily controlled, and no strain to you or your friends. Less chance of dropping something heavy in the engine bay or on the fender. For a stuck head, the neat trick was to use a bottle jack. There's an overhanging lip on the head, as well as a surface at the base of the block. The jack fits nicely in there and you can then ensure the head comes up using hydraulics. Again, no drama. It just comes up very gently.
After the head is off, then, obviously, clean everything very thoroughly and have a close look for problems. Be careful when cleaning, to avoid scratching the exposed surfaces. I used plenty of PB Blaster and a regular wire wheel on my electric drill. The goal is 100% spotless.
I installed the new head gasket without any sealant. You'll get both opinions. Mine has been fine for about 30,000 miles now.
You might also consider getting the head rebuilt while it's off. As I recall, mine cost about $1,100 (7 years ago), but I needed new valve seats..which adds dramatically to the cost. I suggest rebuilding the head because on an overhead cam engine, the head is more than half the show. My car burns no oil, is strong, starts instantaneously.
From Paul Saltwick, 2004-03-25
The metal gasket does seal, but the surface of the
head and block must be perfect. It is a mistake to "just"
replace a leaking metal gasket, you also need to find and fix the problem.
Also consider that the source of the leak may be the front timing cover gasket
while you are hunting. Lay the head gasket over the face of the head and
inspect the edges of the water passages, sometimes they corrode past the gasket
edge and need to be welded. The amount of gunk built up on the back of the intake
valves will give you an idea about the condition of the valve guides.
I would have the head measured and skimmed while it is off and
I would test the valves for leakage and adjust the valve clearances before
replacing the head. If you are using the metal gasket, you need to tell the
machinist that you need a smooth surface with no machine marks. Then hang
the gasket by a string and spray two or three thin coats of Permatex Copper Coat spray.
There are aftermarket composite gaskets available from Terry's, VSE, Rob Beere, etc..
They are more expensive, will alter your compression ratio and, in theory, will seal
more imperfections. I have never had a problem with a metal head gasket that was
installed correctly.
Be careful about bending valves when handling the head, remove the cams or
loosen the caps. Rest the assembled head on three 2X4's to prevent bending
valves while setting clearances. Inspect the studs for corrosion, there should
be a special dowel stud in the second exhaust position. Replacing the studs is
always a good idea. Your engine probably had lifting brackets and longer studs
in four positions. Make sure the studs are fully installed and measure the
exposed thread and compare it with the acorn nut depth before torquing the head.
Follow the pattern and torque it down in three steps.
3.7 - Engine Number Locations ( ,
)
There is one set of engine numbers on the block and another on the head. The number on the block is located just above the oil filter assembly on the intake side of the engine. The number on the head is on the back side of the bridge between the valve blocks at the front of the head. On a matching number car, these should be the same, and identical to those stamped on the ID plate inside the engine compartment.
3.8 - Synthetic Lubricants ( Mark Stephenson,
)
I have used synthetics for many years, and I have found (one) thing. If an engine has a small leak, it will leak more with synthetics. Here is my understanding: Petroleum products are made up of hydrocarbon chains. The thicker the oil the longer the chains; the thinner, including volatile petroleum products, such as fuels, are made of short chains. In crude oil, there is no uniformity of the chains. Refining crude works kind of like sorting rocks through screens, you get a a general uniformity, but you can still have some intermixing of the chain lengths. Synthetic oil is like making the rocks from scratch, so every chain is exactly the same.
The varying chain lengths in refined oils are what causes refined oil to vaporize quicker at high temperatures and thicken more at lower temperatures.
The varying lengths also make the oil less slippery. In fact, synthetic oil makers used to (I don't know if they still do.) advise against using it in new engines, because the rings and things would take much longer to seat, i.e. the engine wouldn't break in. Years ago, in a lesser vehicle, I had a long grade I used to climb on a regular trip that I took. I would crest the hill at barely 50 mph with refined engine oil. When I replaced the engine oil with synthetic, I would reach the top at 53-54 mph. When the transmission was due for a change at about 36,000 miles, I used synthetic gear oil (whatever was recommended), and I crested the hill at 56-57 mph. This is an average over many trips.
So that was proof to me of the reduced friction of synthetics. In addition, I have not had an internal engine failure on any vehicle I've used synthetics in, although that is not a statistically significant sample.
As to the leaking question, I can only surmise that the reduced friction makes the oil flow more easily, and that would include flowing out tiny cracks and crevices. At the same time, the shorter chains in refined oils will vaporize over time, making the oil thicker and less likely to leak.
3.9 - Low Oil Pressure ( ,
)
Peak pressure should be somewhere between 45 and 60psi. The standard specification is 40PSI at 2000RPM. A low oil pressure reading can have several causes. The simplest to fix, and most common is the failure of a pressure transducer (not applicable to Mk 1 with mechanical pressure gauge). You can check this by connecting a mechanical pressure gauge to one of the ports in the oil gallery (brass plugs low on the side of the block). If the pressure reads normal on the mechanical gauge, replace the transducer.
If the pressure still reads low, there are a couple of more things to check. The oil filter body has a bypass valve and a pressure relief valve. When the filter becomes overly clogged the bypass opens. If the pressure from the oil pump is too high, the relief valve opens and returns oil to the pan. If the spring on this valve has become weak, it can open early, resulting in lowered pressure. A symptom of this is usually decent idle oil pressure which rises slightly with RPM and then stops changing. You can either replace the spring, or shim the seat on which it sits. Some fiddling will be required to get it right.
If the pressure is still low, you have a problem either in the oil pump itself, in the pickup tube in the sump, or in the engine bearings.
3.9.1 - Using a S2 XJ6 Oil Filter Head on a MK2/Stype ( Burdo/Hand,
June 28, 2005
)
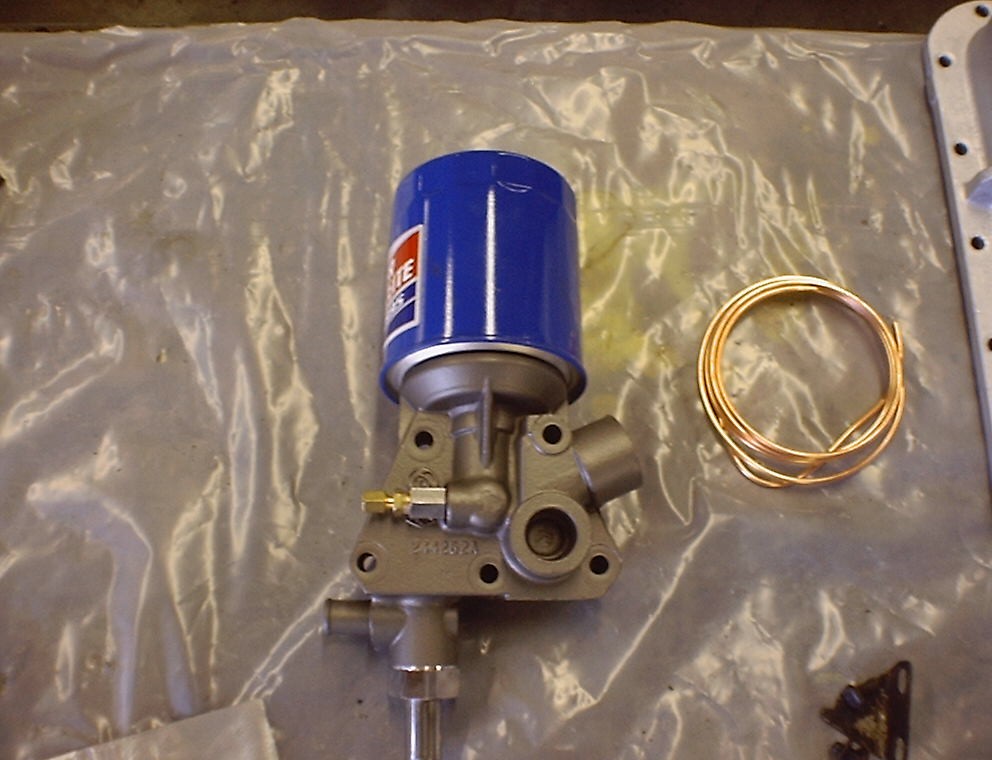
S2 XJ6 Oil Filter Head, non-oil cooler model
|
The filter head from a XJ6 S2 with the top vertical fitting filter fit
the early saloons. I noted that in Paul Skilleter/Jaguar World XK150
restoration book he makes mention that he went from the original
canister style oil-block set-up to a 4.2 S2 XJ set-up. There is a
picture of it on page 99 of his book, picture 5. The filter head shown
has the BL logo on it and the id# starting with what appears to be a
backward ''9''followed by 44282A.
Nick Hand adds:
The series 11 works, from the 76 77 year models . I have one
on my 67 S-Type. It takes a vertical filter[spin on wix # 51231]
|


