|
11 - Front Suspension ( Chris Burdo,
June 7, 2005
)
11.1 - DIY Front Coil Spring Compressor ( Paul Saltwick,
March 13, 2003
)
From Paul Saltwick, March 13th, 2003:
The safest way to remove the springs is to use 4, 3/8-24
threaded rods 12 inches long. Remove the shock, put a floor
jack under the spring pan, remove one of the corner spring
pan bolts and replace with a threaded rod, 3-4 washers and a nut.
The idea is to put a threaded rod at the four corners of
the pan and remove all the bolt and slowly lower the pan by
backing off the nuts evenly. It is a slow procedure, but
it helps to use a few washers to raise the nuts proud of the pan
lip and use ratcheting box wrenches. I will admit to using 2 or 3
rods when in a hurry, but it is tricky to get the pan to lower evenly
because it is not vertical. The force involved is considerable and I
was not comfortable with the one central rod idea, because I did not
have a suitably hardened threaded rod.
11.1.1 - Coil Spring Replacement ( Dan Davis,
September 21, 2005
)
Original ride height
Measuring the starting length of the spring
Spring Compressor rented from AutoZone
Spring Compressor installed, bottom view
Spring Compressor installed, side view

Spring Compressor installed, spring removed
Original packing piece for the spring

New and old spring side by side.

Finished ride height. Two inches higher after installing the new springs!
|
Changing the Coil springs in a Jaguar Saloon
By Dan Davis 1959 3.4 Litre RHD Automatic
Legal Disclaimer:
The Haynes manual starts the section on removal and refitting of coil springs as follows:
“WARNING: These are extremely heavy springs of about 14” free length. We strongly recommend that you do not attempt remove them unless you are fully competent to do so and have all the necessary equipment. Any attempt to remove, or replace, these springs using unsuitable equipment could result in a serious accident.”
Now that’s an understatement if I ever heard one. The information which follows is my own account of how I managed to survive the procedure. You may not be as fortunate.
When I purchased my car, it was fairly evident that it sat to low in the rear. So, one of the first things that I had done, was to pick up a set of replacement leaf springs and have my mechanic replace them.
Before I sent it off for the repair, I crawled underneath to get a look, and found that there were cracked leaves on both sides. This obviously needed to get done!
When I got the car back, I was very disappointed to see that the front of the car now seemed to droop. And to make matters worse, the new leaf springs creaked like the dickens.
This turned out to be just one of the repairs that my mechanic charged me 50% more than the quote for, and I ended up redoing myself at a later date. But that's a separate story.
The coil springs scared my a little. Years ago I had a Ford Capri, and due to financial circumstances, was forced to replace the McPherson struts myself.
The struts were surrounded by coil springs which had to be compressed before I could remove them from the car.
Not having the right tools for the job was always my specialty, so I improvised. I grabbed a bunch of coat hangers, cut about 40 four inch pieces, and began the process of wrapping them around a pair of coils at a time, cinching them together by twisting the loose ends with a pair of vise grips. It was tedious and slow, but eventually, I got the springs down to a point where they could be removed, and carefully set to the side while I removed the struts.
It was shortly thereafter, that my roommate came home with the groceries. With the bags in her arms, she could see that I was under the car, but didn't notice the coil springs sitting against the side of the house. Naturally, she kicked them. I didn't see it myself, but a neighbor later told me that the springs reached an altitude of about a hundred feet, and just missed taking my roommates head off by inches!
The coil springs in a Jaguar saloon are much stronger than the coils in a Capri, and it was with this in mind that I spent a year or so reading up on the procedure, and browsing through the archives to see how others had tackled the problem.
I advise this process over all others. The manual is poorly written, your mechanic does not know what he's talking about, but the experience of others on this list is invaluable when determining the correct and incorrect way to go about things.
In general, most every listing was in agreement. The proper Churchill tool is worth more than the car, and can not be found.
Some had tried garden variety spring compressors and found that they fouled inside the shock tower, and made the job difficult if not impossible. The general consensus of opinion was to locate several lengths of 3/8" x 24 grade 5 threaded rod stock, cut these into either three or four lengths of 10" - 12" and carefully remove a bolt from the spring plate and replace it with the threaded rod backed up by a couple of washers and double nuts for safety. The group which called for three rods, also preferred adding a single 5/8" rod through the center of the spring to carry the bulk of the load. Others seemed to feel that four of the 3/8" were sufficient, although warnings were given in both cases. Either way, this procedure meant backing off on the nuts in turn, to relieve the pressure on the spring plate, until the springs were loose and the spring plate could be removed. This sounded good to me, so I crawled back under my car to try and visualize the process before I gathered up the materials. What I found was not good news. The bolts which hold the spring plate to the lower wishbone sit in a 1/2" recess inside the spring plate. I tried to put an open end spanner on one of them, and found that I could only turn the bolt about a flat at a time due to the recess. I pictured myself under the car for a few days at this point, carefully backing the nuts down the rods a flat a time. It was time to go back to the archives. One post offered some hope, a lister had found a specialized ratchet tool at Sears which had a socket with a hole in it, allowing it to go over rod stock. This was just the ticket! Off to Sears where I located the unusual ratchet. But it could only be purchased as part of a set at $50. I gave this some thought, and determined that I would probably never use this tool again, and I did not want to spend more on parts and tools than it would have cost me to hire a mechanic to do the job.
The next day, I mentioned my troubles to a co-worker. He told me that his son had recently rented a spring compressor from Auto Zone, and replaced the front springs in his pickup truck. I told him that Jaguars were a bit different than pickup trucks, and these tools would probably be more trouble than they were worth. But just to be thorough I went down to Auto Zone to see what they had. I asked the counter guy if they had a good single rod spring compressor, and he said they did, and disappeared into the back to get it. When he showed it to me, I could not think of a good reason why I shouldn't give it a try, since I could rent it indefinitely, and they would refund 100% of the rental cost when I returned it. With a plan "B" in place, it was time to get started.
Back under the car, I went through the process of visualizing each process. The spring compressor began to look better and better as it only needed to pull the spring down a few inches against the pan, and at that point the entire assembly could be removed.
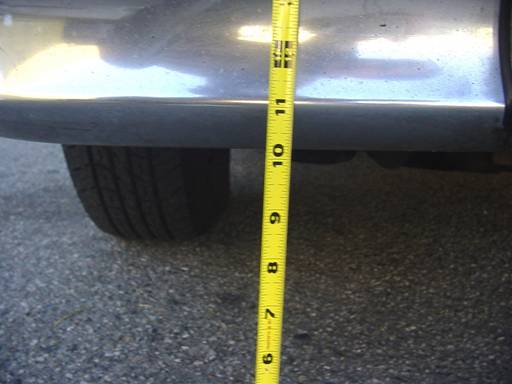
Step 1 - Measure the before height
Both sides measured the same, 11 1/8" to the crease in the bumper.
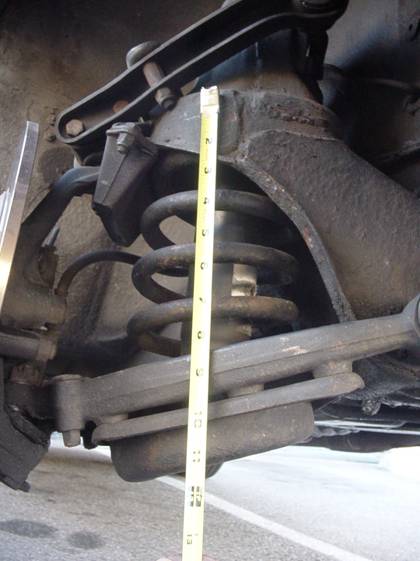
Step 2 - Measure the starting length of the spring
I would need this measurement to determine how high I would need to get the front end in order to remove the spring from the bottom. With the wheel off the ground, the spring measured about 11". The new springs were just more than 14", so I would need to plan on being able to compress the new springs at least 3" to get them back in the tower. Notice in this picture, the differences in angle between the spring pan and the coil. Some wrestling will be needed down the line to get this all to go back together!
Step 3 - Get it up!
I blocked the rear wheels, and with a rolling jack in the center of the front cross member lifted both front wheels off the ground and supported the car with two jack stands for good measure. Pulled both front wheels, and removed the shock absorber from the left side.
Step 4 - Double check, and prepare
I measured the distance below the spring plate at 10", this I reasoned was enough to get the spring out. I then loosened each of the bolts a quarter turn and retightened to be sure I wouldn't be fighting with a seized bolt later in the process.
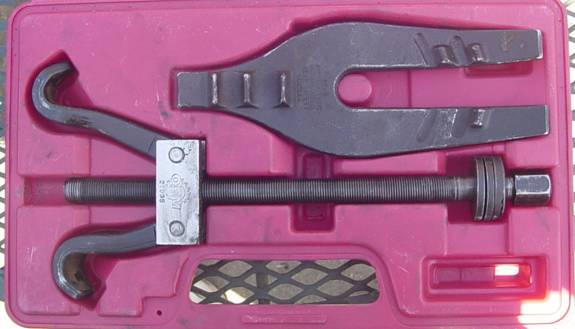
Step 5 - The big squeeze
Here is the coil compressor I rented. It is marked OEM 27035.
After applying some motor oil to the threads, I extended the claws to the end of the rod, and passed it up through the spring plate where I set the claws on the highest sections of coil that I felt didn't interfere with the tower. I then attached the forked plate over the bolt, below the spring pan, and adjusted its position so that I would have access to all 6 mounting bolts.
After 135 quarter turns of the ratchet wrench, the spring popped out of its seat at the top, and I knew it was loose.
Here, I sat back and gave it a good look. Somewhere in the distance I could hear a small voice saying "Tell me again how you lost your arm, Grandpa!"
This reminded me that I wanted to be real sure that I wasn't doing something very stupid before I removed the mounting bolts from the spring plate!
After I had convinced myself that it all made sense, I began removing the bolts, checking along the way for more tension than I would expect.
No worries! The spring, compressor and spring plate came out the bottom just as planned. Over on a table I set the assembly on it's side, and decompressed the spring to it’s full length, where I could remove the compressor and spring.
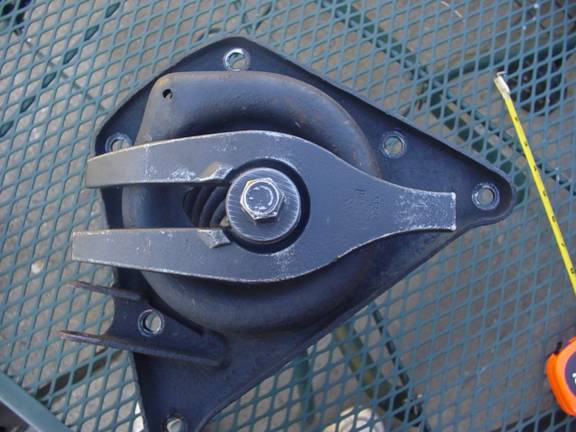
The other piece which fell out was the original packing piece that Jaguar introduced with the advent of the 3.4 Litre to give an extra bit of oomph to support the heavier engine.
As you can almost see from my award winning photograph, this piece is Ľ” thick, and measures somewhere around 5-3/8” in diameter.
Now for the first moment of truth. I sat the old spring next to the new spring to try and determine how much more lift I could expect for my trouble.
Bugger! They are both virtually identical. If anything, the old spring is 1/16th taller than the new spring. This certainly puts a damper on my enthusiasm, but I resolve to carry on, just in case forces are at work which I do not understand :)
Step 6 – Installation is the reverse of this procedure.
The new spring sits in the spring pan with the flat side up.
The bottom of the spring is not flat, and the lower portion of the coil fits into the trough in the pan so that the end of the spring fits in the lowest part of the trough. I laid some pieces of duct tape into the trough before I fitted the spring in a foolhardy attempt to reduce spring noise down the road. I then taped the packing piece to the top of the spring so I would not have to worry about it falling off at an inopportune moment.
On goes the ratchet wrench, and 135 quarter turns later, the new spring is small enough to stuff back into the tower. You may recall earlier that I mentioned that the spring pan was not perpendicular to the tower. This is where that information comes in to play. In order to properly seat the spring and get the bolts in, I first screwed in the one bolt which could reach its threads. Then with a bottle jack, I raised the opposite corner in order that I could get the next bolt in place.
Now that all of the bolts and their respective holes are aligned, they were all tightened down, and the shock absorber was replaced.
This entire process took 2 hours. Broken down, that was 1 hour to do the actual work, and 1 hour spent contemplating my mortality.
The other side was completed 45 minutes later.
The second moment of truth
On go the wheels, down goes the jack, once around the block to settle the wheels and out comes the tape measure. As the many email message in my inbox will testify, you really can gain 2 inches in an afternoon!
Now that the car sits straight and level, I get to take a year off to investigate the replacement of my rear brake disks. Hopefully, AutoZone has a good hub puller!
11.2 - Front Subframe Removal ( Merritt Smith,
)
* REMOVE the splined bolt holding the lower steering column to the steering box. Failure to completely remove this bolt can result in damage to components in the steering column!
* If you have power steering, drain the system and disconnect the hoses from the steering box. Cover the hose ends and openings to prevent the entrance of contaminants.
* Jack up the front of the car high enough that the front tires can roll under the bumper. Support the car securely with heavy-duty jackstands.
* Remove the road wheels.
* Disconnect the front brake lines at the flexible hoses.
* Replace the road wheels.
* Support the suspension cross-member with a floor jack.
* Remove the bolts at the rear suspension mounts, sway-bar mounts, and remove the nuts and bolts at the front suspension mounts.
* Lower the suspension onto the wheels. Watch the steering column spline for binding. Roll the suspension out on the wheels.
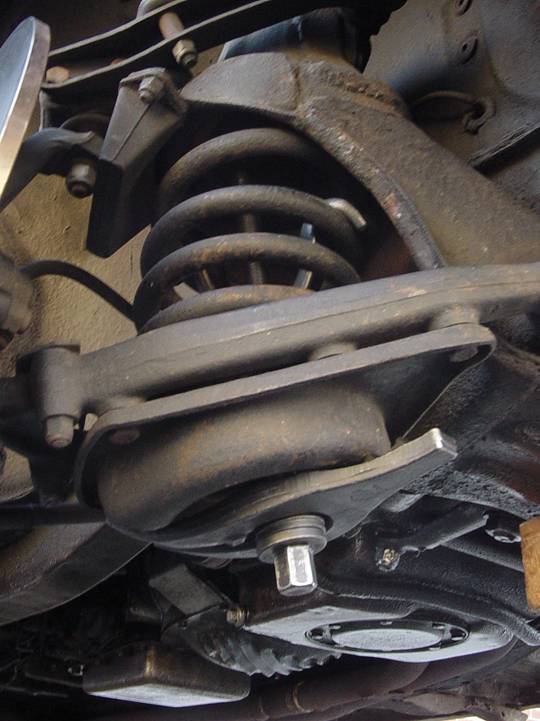
11.3 - Lower ball joint replacement, XJ40 upgrade ( Ryan Border,
)
The lower balljoints in the small saloons consist of a well designed durable assembly. However, as the internal parts wear, they require occasional adjustment- usually achieved by reducing the shim thickness between the lower A-arm and the ball-joint cap- which accounts for wear. They also require periodic lubrication.
It is not uncommon to find the lower ball joints in need of replacement, due to neglect from a previous (or sometimes the present) owner. In these cases, it is possible to replace the lower ball-joint with a unitized assembly from an XJ40 (1988 and up XJ6 in the US). This assembly requires no adjustment or lubrication. However they are rumored to be less durable than the original units IF the original units are properly, and regularly, attended to. 60Kmi instead of 90Kmi according to one source. Many Jaguar owners gladly trade off this durability for the maintenance free, cheaper, more readily available XJ40 alternative.
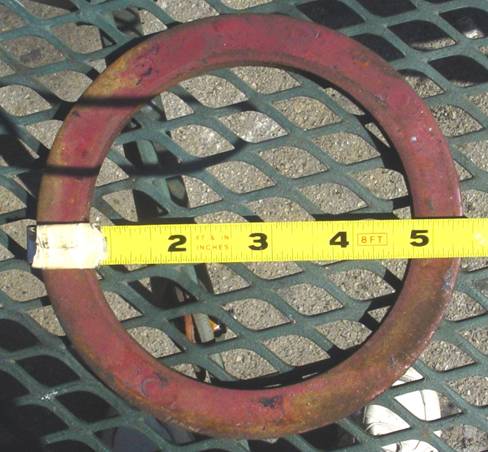
Installation will require removal of a steel ring in the upright. This ring is for the original ball-joint rubber boot retaining clip. Removal of this ring requires precise application of force with the utmost levels of accuracy: whack it out with a hammer and screwdriver. Once this is done, the XJ40 ball joint simply bolts in place of the old assembly.
11.4 - Castor and Camber Settings Explained! ( Scott/Saltwick/Westneat/Grant,
December 8, 2005
)
Castor & Camber explained
Lee Scott asked on 12/07/2005:
I got the front end aligned on the 420, which took care of my tire
squeal issue.
The report I got from the tire shop after it was done says :
camber: 1.1 degrees on the left, .5 degrees on the right
caster: -.8 degrees on the left, -1.6 degrees on the right
toe: .05'' on both.
Then there's this:
cross camber: .6 degrees
cross caster: .9 degrees
set back: .27 degrees.
What is cross camber and cross caster and set back?? Never heard
of these terms. What should the ideal settings be for all these
measurements? The tire shop didn't have the specs for the 420, so
he was using settings for a 69-70 E-type for reference.
Do I need to add/remove shims to adjust my castor and camber?
Clark Westneat responded on 12/07/2005 with:
Lee,
After the re-build on the 420, I mounted the front suspension back onto
the car -- did an eyeball alignment and took it down to my local guys. They
used the AllData specs for the 1969 XJ6 Series 1. We ended up having to
remove and replace shims on the "cage" for the suspension as well as the
wheel alignment. They used a laser alignment tool to make sure it all
aligned properly. It has been about 35,000 miles now and I still have
straight wear on the tires and no mis-alignment
I believe the cross camber and set-back is the relationship to the rear
alignment -- but I could be wrong.
Paul Saltwick responds on 12/08/2005 with:
Hello Lee,
The specs for your car are:
Camber: 1/2 degree +/- 1/2 positive
Castor: 0 +/- 1/2 degree
Toe-in: 0-1/8''
Your camber is (almost) within spec, but far from ideal if you are
running radial tires. It is normal to run more positive camber on
the left, around 1/4 degree, to compensate for the crown in the
road. 1/2 degree negative camber will give your car more grip and
better turn in with radials, at the expense of more inner tire
wear. You add shims to the top wishbone to get more negative
camber.
Your castor is out of spec. You never want negative castor. If
you run +2 degrees, the steering will feel better and self center.
There should be 8 shims and a packing piece with the upper ball
joint assembly. You adjust the caster by swapping them from side
to side.
Toe is OK.
Lee Scott responds back on 12/08/2005 with the following:
Paul,
Thanks for the info. If I understand you correctly, what I need to
do is move one or more of the shims from the back side of the upper
ball joint to the front side to adjust the caster in the direction
it needs to go? Any rough estimate on how many degrees each shim
swap will change the caster measurement?
Paul Saltwick responds on 12/08/2005 with:
Lee,
1/4 degree for each 1/16'' shim. Measure the shims with a caliper,
there are several different sizes for the camber adjustment and
they often get mixed up. Moving shims from the rear to the front
increases positive castor. The shims are slotted and you should be
able to lift up one side, after you jack up the lower ball joint
and loosen the upper ball joint bolts. If you have never shifted
the camber bolts, they often become frozen and heat, penetrating
oil and patience are needed. I recommend replacing them and using
anti seize if/when the subframe is out of the car.
Gary Grant adds in on 12/08/2005 with:
Cross caster is merely a measure of the difference between the
caster value on the right wheel, and the caster value on the left
wheel.
Cross camber is just a measure of the difference between the camber
value on the left wheel, and the camber value on the right wheel.
Set back is any front to rear difference in the positions of the 2
tire-to-ground contact patches. For example, if the RF wheel
contact patch happens to be 1/4'' more to the rear than the contact
patch of the LF wheel, there is 1/4'' set back on the RF wheel. In
other words the wheelbase on the right side of the car is 1/4''
shorter than the left side wheelbase.
And finally Lee Scott responds on 12/08/2005 with:
Thanks to all! Now I think I know what I need to know. What a great
source of info this forum is!
|


