| ||||||||||||||||||||||||||||||||||||||
| ||||||||||||||||||||||||||||||||||||||
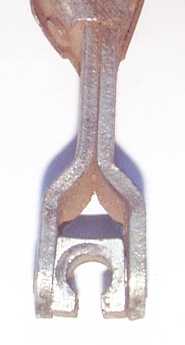
JaguarInboard Rear BrakeHandbrake Cable Attachment
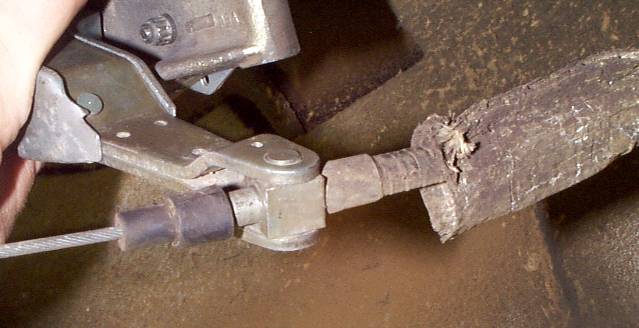
As a result, the clevis will not swivel; it is jammed. This problem was found on both levers. Obviously, that clevis needs to be carefully squeezed back to its original shape -- whereupon it immediately starts swivelling like it should. But trying to prevent the problem from recurring may be more difficult. Palm's solution is to install the cable differently; rather than install it the easy way with the slot facing outward, he turned the clevis around the other way so the slot faced inward. This makes attaching the cable quite a bit more difficult, since the tip of the cable must be inserted between the clevis and the arm itself on both arms, and the rubber boot must be pushed through one of them. Also, the retraction springs cannot be in place; they must be installed after connecting the cable. The tip of the cable can actually be slightly trimmed to make it fit through this opening easier. Grind three flats on the widest part of the tip in a triangular pattern. The flats don't need to be very big to make the tip slip right through the levers. The rubber boot can be greased a little to make it slide through more easily. It is recommended to use a lubricant that won't attack rubber, like K-Y Jelly. When done, the completed installation looks like this on the driver's side:
In theory, this method of installation should make the clevis slightly
stronger, since to spread the sides would have to push against the stronger
part of the arm.
|
|
| ||
 |
Improve your Jag-lovers experience with the Mozilla FireFox Browser!
©Jag-loversTM Ltd / JagWEBTM 1993 - 2024 All rights reserved. Jag-lovers is supported by JagWEBTM For Terms of Use and General Rules see our Disclaimer Use of the Jag-lovers logo or trademark name on sites other than Jag-lovers itself in a manner implying endorsement of commercial activities whatsoever is prohibited. Sections of this Web Site may publish members and visitors comments, opinion and photographs/images - Jag-lovers Ltd does not assume or have any responsibility or any liability for members comments or opinions, nor does it claim ownership or copyright of any material that belongs to the original poster including images. The word 'Jaguar' and the leaping cat device, whether used separately or in combination, are registered trademarks and are the property of Jaguar Cars, England. Some images may also be © Jaguar Cars. Mirroring or downloading of this site or the publication of material or any extracts therefrom in original or altered form from these pages onto other sites (including reproduction by any other Jaguar enthusiast sites) without express permission violates Jag-lovers Ltd copyright and is prohibited |
|