Body jigs
Body Jigs

New content added 11th April 1999 From Wray Schelin
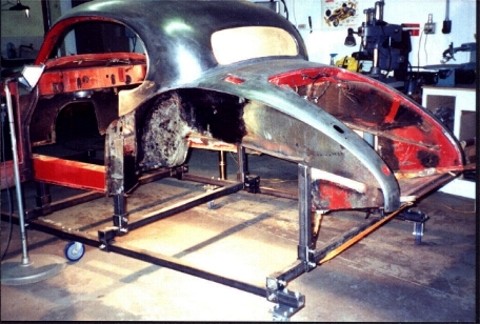
I'm sending you three jpegs for the webpage. The first is a photo of
the 120 FHC that Bob Lockas ( a XK Lovers list member from KS) is
restoring.
He had sent me some photos of his car, so as to show me what
sheetmetal he was missing and would probably need. Apon receiving the
photos I noticed what a nice design that he had come up with for his
body gig.He wanted something that would have utility beyond just his XK
120, so he designed the gig to be essentially infinately adaptable and
also something that could be collapsable when not needed, and to boot
inexpensive, strong, and allow you to really have good working room
around and underneath the car. It will accept just about any car
providing you adjust or change the length of the support arms, and the
location of the supports themselves, which are slide adjustable, this
allows any pickup point to be matched on a car body.
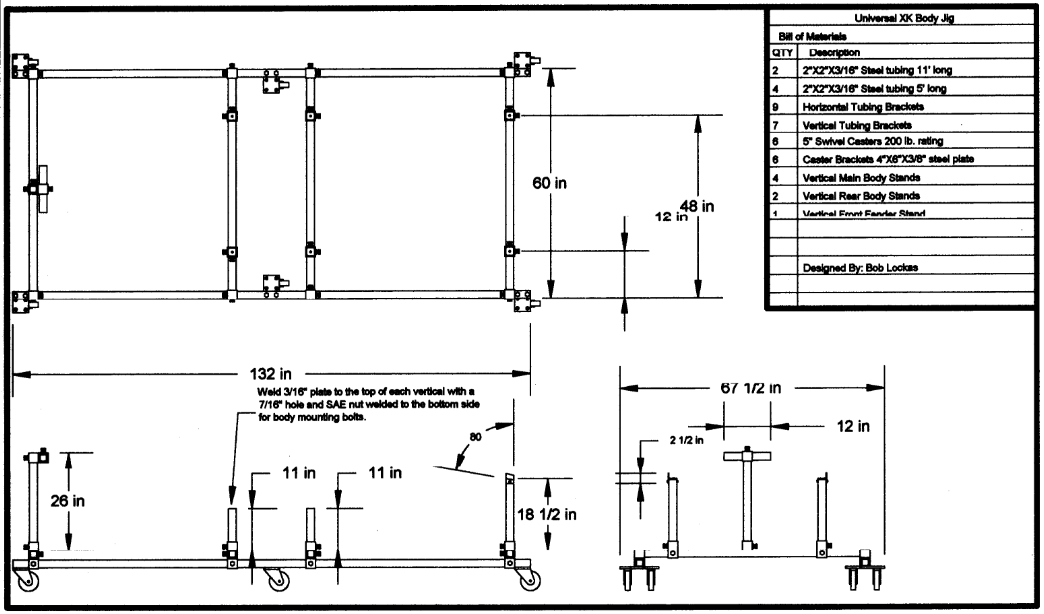
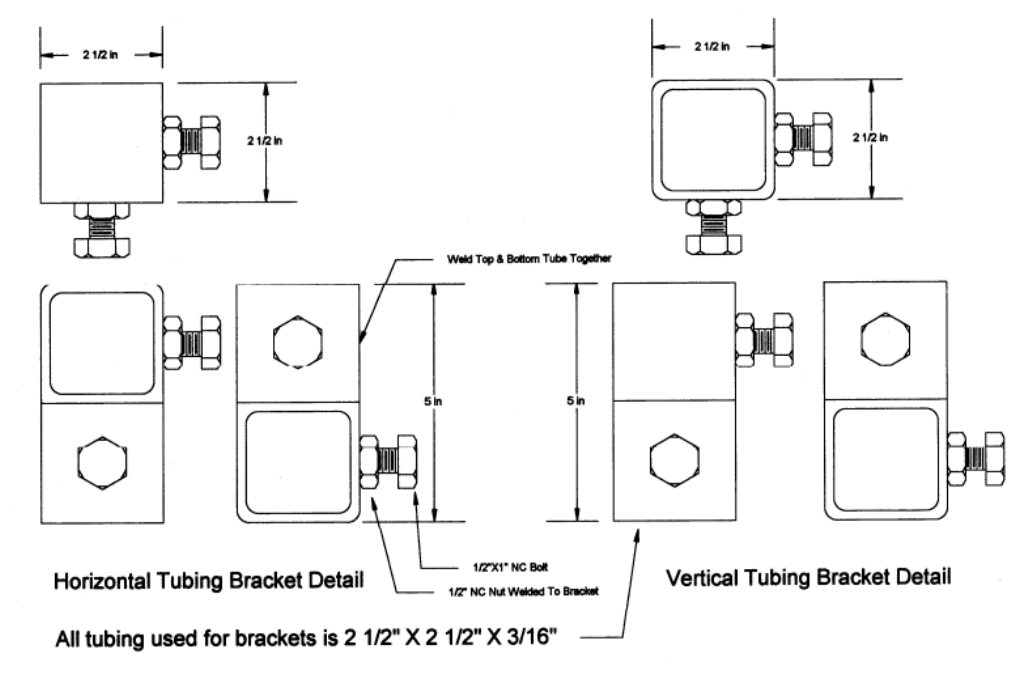
I asked Bob if he would allow his design to be posted on the XK Lovers webpage so that
everyone would get a chance to see a well made gig, something they
might consider to build themselves. Bob also had his son send me some
drawings of the design showing all of the necessary dimensions and list
of materials to build the gig. Bob mentioned that if anyone wanted a gig
made just like his and they didn't have time to do it themselves he
would consider making copies of it. You can contact Bob Lockas at:
lockas@swko.net
Hi all, I've recently recieved a catalogue from Guy Broad and in one of the
glossy brochures that came with it, showed an XK120 off its chassie and on
a jig. Does anyone know the dimensions (mounting positions, heights, etc)
of that type of jig? ...I would like to build one for my 120 as I feel the
body will be off the chassie for a while and it will make the restoration
much easier. Thanks - Gary Coorino

Gary: I second your request.  Some months ago I made the same request to
this group, without a response.  I plan to build one sometime this summer
for my xk120 FHC.  If it works well, I will share it with the group. - Carl
Hanson

To all... is the notion of a travelling universal FHC jig too impractical?
Have any of you tried the rolling rigs which attaches to the axle stubs and
"alledgedly" allows you to position the body at any angle from horizontal
to vertical with only a few pounds of lifting force. My back and overhead
welding skills both think the rollin' idea is good; but what say ye?
Regards - Klaus Nielsen

Klaus: I have seen the "tilters" and they do work. One on the best ones is
made in Germany and distributed here on the West Coast US By MnG (Made in
Germany) PO Box 181281, Coronado Ca. Tel 619 437 7001. While they could be
purchased direct from the manufacturer in Germany at a reduced price, the
hassle of importation has to be considered. (No, I have no interest in the
business). The literature shows a seductively simple device that tempted me
to consider fabricating my own except for the consideration of my poor
welding skills would give me ulcers every side I had a beloved car on its
side! - Regards, Bruce Baysinger

Bruce, I have the same welding reservations, which of course prompts the
thought of just having the "curvy" pieces rolled and bolting the assy
together. Bolting would sure ease shipping and sharing of such a beast. Do
you own sketches sufficing for reverse engineering. Regards - Klaus Nielsen

Klaus: I had drafted up the rolled pipe and plate sketches and gave them to
a friend of mine about a year ago to have them fabricated "under the table"
at his place of employment and have not seen them since. Thanks for the
reminder. If I can get them back I'll send you a copy. - Bruce Baysinger

My XK-140 OTS body is currently resting on a truss-type frame with castor
wheels (hopefully not for much longer). I'll get the dimensions the next
time that I visit the body shop. It is, however, a pretty simple structure,
since the body isn't all that heavy. Make sure that the framework supports
the body mount hardpoints, but don't worry too much about the front and
rear body overhang. With the OTS, at least, you must strengthen the door
opening by mounting a steel bar that runs from the scuttle to aft of the
door. I mounted the bar at the hood (soft top) pivot and at a instrument
panel support. - Regards, Mike Carpenter

Listers: I am going to need a body jig for a 120 ots in Chicago around
June, if anyone would like to rent one to me that would be fine.  If not I
would take on the task of having it made. 1) I really don't have any
storage space for this once it is built, again any ideas ? 2) Does anyone
have a bare 120 frame that I can take measurements off of ? OR would anyone
be willing to take the time to provide me with measurements and demensions
? 3) Would anyone be interested in sharing the cost ?  I feel that a large
diameter tubing, about 3 inches, with "outriggers" to support the main part
of the body undercarrage with smaller tubing as a substructure to hold the
cowl etc. would be the way to go. 6 to 10" casters would make it roll over
any surface. All turnable, 2 with brakes. Is this overkill or do you think
it will not be sturdy enough ? PLEASE GIVE THOUGHTS AND OPINIONS. Any
ideas.......????? - "Midget" Susan (Susan Hedman)

Klaus:  Travelling in what way?  Like use it for awhile and send it to
someone else?  or something on wheels?  The rolling jig you mention would
be useful for body-on-frame repairs, but I think both Gary and I are
looking for a jig that will hold the body together while we send it to the
paint shop off the frame. - Carl Hanson

gary - you dont need to know the dimensions of a chassis jig, mount it off
your body points make it out of 2" x 2" rhs steel and you have a replica
xk120 chassis at least as far as the mount points (and thats all that
matters) is concerned. Works for any car you like. - Peter Hitchin

To all, re the discussion on body jig's. I have one available but in the
Netherlands, Also: It is a rather large piece, about 2 by 1 meters and
heavy It was purpose made based on a crude general jig. If somebody is
interested, Please let me know. Also I am about to put the newly cut front
windows in my 120 FHC. This seems a difficult job for at least two persons.
Any tips available? - Duco Avis

To all XK 120-140-150 Jag Lovers  needing a body jig, I have one that is
adjustable and works very well. It is on  caster wheels that make it
portable. It holds the body in a rigid position so if  you are replacing
the sill or major parts and panels, it will hold the car  correctly. Give a
mail address and I'll send a drawing and picture. Still need  help on my
XK120M Fixed Head Coupe Parcel Box and partition behind box and trunk
area. Can anyone help locating these parts in the USA?   The information on
my 1954 XK120M Fixed Head  Coupe:  Chassis #680147. Engine #W6204-8. Gear
Box #JL13354. Body  #J2156.   E-Mail address lockas@swdtimes.com - Bob
Lockas

Hi everybody, Well from the email regarding a body jig it is apparent that
several people have a need for such a device. Whether a jig is manufactured
for the members and made available, say for a rental fee, is to be debated
but the problem arises as to how long one person can have it while others
also have a need ....it can get messy. Also the type of jig would be
important, a simple device may suffice for body off painting but a more
complex and sturdy device would be required to do major body work, then
transporting such a device could be costly and components can go
missing....it get messier. I'd sooner build my own, and as I have major
work ahead, then if it were able to support the body correctly while this
type of work were carried out then the better. At the end of the project it
could then be sold to another XK restorer. So if plans for a jig exist or
someone has a jig and is prepared to make a detailed diagram of it
available then I'd be very grateful. Thanks for the email and I appreciate
everybodys help and suggestions. - Regards,  Gary Corino

Carl....sorry about being unclear. Certainly it should have the convenience
of casters,but I meant travelling in the sense that it could travel from
user to user. Granted, if measured by my repair speed, it might not
"travel" often; but if used just for painting, the frequency could be
acceptable. Using pinned and bolted joints instead of welded construction
would ease shipping without loss of rigidity and accuracy e.g.
repeatability. I am still curious about the idea of a common jig for both
120/140/150. Any comments from those who know wheteher this makes sense.
Regards - Klaus Nielsen

Bob, Please send a sketck of the jig to me. - Klaus Nielsen

I worked for the Boeing Airplane spares department for several years before
my retirement. It may be useful to know how they handled the refurbishment
(repair) tooling for airplanes. (There are now about 300 707's still
operating so the disparity may not be too great between 707 problems and XK
challenges.) Tooling was designed by Boeing tooling engineers based on the
expected frequency of  repair. Inexpensive tools were made nearly part of
the public domain by releasing the engineering drawings to approved tooling
suppliers and suggesting that these tools be purchased by the operators.
Some of these were shared between operators. Major tools, however, were
built at Boeing and rented to the operators as needed. There was no time
limit, but the operator was required to define the expected period of use
at order entry. When the repair was complete the tool was returned to
Boeing where, without exception, it went through an inspection and repair
operation. There was no charge for this refurbishment service unless there
had been gross abuse by the operator.  It is possible that someone could
initiate a jig program based on the Boeing model, but it would have to be
someone with a true love for the XK type  and a very long view of  return
on investment potential. The management of the program would also require a
pretty professional shop and administrative capability; Welch?, Wray
Schelin?  Guy Broad? XK Unlimited? or maybe there is a retired tool
engineer out on the list who could create tool design and make it part of
our public domain? - Carl Orlob

Perhaps someone could post a drawing/photograph on the Tech Library. - Carl
Hanson

Send me the pictures or drawings, I'll post em. - Dick White

My 2 cents on the body jig thread. I would use the body jig only for easy
transport of the body shell when it is off the frame. I would not recommend
any welding of structual components with the body assembly mounted on the
jig. Alignment should be done only on the frame, it would be very difficult
to exactly reproduce all of the frames complexities of support. Final
alignment should be done only on the frame. A inexpensive and dual purpose
body jig can be made with supplies from your local lumber supply
yard,scrap, and junk yard. Build a rectangular frame using 2x6s,attach on
the top edge some 4x4s cross braces , that will pick up the sill support
points, mount some risers to mate with the rear body support points. Brace
the 2x6 frame corners with some plywood. For the axel I have used a  solid
rear axel from a front drive car.The junk yards are overflowing with these
axels and you should be able to get one very inexpensively. I like to use
the mini spares mounted to the stripped down axel. You have to weld some
plates onto the axel to attach it to the 2x6 frame. Weld a 2x2 steel
tube(.060"-.085"wall thickness) to the center of the axel and on the other
end ,weld a trailer hitch ball socket. You now have a body jig and a
useable yard trailer (just mount some sideboards and a plywood floor). -
Regards, Wray Schelin

I will be replacing sills and other major parts and would appreciate a copy
of the jig drawing. Photo would also be helpful. - Bob Schilling

To all Jig-lovers: a couple of years ago, I built a rotating jig so I could
"barbecue" my wife's delicate XJ6C that had fully- terminal tinworm. It
worked extremely well, was fully portable on casters and spun the heavy XJ
by 360 deg so you didn't have to "limbo" while sand-blasting and welding.
It was inexpensive to build, involved hardly any welding yet folded down
flat to fit under the bed with both the rowing machine and our large sack
of NOS Lockheed brake cylinders that we're hoarding for our retirement
funds. (Please, no mail begging for wheel cylinders, that was just a
Jagjoke) If I'd built it a few years earlier, and with just minor
modifications, it could have been very useful when we were gutting my XK
140 OTS which had all the usual fender, sill and door post problems but I
must stress that I heartily agree with Wray Schelin's  warning about final
body welding being done only back on the car's chassis when the restored
parts are ready for re-assembly, it's the way to go if the chassis is true.
The flimsy XK OTS body MUST  have been internaly braced as normal before
being transfered from it's chassis to the "Universal Jag-Jig" and then the
fun can begin. (Or the standing and wondering- "Why did I do this?"). I
never intended to restore another XJ again so I sold the Jag-Jig to a guy
who wanted to modify it to tackle diseased Volvos. ( The Swede Spinner?)
Just so's I don't get into any unwanted debate or misunderstandings on the
construction and safety of the thing, I'm not going to make sketches or
diagrams- I'm not an engineer and I don't want to hear that it's my fault
you didn't agree with my drawings and your XK's fallen on the garage floor
but what I'll do in the near future is to scan a few pictures of the
Jag-Jig supporting approx. 2400 lbs of XJC body and suspensions and offer a
few comments on how it was built and how I see it being modified to handle
a frame-off XK 120/140 OTS with a properly braced body. I'll offer these to
the list administration for inclusion in the "Library" and you're on then
you're own, like I was. Please don't mail me asking for accurate
dimensions, I never kept a record of them and will be offering a
description of the materials list only. If you really want to build one
like this, you'll do it and you'll be popular in the restoration fraternity
in your area. I was and it was a ******* nuisance. Ha!- you won't believe
how some people can do an $X,000 body- restoration job by borrowing and
tying up your equipment but are offended when the subject of a little help
to off-set  the cost of making the equipment comes up. You're supposed to
be happy with the case of beer. This thing takes a couple of days to build
and requires access to a good supply of scrap or reasonably priced, rolled
section steel and welded, square steel tubing, it's not for someone who has
no means of drilling lots of 1/2" dia. holes accurately at least by hand
through 1/4" and 5/16" thick steel. You also need a clear floor space of
about 6' 6" x  18' for it just to stand with the body mounted, that doesn't
include room to work at the sides when the body is elevated and in a
horizontal position. 'Nuff said, I'll proceed with the pisc ASAP so TTFN -
John Morgan

To all wishing to barbeque this spring, at
http://www.jag-lovers.org/xk-lovers/library/drenzek.html are pictures of the
rotisserie which David Drenzek built for his 150 OTS.  There aren't any
dimensions or instuctions but perhaps the pictures will provide some ideas.
As for TTFN I'm surprised no one has mentioned Winnie the Pooh.  Tigger
(that's correctly spelled with two guh's) frequently says TTFN as he
bounces off screen. - Regards, Dick White

Many thanks to Bob Lockas for the jig drawings. It looks like a very
straight forward way to handle the OTS body off of the frame. I am just
getting to the point of worrying through how to accomplish that manuver so
the plans were very timely. My 120 does have a badly damaged front wing. Is
it a good idea to remove the damaged wing before removing the body? The
damage is to the front third of the wing and does not seem to have affected
the mounting point near the frame. I have had some advice to remove both
wings for access to the posts. Will this make for a difficult  fit up with
the bonnet on reassembly? Any advice or comments are appreciated. - Bob
Schilling, OTS 660775
|


