| ||||||||||||||||||||||||||||||||||||||
| ||||||||||||||||||||||||||||||||||||||
JAGUAR XJ-SMAIN FUSE BLOCK REPLACEMENT
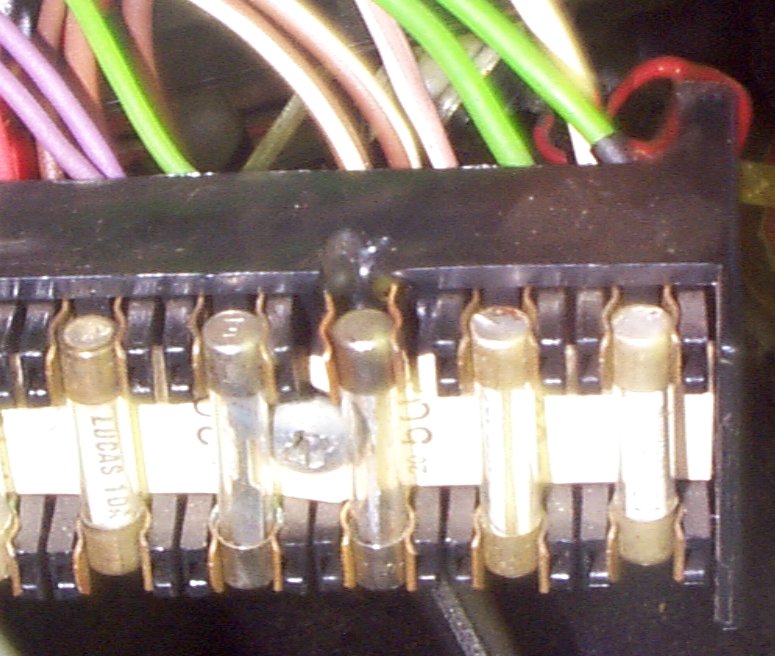
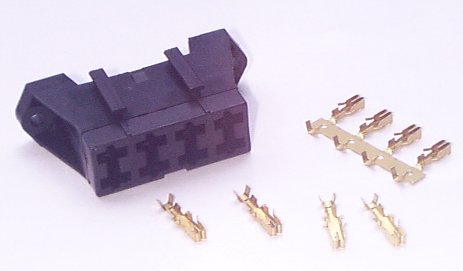
Corrosion -- either between the clip and the fuse or between the wire and the terminal -- resulted in a high-resistance connection. On the fuses that carry serious current -- that's fuse #10 in the middle of the pic, a 50A fuse that serves the A/C blowers -- the resistance in the joint causes it to generate heat and melt the structure of the fuse block itself. Notice that each end of each fuse has a pair of plastic posts on either side of the clips to provide support and separation, but the posts on the top end of fuse #10 are gone. That plastic is actually now a large blob on the back side of this fuse block. Palm feels that it's the connection between the wire and the terminal that's the problem. This is the second one that's done this (the fuse in the headlight fuse block for the radiator fan also melted through the block) and no amount of cleaning these clips helps. The wires are connected by crimping -- no solder -- so corrosion eventually does them in. There are several warning signs. First, the fuse fails. It doesn't blow, it fails; it still looks good when you look through the glass, but checking with an ohmmeter shows an open circuit between ends. Apparently the heat buildup causes the fuse to come apart within the metal cap at one end. Second, in the case of the main fuse block above the footwell, there's the unmistakable odor of melting plastic inside the car. Finally, in the case of the headlight fuse block under the hood, there's the euphoria the driver experiences when seeing smoke pouring out from around the hood while sitting at a stoplight. In Palm's opinion: you're going to be replacing these Lucas fuse blocks sooner or later -- either before they cause trouble or after. Best to do it before, obviously. There are several ways to proceed, but first and foremost the glass tube fuses must go. As long as you're doing the work, get that garbage outta there and install fuse blocks that use modern plastic blade fuses. Palm bought generic fuse blocks at the local auto parts stores. These type blocks cost only about $4 each, hold four fuses each, are stackable, and are sold under the brand name Conduct-Tite! Here's what the pieces look like:
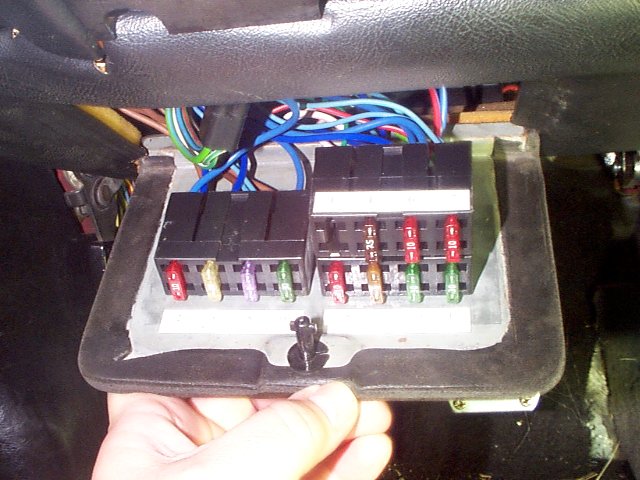
That strip of four terminals in one is very handy if you're providing a single power source for all four fuses. If you have separate power sources, it can be cut apart and used as four separate terminals -- or two or three ganged together. You need to cut a section out between them so they can't touch each other when installed, but Walter Acker IV warns that you must not cut away too much or the terminal can be pulled through the fuse block when you're pulling a fuse. The two ribs on the top of the block mate to two slots on the bottom when connecting multiple blocks together. Of the 12 fuses in the main fuse block on the XJ-S, four are powered directly from the main battery terminal on the firewall and hence could be ganged together in a fuse block. Unfortunately, they are not sequential; they are fuse numbers 2, 3, 8, and 10. Palm decided to gang them anyway and just label them carefully. This has the significant advantage that all the power supply wires (there are five, actually, there were two to fuse #10) feed all four fuses rather than each fuse relying on its own wire. There are also three fuses powered by the Ignition Protection Relay (also known as the Load Relay), numbers 9, 11, and 12. Makes sense to gang them. Palm went a bit further: fuse #5 is powered directly from the ignition switch and is therefore powered whenever the Ignition Protection Relay is energized, but you can't gang those sources together or they'll backfeed. Instead, Palm abandoned the lead from the ignition switch and powered fuse #5 from the Ignition Protection Relay, allowing all four fuses to be ganged. This adds load to the contacts in the relay while reducing load on the ignition switch, but since Palm has fitted relays on his wipers the load on the Ignition Protection Relay will be far less than it originally was anyway. So, using three 4-fuse blocks to replace the original Lucas 12-fuse block, one block will be ganged to unswitched battery power, one to the Ignition Protection Relay, and one block will be four individually-powered fuses. Anyone who's ever tried to change one of those glass tube fuses knows another truth about the XJ-S: they are a bear to get to. There's an access door, but the fuse block is so far above the access door that it's really easier to remove the entire underscuttle cover to replace a fuse. Well, as long as we're replacing the fuse block, why not locate it better? While Palm was contemplating the options, John Napoli made one of those why-didn't-I-think-of-that? suggestions: Mount the fuse blocks on the access door. This proves to be especially workable plan here, since the door isn't attached to the underscuttle cover but in fact can be slid right through it. That means you can still remove the underscuttle cover when you need to work under there, you just leave the access door itself hanging by the wires. Palm decided to dispense with the fuse block mounting lugs and just mount two fuse blocks directly to the door with automotive trim tape and snap the third block to one of them. So the first step was to use a boxcutter to cut the mounting lugs off the new fuse blocks. They are really easy to cut with a sharp razor knife; five minutes of whittling and they're down to the basics and about half the size they started out! The job itself isn't difficult, it's just repetitive: cut a wire off the old fuse block, solder on another piece of wire to make it 6" longer, apply heat-shrink tubing to insulate the splice, crimp the other end of the extension to a terminal, solder it for good measure, snap the terminal into the block. Repeat 23 more times, one at a time so you don't mix the wires up. Actually more than 23 more times, since many fuses have more than one wire to them. Is it significantly easier to get at the fuses? Judge for yourself:
Yes, this picture was taken through the steering wheel with the underscuttle cover in place! Since the fuses actually protrude from the blocks a bit, they are easily pulled with fingers. The labels were washed out by the flash in this picture. Each label -- two on the door itself and one on top of the second-level block -- provide the original fuse numbers in what appears to be random order. The label at lower left says 2 3 8 10 and below that in smaller letters it says "Direct Battery Feed". The label at lower right says 5 9 11 12 and below that says "Ignition Protection Relay". The label at upper right says 1 4 6 7. The labels were printed out on label stock on the inkjet, cut to size and stuck in place, and a piece of cellophane tape put over them to keep them from getting smudged. Fuse 1 is unused on this car. There was originally some confusion between fuse #1 serving the fog lights at the front and fuse #6 serving the fog warning lights at the rear: there are no fog warning lights at the rear, and there was no switch operating the fog lights at the front. The fog light position on the headlight switch sent power to unused connectors at the rear. So the leads have been rearranged so that the headlight switch now actually operates the fog lights via fuse #6. It's possible to use position 1 as a spot to hold a spare fuse, but Palm decided against it. The terminals would need to be snapped into place, since the spare fuse would just fall out without them. Once they're in, it's hard to tell the fuse is a spare! Might as well keep the spares in the glovebox or trunk. The only downside to this project: The fuse chart was originally on the access door, and it clearly can't go there any more. A new chart was made up on the computer, printed out, laminated, and stored up inside this recess.
Acker did this job using a 14-fuse block; you can review his work on the jag-lovers Lumps page. Alan Heartfield also had problems
with the main fuse block -- in fact, it was that same #10 that melted --
and replaced the fuse block with one from a Subaru from a junkyard.
He doesn't like the idea of mounting the fuse block on the access door,
so he fabbed a bracket to hold it behind the door but aligned so it is
easy to reach. You can look over his work at http://www.mts.net/~aheartfd.
Click on the "fuse box" link.
|
|
| ||
 |
Improve your Jag-lovers experience with the Mozilla FireFox Browser!
©Jag-loversTM Ltd / JagWEBTM 1993 - 2024 All rights reserved. Jag-lovers is supported by JagWEBTM For Terms of Use and General Rules see our Disclaimer Use of the Jag-lovers logo or trademark name on sites other than Jag-lovers itself in a manner implying endorsement of commercial activities whatsoever is prohibited. Sections of this Web Site may publish members and visitors comments, opinion and photographs/images - Jag-lovers Ltd does not assume or have any responsibility or any liability for members comments or opinions, nor does it claim ownership or copyright of any material that belongs to the original poster including images. The word 'Jaguar' and the leaping cat device, whether used separately or in combination, are registered trademarks and are the property of Jaguar Cars, England. Some images may also be © Jaguar Cars. Mirroring or downloading of this site or the publication of material or any extracts therefrom in original or altered form from these pages onto other sites (including reproduction by any other Jaguar enthusiast sites) without express permission violates Jag-lovers Ltd copyright and is prohibited |
|