| ||||||||||||||||||||||||||||||||||||||
| ||||||||||||||||||||||||||||||||||||||
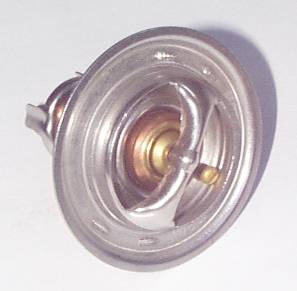
Jaguar V12Auxiliary Air ValveBaseplate Rebuild Using Robertshaw 988-170 Thermostat988-170 is a fairly standard-looking item except for that extension off the bottom, which looks similar to the bypass closing disc on the Jaguar V12 thermostats except that there's a tripod at the end instead of a disk. Interestingly, the 988-180, right next to this one on the rack, had no such extension on the bottom. This thermostat also has a jiggle pin in the valve disc itself.
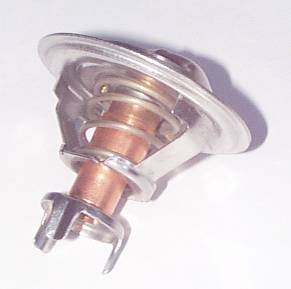
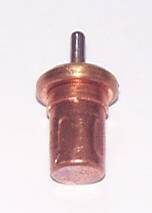
The extension off the bottom involves a stepped-diameter copper tube that is simply pressed on to the bottom of the bulb itself. Disassembly of this thermostat to obtain the bulb was actually more difficult than expected. It is recommended that the first step should be to cut that tripod extension off with a hacksaw by cutting through the copper tube close to the tripod itself. Second, use a pair of tin snips to cut through the two struts holding the spring base to the main disc. At this point, you will have several parts to throw away, leaving only the bulb with the copper tube and the valve disc itself attached to it. I attempted to cut this disc away, which was a mistake. A better idea would be to select a deep socket that will fit around the bulb itself and use it to press the disc off. When the disc runs into the pressed-on copper tube, either use the tin snips to cut the disc away (easier now!) or insert a drift in the bottom of the copper tube and press the bulb out of both the disc and copper tube together. Note that the copper tube may come in handy, try not to mangle it just yet. When you finally get it out, the bulb looks like this:
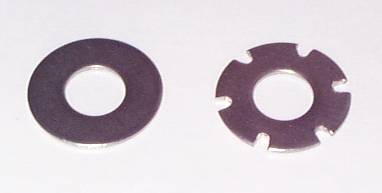
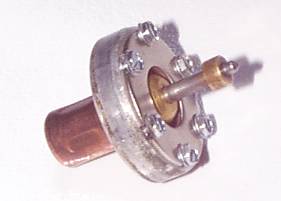
Note that while the OEM bulb has a seal glued to the top, this bulb's seal is positively attached using a crimped-on brass cover. Note that the flange portion of this bulb is not beveled on the bottom as the OEM bulb was; it's flat. Hence, it doesn't sit in the opening of the baseplate as well as one might hope. To help it center better, I cut a small ring off the end of that copper tube and pressed it back on to the bulb, up against the bottom of the flange. This ring is visible in the lower pic above. It's not really necessary, but it seemed to make assembly easier and neater. The plunger on this bulb is really short; in these pictures, it is actually extended a ways, but as installed against a spring it's far too short to reach where the AAV piston would need to sit. You could devise some sort of extender to sit on top of the plunger, but an easier solution is available. A check with a dial caliper showed that the diameter of this plunger was exactly the same as the one in the OEM bulb, so the plungers were swapped! Note that the proper way to insert a plunger into a thermal bulb would be to do it inside a vacuum chamber so there's no air trapped inside; air makes the plunger operation "spongy", like a brake pedal when it needs to be bled. Lacking a vacuum chamber, I heated the bulb in boiling water prior to inserting the plunger, which minimizes the amount of air trapped (the wax is taking up as much room as possible). It still leaves the plunger feeling spongy, but the spring on the piston seems to crush out all this motion and push the plunger to hard wax. To retain this new bulb in the baseplate, I decided not to fiddle with the old crummy flat washer and trying to recrimp the lip over it. Instead, I purchased a new 1/2" stainless steel washer, which happens to have a 1-1/4" OD which is just a bit larger than the original flat washer but still smaller than the OD of the baseplate itself. I then prepared it by cutting a set of six slots around the edge. I found the most convenient way to cut these slots was to fit a cutoff wheel in a rotary hand grinder and chop away at the edge until I had a notch the right shape, but there are countless other ways to make such notches. You could choose a pattern of three, four, eight, or whatever number of screws tickles your fancy; I just liked six.
This picture obviously shows two washers, one before and one after cutting the slots. The stainless steel washer is also considerably thicker than the OEM flat washer, so using the method of AAV disassembly involving six pins inserted through the holes in the piston would be less likely to dent it (presuming you will eventually have to take this thing apart again!). Meanwhile, the lip on the baseplate was completely removed (most of it can be simply broken away with a pair of pliers) and the upper surface of the baseplate was filed flat. After notching the washer, it was positioned centered on this surface and the locations of the notches were marked. Each location was center-punched and then drilled with a really cheap drill press using a 3/32" drill bit. Note: it is far preferable that these holes do not break through to the bottom surface of the baseplate, as that would form a leak path for coolant. Hence, the drill press. Alternatively, a drill stop could have been used, or even a homemade version by sliding a piece of tubing over the drill bit and against the jaws of the chuck. Of course, you could opt to drill on through and then try to seal the holes up later.
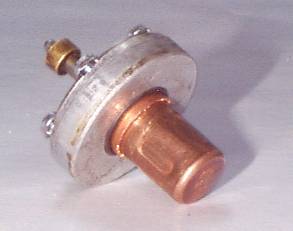
The assembly requires #4 screws 1/4" long. Those are a bit of a challenge to find, too small for most hardware stores to carry. Home Depot carries them. You might try hobby shops, or electronic supply houses. I wish I could have found stainless steel screws, but that was asking too much that day. It is highly recommended that you thread the screws down into the holes beforehand to create threads rather than trying to thread them in during the actual assembly. Besides the copper ring pressed onto the bulb, I also opted to install a thin O-ring at the bottom end. This was more for holding the bulb centered during assembly than for sealing, but it probably sealed pretty well, too! So, the baseplate was assembled by pressing a copper ring onto the bulb, putting a 1/16" cross section O-ring onto the bulb and around that copper ring, setting the bulb into the baseplate, setting a 1/8" cross section O-ring around the top edge of the bulb, setting the notched stainless steel washer on top of that, and inserting six screws. In fact, the assembly was held together tightly between two sockets in a vice while the screws were installed. Remember that this assembly needs to be watertight; if you don't trust your O-ring installation, now is the time to be using some sealant. When done, the assembly looked like this:
You can just see that thin O-ring around the opening in the bottom of the baseplate, as well as the copper ring. This baseplate assembly was reinstalled in an AAV and tested in a pot
of water on the stovetop. It worked as expected, providing very little
motion until the water temperature was approaching 170ºF and then
quickly moving to fully closed.
|
|
| ||
 |
Improve your Jag-lovers experience with the Mozilla FireFox Browser!
©Jag-loversTM Ltd / JagWEBTM 1993 - 2024 All rights reserved. Jag-lovers is supported by JagWEBTM For Terms of Use and General Rules see our Disclaimer Use of the Jag-lovers logo or trademark name on sites other than Jag-lovers itself in a manner implying endorsement of commercial activities whatsoever is prohibited. Sections of this Web Site may publish members and visitors comments, opinion and photographs/images - Jag-lovers Ltd does not assume or have any responsibility or any liability for members comments or opinions, nor does it claim ownership or copyright of any material that belongs to the original poster including images. The word 'Jaguar' and the leaping cat device, whether used separately or in combination, are registered trademarks and are the property of Jaguar Cars, England. Some images may also be © Jaguar Cars. Mirroring or downloading of this site or the publication of material or any extracts therefrom in original or altered form from these pages onto other sites (including reproduction by any other Jaguar enthusiast sites) without express permission violates Jag-lovers Ltd copyright and is prohibited |
|