|
15.6 - MK2 Headliner Removal ( Tom Carson,
October 4, 2002
)
Another trip down Memory Lane. And remember the following comments pertain
to a 1962 Mark 2.
You will be performing what the manual always calls "the reverse order" of
installation. And do this carefully so you hopefully end up with a complete
old headliner to reference when you install the new one.
Preliminary to the following steps I also recommend removing the front and
rear seats and if at all possible, the carpeting. I had glue and stuff all
over the inside of the car when headliner installation was underway.
OK, the steps for removing the old headliner:
1) remove all the wood trim pieces around the edges of the headliner (this
is not incidental, but I am assuming you know where the screws are...holler
if you don't),
2) remove sun visors, rear view mirror, and the two interior lights back by
the parcel shelf (careful when removing these last two items...there's a
wood ring each light mounts to that will probably fall to bits when you
remove it..you need the old ones for a pattern),
3) remove the front windscreen complete with rubber gasket,
4) remove rear wind screen complete with rubber gasket,
At this point you will basically be ready to begin removing the headliner
proper. Observe how it is installed. If you have a digital camera snap a
bunch of images. Now begin removing it:
5) peel the liner carefully off the lip of the rear window opening (where
you will find it glued),
6) ditto front window opening,
7) work your way along each side edge of the headliner. You'll probably
find a combination of staples, brads, glue. Note all this carefully because
you'll be there again pretty soon with the new headliner, trying to achieve
a tight, wrinkle-free installation.
8) once the front, rear, and both sides are free, you are at last ready to
remove the cants (cants are the metal bows that hold the headliner up into
position). The cants are in sleeves in the headliner, and at each end of
each cant is a metal clip that fit into a bracket welded to the inside of
the body just above the door openings.
9) starting at either the front or the rear, you will now be able to grasp
the cant through the loose fabric of the headliner and actually rotate it
back towards the center to the car and downwards. Once in this downward
"sagging" position you'll be able to lift each of those clips up and out of
the bracket. Pay particular attention here!! Each cant has it's own
particular clips. The clips are NOT interchangeable among the various
cants, and the cants are not interchangeable among the various sleeves.
Keep the digital camera at hand and proceed with care. Mark everything so
you know which cant goes in which sleeve, and which clips go with which
cant.
Once you have the cants and clips free, then the headliner is also free. I
recommend laying the old headliner out on a table or flat surface, and
installing the cants and clips back into it...and make them secure so things
don't fall apart. Keep it all together until the new headliner is ready to
be installed. Which ain't yet, by the way.
There'll undoubtedly be lots of clean-up to do. The jute matting that is
glued above the old headliner is probably history. I replaced the jute
stuff with that self adhesive "black rubber" sound-deadening mat (Dyna
Matt?) above my new headliner. It worked OK, but I made the mistake of
using every piece of the mat (it's not cheap stuff!), cutting it into small
pieces to fit here and there. I now recommend against this approach. Buy
as many mats as you need, but only install it in longitudinal pieces that
span at least two cants. Even though those mats are self adhesive (and as I
recall I also used 3M spray adhesive in an attempt to achieve maximum
overkill), I have suffered some of the smaller pieces coming loose. Not too
cool.
15.6.1 - Headliner Installation for the MKVII and MKVIIM ( Alan Schultz,
July 8, 2008
)
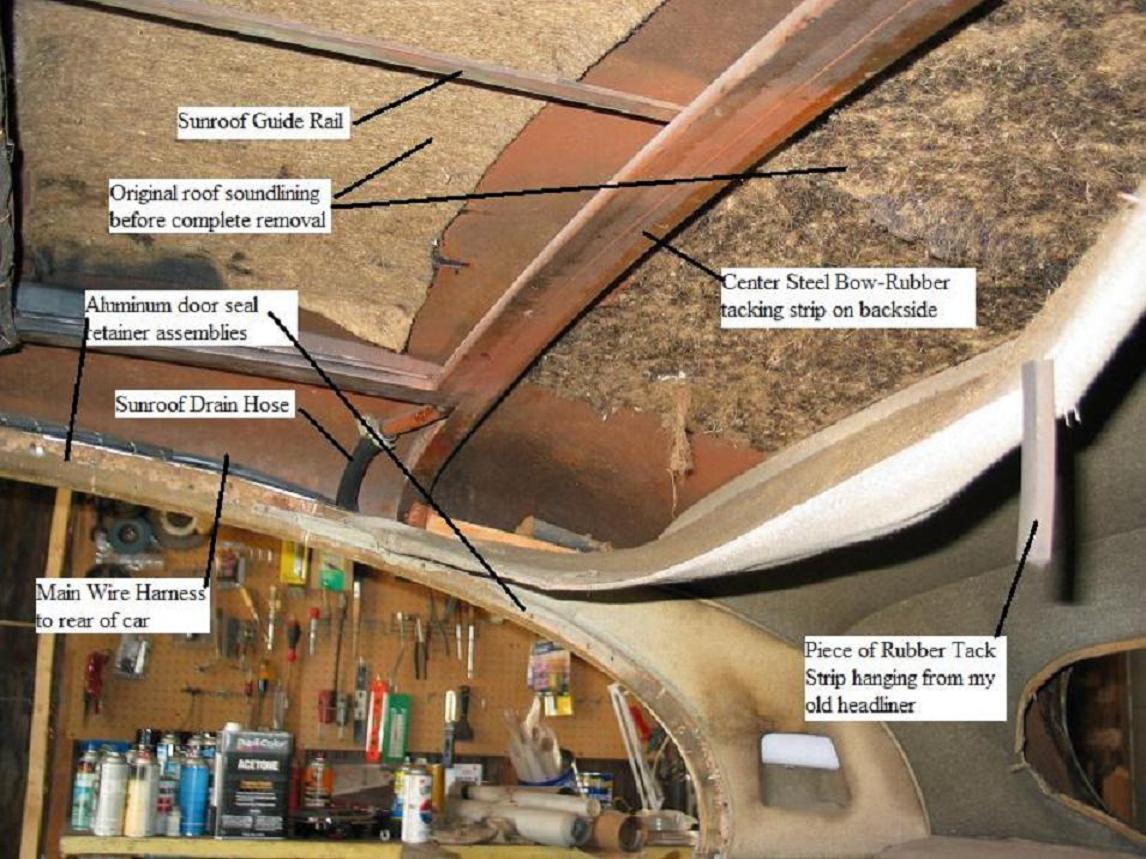
Picture #1 - Roof layout
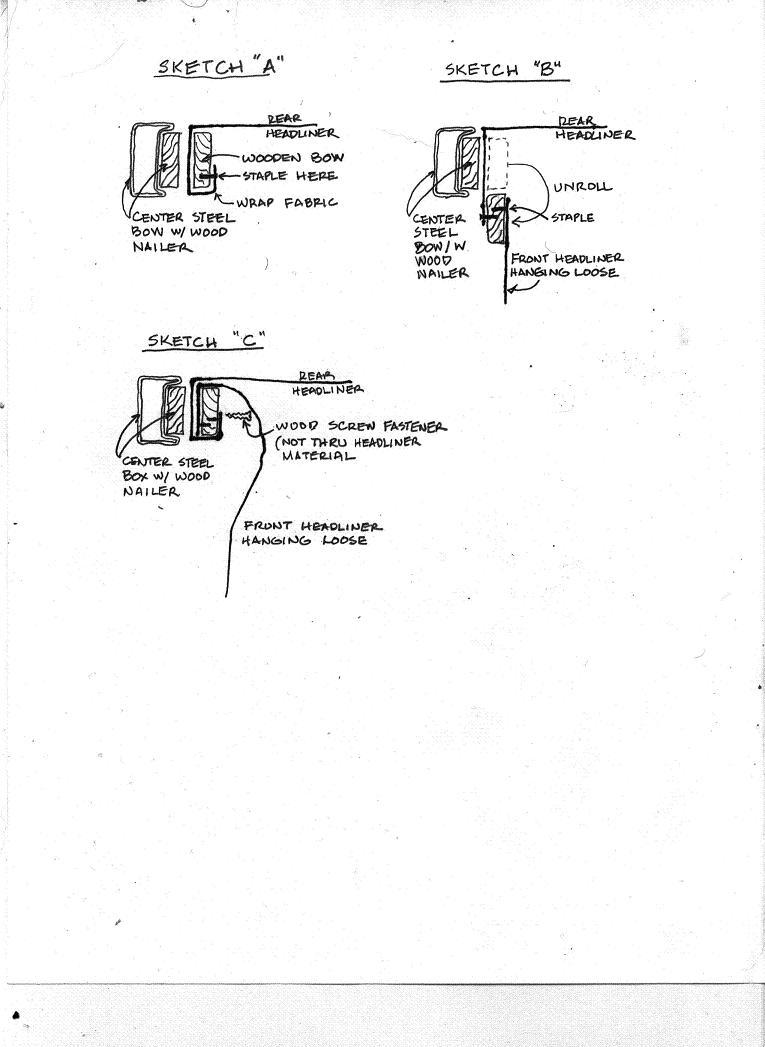
Sketches A.B,& C: Sketches of how the headliner is stapled to the wooden bow follow

Picture #2: Picture of headliner for a MKIX. Same for a MKVII
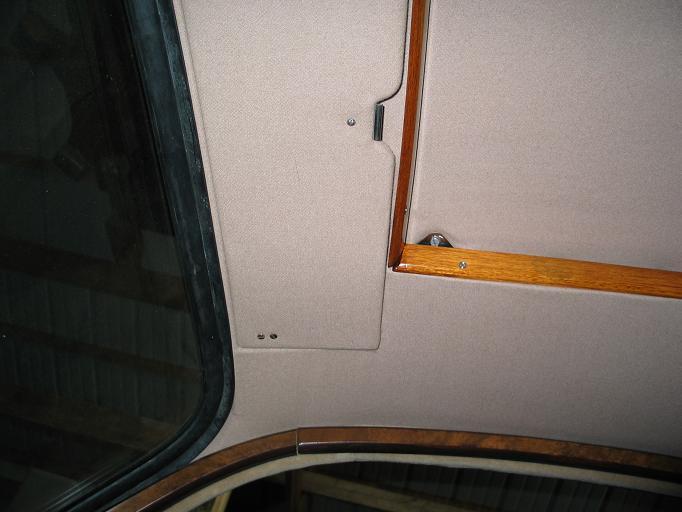
Picture #3: Headliner detail for step #19
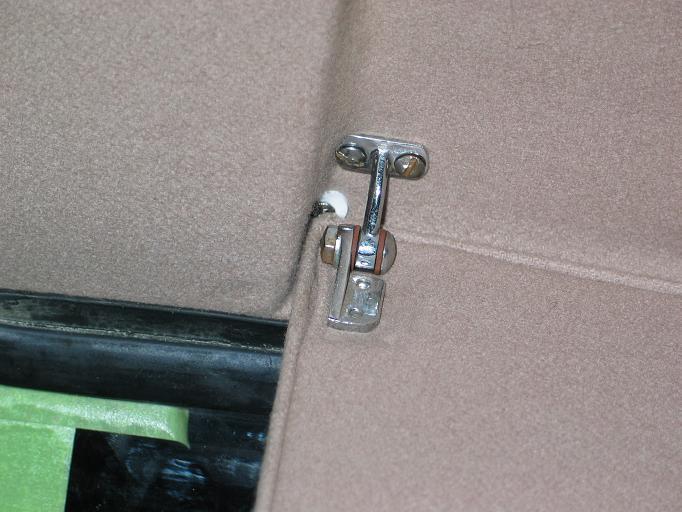
Picture #4: Sunvisor detail for step #23
|
Jaguar Headliner Installation for MKVII and MKVIIM
(May be applicable to the MKVIII, MKIX and MKX) by Alan Schultz 7/8/08
List of Materials:
1. Four (4) boxes each of medium and small size spring clips.
2. Spray can of 3M #8088 adhesive.
3. High quality sharp good cutting hand scissors.
4. Heavy Duty staple gun.
5. Box of Ľ” leg heavy duty staples.
6. Tacks similar to the ones removed when original headliner was removed.
7. Headliner materials.
8. Three or four large “C” type vise grips.
Before beginning the installation:
* This is the time to replace to rotted drain hoses for the sunroof.
It also would be best to install the new wire harness at this time (if needed).
* Check all tacking strips. They need to be in excellent condition. Replace the
strips with new plywood pieces if required.
* The nailer strip installed on the center steel bow is rubber and is very hard.
Remove it and replace with plywood or do as I did and steam bend a piece of
straight knot-free pine to conform with the steel bow’s contour.
* Add sound lining to underside of roof where desired. I used 2 coats of 3M #8088
adhesive sprayed on both the sound lining felt and the metal.
* Install the sunroof (if it was removed). The center guide rail must be bolted
to the center steel bow which will not remain accessible for long. See picture #1.
You are now ready to start installing the headliner!
1. Determine which flexible steel bow and which end of each match the mounting holes.
This is important since it determines the position of the bows when installed.
2. Insert the bows into the sleeves of the headliner
3. Offer up either bow and fasten at each end. Don’t tighten yet, leave a little play.
4. Offer up the second bow and do the same.
5. There should be excess headliner material bunched up at each end of the both bows.
Carefully cut the stitching at the ends so the bunching is eliminated. Try to snip
the same amount of stitching on each side so headliner is centered. Pull the
headliner to the sides to see if enough stitching has been cut to allow the material
to be pulled tight and sagging eliminated.
6. Now gently pull the headliner to the rear window opening. Leave the material sag
loosely. Use spring clips to hold the material at the top of the window opening.
7. Now staple the rear headliner and the front headliner to the loose wooden bow
which you should have saved after it was removed with the old headliner.
Note how it fits up to the center steel bow. Refer to the following sketches
showing the step by step procedure for completing this task.
Sketches of how the headliner is stapled to the wooden bow follow:
8. See sketch “A”. Wrap the front edge of the rear headliner material over the
loose wooden bow. Don’t staple yet. Place the wrapped bow against the center
steel bow. If there is slack pull on the fabric to tighten. Don’t pull too
hard against the two steel bows. Pull the material to the sides as well
to tighten the material. Clamp the wrapped bow to the center steel bow with
a couple vise grips.
9. Now pull the rear headliner material tighter to the rear window opening.
When the material is taunt and sag free. Place many spring clips at the
rear window opening to hold the headliner in place. Pull sides of headliner
so wrinkles disappear. If it looks good, you are ready to staple the fabric
to the wooden bow as shown in Sketch “A”.
10. Staple the fabric to the wood bow.
11. See sketch “B”. Unroll the wood bow and attach the front headliner fabric.
12. Reroll the fabric and wood bow, place on center steel bow and clamp in place.
Note: Lift front headliner material so that wood screws can be driven through
the wood bow and into the wood nailer in the center steel bow. See sketch “C”.
13. Unfasten the headliner from the rear window opening and carefully apply 3M adhesive
to the edge of the headliner. Masking areas with tape and paper to avoid spraying
areas where adhesive isn’t desired.
14. Pull headliner tight and press onto adhesive. Careful to avoid wrinkles. Put
many spring clips on the assembly and let the bond cure for several hours.
15. Picture #2 shows the rear and front headliners in place.
Picture of headliner for a MKIX. Same for a MKVII.
Pull the sides of the rear headliner to the tack strips above the rear doors
and staple. Note: I found that the 1/4” staples are only sufficient to temporarily
hold the headliner in place. In a later step, I tacked the material in place to
securely anchor the material.
16. Next is the front headliner. If your vehicle has a sunroof, the headliner will
need to be cutout for the opening. Pull the material over the opening and mark
with dressmakers marker or some such. Don’t cut on that line! Leave at least an
extra 2” of material. You don’t want to cut the opening too large and ruin headliner.
Excess material can be trimmed later.
17. You’ll need to cut at the corners of the opening to allow the material to conform
to the opening. Don’t cut too far; the material will have some stretch.
18. Pull the headliner to the sunroof opening and upwards. There should be a tacking
strip on all four sides of the opening. Staple the fabric to this tack strip.
Note: I found that the 1/4” staples are only sufficient to temporarily hold the headliner
in place. In a later step, I tacked the material in place to securely anchor the
material.
19. Work your way along both sides and staple the headliner to the tack strip above
the door and the tack strip on the sides of the sunroof opening. As you work
along check to make sure the headliner is tight and without wrinkles. See Picture #3.
20. Where the headliner is to be attached to the “A” pillar. Use a strip of double faced
tape to hold the material to the steel pillar.
21. Staple the headliner at the front of the sunroof opening.
22. Now pull the material to the front upper edge of the windscreen opening and spring
clip in place.
23. If you have recessed sunvisors, I wish you luck. I had to screw the corners of the
material in place with #4 stainless steel screws and finishing rings. See picture #4.
24. Once you are satisfied with how the front headliner looks at the “A” pillars, recessed
sunvisor pockets, the sunroof opening and the front clipped edge, you are ready to begin
using the 3M adhesive to attach the material.
25. Apply adhesive to the inside edge of the wind screen opening only and headliner fabric.
26. Stretch and stick to the inside edge of the opening. Clamp with spring clips and let cure.
27. After curing remove the spring clips and carefully trim the fabric so there is only about
an 1/8” of fabric that will fold over the windscreen lip.
28. Apply 3M adhesive to the remaining 1/8” of fabric and the outside lip of the windscreen
opening.
29. Fold over and clip in place.
30. Go back over the installation and remove any wrinkles. Try the wood trim moulding over the
doors to see if the staples and/or tacks are hidden from view. Remove those that show after
tacking the headliner in place.
Good Luck, Go Slow, Be meticulous and you’ll get a satisfactory installation,
Alan Schultz
1951 MKVII
alan@andysnet.net
|


