| ||||||||||||||||||||||||||||||||||||||
| ||||||||||||||||||||||||||||||||||||||
|
Jaguar XKE Tech Tips The following tech tips were compiled from the member's of e-type Digest from jag-lovers.org. There are no implied guarantees. These suggestions are from other XKE owners on how they solved similar problems or challenges and may illustrate varied and occasionally contradictory conclusions to the same problem. Please forward any questions, comments, criticisms, or suggestions to mhicks@mathe.com. Commercial use is strictly prohibited. Ó Copyright 2000 by Mark Hicks. Legal Restrictions Body Interior
& Exterior
Stripping of
the IRS When I redid my IRS I used chemical stripper
(nasty stuff). You let it sit for 30 minutes and wash it off with a garden
hose. Always a good idea after to sprinkle some baking soda on it to neutralize
any left over acids from the chemical stripper Altering the
Dash Fold-Down for easy maintenance Dash fold down- I replaced the screws, which
hold the plastic bezel strip to the bottom with two thumbscrews (6-32 aluminum,
small heads, available in those hardware assortments at hardware stores), one
at either side. This makes removal of the plastic strip very quick and easy,
after which the panel swings down quite nicely. I did see one fellows 'E in
which his new wiring harness was a little short at the fuse blocks, so lowering
the panel completely caused a wire to unplug - you may want to check for this
problem before you fully open the panel. Some one along the line of owners of my car
have made the soft molding under the center section removable with this removed
the indicator strip clears the top of the radio console. Simply return the dash
and screw down the two screws then slide in the soft molding. Refinishing
the Wooden Steering Wheel One Method I just refinished my series 2 steering wheel
a few months ago and bought a clear varathane spray in a black can from Home
depot. To refinish I sanded the old varnish off, glued the cracks (lots) with
yellow carpenters glue (binding with reversed electrical tape after the glue
was in) and then lightly sanded again and then sprayed numerous coats after
masking the spokes. I lightly sanded after the first two coats and then
realized this was not needed. The wheel took on a darker colour and looks very
professional! Another
Take The two
series I cars I have owned (one from new) did not have any stain applied to the
steering wheel wood. I have found that the polyurethane finishes are the only
finish tough enough to stand up to general use - rings on fingers, high salt
from sweat. These finishes have no color as does spar varnish. Headliner Replacement First Method Fitting a new headliner is a really
interesting way to spend a spare hour or two. The simpler alternative is to
have the car converted to an OTS. I used the foam-backed woolen headliner from
BAS (no it doesn't add any torsional rigidity) and fitted it single-handed,
although that's only because my wife had run out of sympathy for me. You have several problems but the main ones
are: 1. how to get stick it on square so that you
don't run out of material at one corner; 2. how to stick it on with out getting any
bubbles it in; and 3. how to stick it on without inadvertently
sticking it to itself. I used contact cement so this was a definite
possibility. First I marked centrelines on my roof
(inside, of course) using chalk. Then I marked the lateral centreline on the
foam side of the headliner using a permanent marker. I also marked the mid
point of that line. Next I applied contact cement to a strip about a foot
(can't remember exactly) wide along the line on the fabric and the
corresponding line on the roof. This is where the fun starts. Now you climb
inside the car with this large piece of fabric draped over your arms,
supporting it along its centreline. You offer it up such that it first touches
the roof at the centre point (with one hand) while making sure that the
lines are in line as they run out to one side of the car (with the other hand).
Working from the centre point, gently smooth the fabric onto the roof towards
that side of the car taking care not to stretch the fabric. Repeat for the
other side. You should now have a double curtain hanging across your car and
your pulse should be starting to slow. The rest is relatively straightforward: just
apply more contact cement in strips parallel to the first and gradually work
your way rearwards and then frontwards. Two tips: Don't press too hard (if you
force contact adhesive into the cells of the foam you'll end up with permanent
depressions in it); and don't go right to the sides with the adhesive (leave
some slack to play with while you trim off the excess and prepare to tuck the
edges in. It's rather like hanging wallpaper on a low ceiling, only much more
expensive, and in fact I used a wallpaper-hanger's brush to smooth out the
fabric as I stuck it in place. Second Method If the 2+2 headliner is the same as the FHC
then I assisted a professional trimmer with the fitting of mine. The FHC
replacement liner (from BAS) is a thick (1 inch?) foam pad with the wool lining
material already pre-glued to it. After a trial hold in place to establish
that the size was correct and which was front and back, the following procedure
was adopted- Find the centre point of the roof panel by measurement. Mark half
way along each side of the panel and join these points with pencil. Where your
lines intersect is the centre point. Do the same with the replacement liner to
find the centre point of the foam. Coat the roof panel and the foam pad with
contact adhesive. The trimmer used a commercial adhesive which he sprayed with
a compressor and spray gun. The adhesive he used grabs if dry but does allow
some movement when still moist. Pick up the liner and locate the centre point
with your index finger from the wool side. You will have the liner draped down
your arm with the centre point at the tip of your finger. You will need help to
hold the liner so that the adhesive coated surface of the liner does not adhere
to itself. Probably you need to be positioned in the car and have the liner
handed to you. Bring the centre points of the liner and roof panel together,
ensuring that the liner is oriented correctly (front, back etc). Then
progressively smooth the liner onto the roof panel working from the center
outwards. The edges should tuck under the side rails but you may have to trim
off a little. I was going to attempt this myself but even though the trimmer
made it look easy I'm glad I didn't. Took him about 30 minutes. Carpet
Replacement/Installation Replacing
Carpet First remove the driver and passenger seats.
Then remove the radio housing and the console panel. The old Carpets were glued...had
to tear out and laid aside of the car. Use a good adhesive remover...must not
remove any paint. Use Rustoleum Primer on the metal floors and all surfaces to
be covered by the carpets. Layout the carpets in the car without any
adhesive....some pieces may have to be trimmed. Use a carpet cement, not
contact cement and this will allow you to move the piece around for final
position. Have plenty of patience....and I started from the rear forward. The
project took me about 24 - 26 hours, yours may take longer. DO NOT RUSH THE
JOB...TAKE YOUR TIME.....NEVER LOSE YOUR COOL. Converting a Coupe/2+2 to a Roadster
The Driver's Seat - Conversion kits for Coupes & 2+2s - http://www.drivers-seat.com (Kits run between $5,500 and $5,900 and
require significant professional bodywork usually running around $3,000) Martin Robey - Converting using original parts - http://www.martinrobey.co.uk/info/ (Cost varies depending on what
panels you need. Only for the expert body worker and mechanic.) Bull Market? Yes, I actually have a video from the
company that does it (somewhere). The installation seemed fairly
straightforward. However, in my opinion this conversion was a
"bull-market" phenomenon. I believe that you can get a reasonable OTS
series 1 for less money than the all in cost of this. The car will be worth
very little after this is done. I know of some unscrupulous dealers that
converted V12 coupes into convertibles and sold them overseas as the real
thing. Neutral While I am not pro or con on this issue
since the chassis is the same and it can be argued that you have not really
done anything bad to the car, just moved some production figures around, I
would like to comment on the salability. I have a 1970 2+2 and I have considered this
conversion because it has the ability to be made into a Phyaton since you can
conserve the 4 seat configuration. The actual fact is that the 2+2 is the ugly
stepsister in the minds of most lovers of the E-Type. Personally I don't agree
and prefer the look of the 2+2 windshield, that's why I bought it. Con The cost of conversion is very high, and is
pretty much irreversible. And in five or ten years, when you are looking for a
replacement top, the company that made the kit had better still be around. You would do better to sell the car, and buy
a real OTS. And you would preserve a beautiful 2+2 in the process. Pros & Cons I have both a FHC and a roadster, parked
side by side in my garage, so I can compare the beauty of the cars every day if
I was so inclined. The funny thing is that one day I might feel the coupe is
prettier, the next day I might think the roadster is. I have a factory hardtop
for the roadster, which gives it a dramatically different appearance. I sometimes drive the roadster one-day and
the coupe the next. The coupe is a far more practical everyday driver, roomier,
and more tolerable in cold or bad weather. Ah, but on a warm, sunny day,
nothing beats a roadster! The bottom line is that we are all
different, see things differently, and have different needs. It's ridiculous to
try to talk absolutes on something so subjective. On the subject of chopping a 2+2, I have to
agree with the others who have said that it's probably more financially sound
to sell the 2+2, and get a real roadster. In the end, it would probably cost
the same. Leave the 2+2 intact for the many people that want one. Pros & Cons (From one of the
conversion vendors - you can figure out which) I'm tired of misinformation about my true
loves (XKE's and car work). I'm a bit familiar with XKE and XJS conversions
(change from closed to open car configuration) and want to supply a few words
about conversions: There are at least 3 separate conversion
activities I know of. 1. Converting via partial body disassembly and
thence replacement with "original" (read Robey) parts (only common
with 2+2's). 2. California conversions AKA Miami Tops.
Partly fiberglass. (only 2+2's) 3. Driver's Seat (started in Georgia, owned
by Bob Boston, and then sold to Drivers Seat of Delaware, Inc., which is a
different company and different management). Bob Boston started it to capture
an opportunity created by the bull Jag market. Drivers Seat of Delaware now
does work aimed at quality, 'original look' conversions and restorations of XKE's,
and also offers a unique XJS conversion product. Drivers Seat kits are available for all
series E types, and certain applications now result in a car which is virtually
indistinguishable (except for Very Very close scrutiny with disassembly or vin
plate inspection) from an 'original' OTS. These cars are Series 1.5 and 2
coupes, and series 3 2+2's. Early kits did not use a standard rear deck or rear
deck hinge arrangement, and some of the top frames and other details were a bit
more primitive than the originals. All of the early kits used an ABS plastic
for the compartment behind the seat in 'long door' conversions rather than a
steel assembly and used pneumatic struts to raise the rear deck lid. The kits now use standard OTS tops, rear
deck lids, windscreens, side windows, trim, etc. The top frames, rear lid latch
and brackets, and rear deck lid hinges are copies of the originals. The cloth
tops are standard, commercial OTS tops of Stayfast cloth (NOT VINYL) material.
The convertible from a series 1 2+2 uses a non-standard top which is like a
series 3 top but tapers an extra inch toward the front because the series 1 car
takes a stock series 1 roadster w/s. The 'short door' cars (read coupes) can be
finished with tall or lowered door profiles, the latter providing an OTS look
indistinguishable from the original. (Early roadster doors are built up exactly
like the coupe doors, but a shorter top piece is spotwelded onto the main part
of the door skin.) There appear to be three common situations
for doing the conversion: 1. Person has a good, sorted out car (they
are not easy to come by) and wants to have a good, sorted out convertible (they
are very difficult to come by). Many 'original' OTS's got a lot of makeup in
the bull market days and are bondo timebombs; some others just need a lot of
work (expense). (A real pro clobber job is very hard to detect until the rust
blooms through or the car starts to break in two.) Often, that's why people
sell the cars. 2. Person does it for profit motive.
Envisions buying a car for $3000 and selling it for $30000, This is a dream,
and someone is going to wake up with a hangover. The kits are $5500 (when on
sale, otherwise $5900), installation is $3000 (in our shop) and a paint job is
additional $2500 or so. A DYI can save a lot of the labor costs, and the only
long costs in painting are about $1000 in materials (abrasives, fillers,
sealers, surfacer-leveler, and basecoat/clear coat). The DYI still has to do
the work, which can be fun for a hobbyist or a chore for daily bodyshop worker. 3. Person wants a special car. Example: A 6
cyl 2+2 E-type makes a great handling beautiful car (see the one on the web
site Http://www.drivers-seat.com) It has the lithe feel of the lighter cars,
but has the roomy interior of the 2+2 or series 3 cars, the stability of the
longer wheelbase, the great inexpensive reliability of the 6 cyl motor, etc. I
personally love these cars. The best time for conversion is when the car
needs a paint job or some bodywork because the incremental cost of conversion
is more modest, and the result is very nice. Best way to do it is remove seats
and carpets, as well as tank, etc., gut doors, paint inside of car, insides of
doors, inside hidden regions, etc. while doing the conversion, finish
conversion, paint outside of car, and then reinstall the interior (seats,
carpets, console. Pros & Cons (Also from one of the
conversion vendors) First, Just like any other constructive
sheetmetal fabrication work, one could in principle convert an open car to a
closed car. I don't know of anyone who has done the conversion back to closed
car configuration. People want the open cars (in fact, over 300 have converted
their closed E types to open cars. Prices of open cars clearly reflects this
preference.) The second part is more complicated than you
might think. The drop you allege in the resale value of conversion cars is
quite different that I have heard. Resale value of these cars appears to be
more affected by condition, exact series of car, nature of buyer, and
situation. Remember, there are a lot of variables and wide range of price
fluctuations in these cars. Common sales prices of E types has dropped nearly a
factor of 2 in the last 10 years, near-show condition cars went from the
$90-$60K range to $30K. Basket case vehicles went from about $6000 to about
$3K. Some reasonable 2+2's are now worth less than the price of a kit.
Incidentally, converting a lousy car to a convertible makes a lousy car that is
a convertible. Also, beauty is in the eyes of the beholder.
If someone wants an open two seater (OTS) configuration XKE with the roomy
interior of the series 3 car, but wants the lithe handling and
simplicity/reliability of the 6 cyl cars, then a conversion is literally the
only way to go. Some of these have won prizes at shows and fetch good resale
money/offers, but a jag purist might rather walk along the road than ride in
such a car. Many converted cars have sold for
substantial sums, and others not, depending on situation and conversion
quality. E type conversions have varied greatly in quality, too, and that is a
factor. Some converted cars are virtually indistinguishable from a factory OTS;
others are butcher jobs, some using fiberglass or non-stock parts. If the only purpose for the conversion is
investment, I wouldn't recommend that you do it. Stock market, etc bring better
returns. If you want to make your 2+2 into an open car, then a conversion is a
good way to do it. Pro Because most don't agree with me on the
beauty of the 2+2, the value of your car will go UP after the conversion. Only
someone looking for a concourse car will find it undesirable. There are so many
people looking for a roadster that you will be able to sell it easily, but not
at an "original roadster" price however well above what the 2+2 would
bring. Since OTS sell for 25K AND UP and 2+2s sell
for TOPS 15K there is alot of room there for improvement in selling price and
the conversion can be done for 5K if you do all of it yourself. I have been told that a Phyaton (four-seat
convertible) would actually bring MORE than an OTS if you could find the right
buyer since NONE of them were built. Look at the price of the convertible
conversions of the early XJS which was never made as a convertible until later
in the series. Upholstery - Leather Rejuvenation & Maintenance Hyde Food I have heard of a treatment for old leather
that a few restorers swear by. You take a jar of Jaguar Hyde Food and heat it
in a microwave until it's warm and very soft. Almost a liquid. Then using a
soft brush apply the liquid to the leather. Let it sit over night. Then reapply
again. Repeat several times until the leather is back to how you want it. I
can't verify that it works myself, as I haven't tried it yet. Still waiting for
the car to arrive. But if your only choice is to replace the leather it might
be worth a try. NeatsFoot Oil I have used neatsfoot oil on all my leather
goods (saddles, ball gloves, old furniture,etc.) for years. If applied
regularly it will keep leather from dry rotting or getting hard. The downside
is that it is oil so it will remain oily on the surface for some time if left
as applied. On old leather that has hardened I do the following: Apply several
times to the surfaces with a saturated (in neatsfoot oil) cloth waiting an hour
or two between coats, leave overnight and apply one more coat the next day, on
the third day check the leather to see if it has softened (everything I ever
tried was soft by the third day), use a mild soap and water solution to remove
the oil from the surface, treat with one of the popular "hide foods"
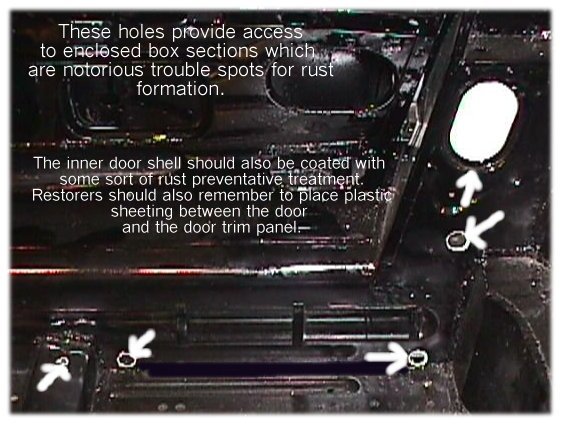
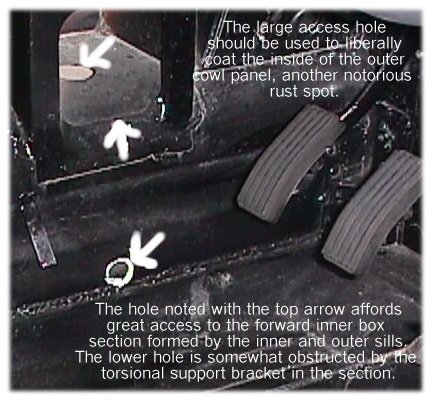
to seal in the oil. One Method The photos below are recommended areas for a
rust preventative paint/treatment.
Another Method FOR DETAILED RUST-PROOFING AREAS AND STEPS, CLICK HERE.
Windshield (windscreen) glass Installation Chrome Piece over Rubber
seal The chrome piece is held in place by the
rubber seal. There are '' lips'' on the top and bottom of the seal that overlap
the chrome and hold it in place. If you do not have this then the seal is
backwards and the ''lips'' are in towards the cockpit. Just pull the shield and
reverse the seal. Use glue to help hold it in place. Keepin' that top sealed on
an OTS. If you hang upside down and press your face
firmly into the windshield wipers from the outside of your OTS, you can easily
see the seal between the wind-shield and the top. When it rains, this is where
it pours. Next, if you lay the top (hood in some parts of the world) back, you
can see that the rubber seal is almost square, and is slid into a recess in the
top. When most people install this seal, they just push it all the way in and
glue it in place. Then they bitterly compalin when the rain gets pushed up the
wind-shield at highway speeds and soaks their clothing and instrument panel.
That need not be. Close but do not clamp down the top. Tilt the front most
panel of the top to the angle it will sit when it is clamped down. Then slip a
piece of paper between the top and windshield. The seal should just touch the
windshield at an even pressure all along this line. If not, pry the square seal
out a bit, or push it in a bit until it is 'even' all along the top of the
windshield. Drain Channels I have removed the door trim on my 65 OTS on
the Right Hand Side (when you stand at the back and look forward). When you
look at the inside of the door, after removing the plastic, the two apertures
(holes) at the bottom being the wide hole on the left side and small one on the
right have plates pop riveted to the top of the aperture with the plates being
bent to go through the aperture and rest against the far side of the door at
the bottom. The plates are as wide as the holes. I presume they aren't original?
What are they there for (channel water?) I intend removing them by drilling out
the rivets as they are blocking access to bottom of the doors, which need rust
proofing. One Option You and I are in the same position except I
am trying to buy the drain channels. These are needed to channel the rain-water
from inside the door past the door sill seal (that presses against the door
when it is closed. I would suggest you take them out, do your rust-proofing and
then replace them ensuring that they offer a clear path for the rainwater! Tool for Installing the
Glass into the seal The following tool was made using Sears
Cotter Key Puller, catalog item #4319. It can be used to lip the rubber seal
over the windshield by either working from the front or by working the tool
underneath the glass to push the rubber behind it.
Polish from the beginning of the cork screw
to the tip using a polishing wheel. Any rough spots, including too sharp a tip,
are apt to scratch the glass. This tip is copyrighted by ©
1998 Steve Kemp. All rights reserved. For free publication and distribution on
xke-lovers and related not-for-profit Internet sites, and by permission only.
|
|
| ||
 |
Improve your Jag-lovers experience with the Mozilla FireFox Browser!
©Jag-loversTM Ltd / JagWEBTM 1993 - 2024 All rights reserved. Jag-lovers is supported by JagWEBTM For Terms of Use and General Rules see our Disclaimer Use of the Jag-lovers logo or trademark name on sites other than Jag-lovers itself in a manner implying endorsement of commercial activities whatsoever is prohibited. Sections of this Web Site may publish members and visitors comments, opinion and photographs/images - Jag-lovers Ltd does not assume or have any responsibility or any liability for members comments or opinions, nor does it claim ownership or copyright of any material that belongs to the original poster including images. The word 'Jaguar' and the leaping cat device, whether used separately or in combination, are registered trademarks and are the property of Jaguar Cars, England. Some images may also be © Jaguar Cars. Mirroring or downloading of this site or the publication of material or any extracts therefrom in original or altered form from these pages onto other sites (including reproduction by any other Jaguar enthusiast sites) without express permission violates Jag-lovers Ltd copyright and is prohibited |
|