|
Experience
in a Book
Electrical
System (continued)
Windshield
Wipers
WINDSHIELD WIPER MOTOR: The housing of the wiper
motor consists of a cylindrical can with covers on each end.
The cylindrical can has a notch cut at one end to form a
drain hole to keep water from collecting inside the motor.
Unfortunately, the drain hole is not at the bottom! To
correct the problem, Jaguar provides a plastic cover over
the motor to keep water from getting on it.
If you have trouble with the wiper motor, proceed as
follows:
1. Mark the housing before taking it apart. The
parts must line up the same way when reassembled. Also,
mark where the bottom is as installed in the car.
2. Clean up the internal parts, especially the
brushes, which tend to jam when they've been wet for a
while. Make sure the brushes slide freely.
3. Cut an additional notch in the housing, this time
at the bottom.
4. After reassembly, it wouldn't hurt to cover the top
of the motor with aluminum tape (available where air
conditioning supplies are sold -- it's used to seal
ductwork) to help prevent water from getting in.
Herman Green adds his experience: "I took the motor apart
and found that one of the magnets had come loose and had
jammed the armature. The magnets are glued in with what
seems to be some kind of silicone. Rust had crept under the
bond and it gave up. I marked the location of the magnets
with a file and measured the distance from the end of the
housing to the top of the magnet, so I could put them back
in the correct position. I also marked the magnets as to
their location and orientation. If they're put in wrong, the
motor will either run backwards or lock up. I then removed
the magnets and cleaned them and the inside of the motor
housing with a sanding flapper wheel in a drill motor. I
then mixed up some JB Weld and glued them back in place.
When gluing the magnets in, use a clamp of some sorts to
snuggle them in tight. If not, you may not be able to get
the armature back in! Once cured, I painted it with
rustoleum to prevent further rust, and put it back together.
Works great and should last a long time."
Of course, providing a new plastic cover over the
assembly would help for a while. Notice that the assumption
was made here that the original is no longer on the job.
Yes, it's junk. The aluminum tape in step no. 4 is likely to
be the prime protection in the long run.
Chuck Roach says: "I went to my Jag dealer to pick up a
new cover and the parts/service manager told me to forget it
and just use an old one-gallon plastic bottle and cut it to
fit and hold it in place with cable ties. Worked great. Will
probably last as long as the original." I disagree; it's
likely to last a good deal longer than the original.
By the way, if you're wondering where the original cover
went, you need to read about water
leaking in through the A/C system.
WINDSHIELD WIPER MOTOR DURABILITY: A design
problem with the Lucas wiper motor is that the drive gears
at the wiper arm shafts are plastic. Wear is a reported
problem, and can be aggravated by operating the wipers on a
dry windshield. It is suggested that the XJ-S owner use
Rain-X or similar product on the windshield on a regular
basis. This will make the water run off so the wipers need
not be used as often, and it will also make the surface of
the glass more slippery, so the wipers move more easily.
Note that 1987-on cars may be fitted with an Electrolux
motor; this unit has metal gears at the wiper arm shafts.
Stefan Schulz says "The parts guy at my local Jag dealer
says that it is not a drop-in replacement for the
Lucas one."
WINDSHIELD WIPER PARKING: If your wipers don't
park, you may be tempted to start tearing the wiper motor
apart to work on the parking contacts -- but you would be
forgetting that this is Lucas you're dealing with. As Mark
Roberts found out, the problem is every bit as likely to be
within the stalk switch. "Because the wipers would park in
intermittent mode, I was skeptical about the problem being
with the parking micro switch, but checked it anyway. Micro
switch was fine. The problem was traced down to the stalk
switch. In the off position, pins 5 & 6 (ULG & BLG
respectively) are supposed to be shorted together, to
provide a ground path for the motor. They are also supposed
to be shorted when in intermittent mode for the same reason.
On my switch, 5 & 6 were shorted in intermittent mode,
but open in the off position...no ground, no
work."
WINDSHIELD WIPER PARK POSITION: For some reason,
the XJ-S wiper pivots are symmetrically located, so the
driver's side wiper bumps into the windshield frame when
parked. To solve this, the official adjustment scheme is to
adjust that wiper to park up high so it doesn't hit the
frame, but it looks stupid -- and is right in the driver's
face. Just to make sure you're aggravated, the wipers park
on the right in countries where they drive on the left, and
vice versa; it's always in the driver's face.
One workable solution is to modify the driver's side
wiper arm to be shorter. This requires carefully unfolding
the sheet metal where it is wrapped around the strut, and
drilling out the rivet just above the spring attachment.
Then the strut can be cut about an inch shorter, drilled and
bent to form a new spring attachment, a new rivet hole
drilled, and then the strut can be reattached with a new
rivet (a pop rivet will do) and the sheet metal re-crimped
around the strut. A little flat black paint, and no one will
know the original design was so poor. With the shorter arm,
the left wiper can be positioned much closer to the bottom
of the windshield. Note that the shorter wiper will not
reach as far toward the top of the windshield either, but
this doesn't seem to pose a problem.
Another possible solution is to alter the wipers so they
park on the passenger's side. In the case of the later
Electrolux motor, Stefan Schulz says this can be done by
merely opening the motor gearbox and moving the park cam 180
degrees; it might be possible to make a similar change on
the earlier Lucas motor. Or, you could arrange to buy a
wiper motor from another country, or even trade with
somebody in that country who's trying to make the same fix!
You will need to purchase Jaguar wiper arms that have the
little bend the opposite direction. Of course, after all
this the wipers will still be just as obtrusive, but they
will be aggravating the passenger instead of the driver.
WINDSHIELD WIPER PARKING -- EARLY CARS: Mike
Morrin reports at length on the early XJ-S wipers: "The
wiper in question has a highly (over) engineered parking
facility where on the parking stroke, the blades go an extra
5 degrees or so, which pushes them off the screen onto the
chrome strip. In the parked position, the blades are on the
glass for about half their length, and on the chrome strip
for the other half. Definitely further out of the driver's
field of view than where you would put them on a normal
wiping stroke. The early cars had this feature; the pictures
in the pre-HE parts book and the service manual both show
the solenoid (although it is not labelled in the parts book
and the service manual calls it a switch).
"I suppose this was why they designed the car with the
wipers parking on the driver's side. It is nearly a good
design, suffering only from the poor thermal design of the
solenoid, and perhaps the parking switch should have been
operated by a cam on the driven gear, rather than by a
switch on the sliding link thingy.
"I should say that I am not sure when the wiper motor
design changed, but I think it might have been with the
introduction of the HE in 1981. I have heard that the early
Lucas unit was unreliable, and many cars have had the later
Lucas unit fitted.
"I found that the wipers did not park, did not run on low
speed and the single wipe facility did not work. I thought
it would be a simple repair, so I pulled the motor, even
without a service manual or wiring diagram. It was obvious
that the PO had pulled some wires off of the parking switch,
and after some further disassembly, I found that the parking
solenoid was fried.
"The parking solenoid was fried because it is designed to
be energised all the time while the wipers are switched off
and are not parked. The designer thought that this
period would be only a couple of seconds, and designed the
solenoid with thermal capacity for about 30 seconds.
Unfortunately, a little bit of dirt or grease in the wrong
place is enough to stop the solenoid pulling in all the way,
which prevents the eccentric gear mechanism from pushing the
wipers off the edge of the screen which means that the
parking switch doesn't get activated, which means that the
wipers keep going and going and..... fried solenoid.
"If you do have an early car (pre H.E.) with this
facility, if the wipers ever keep running after you have
turned them off, then put the switch back into the ON
position, or the solenoid will burn out within a minute or
so. Remove the wiper blades if it stops raining. If the
solenoid has not melted, the parking function can probably
be restored by carefully dismantling, cleaning and
reassembling the solenoid.
"At this point the PO had pulled wires until the thing
stopped, and then put them back (in the wrong place) so that
the wipers at least worked with the switch in the high speed
position.
"At the time I found that the parking switch is
adjustable, and by trial and error found a position where
the wipers would stop more or less at the bottom of the
screen when switched off, even with the parking solenoid
removed.
"This solution was almost perfect except that with the
blades fitted so that they parked at the bottom of the
screen, they did not wipe all the way to the passenger side
of the windscreen. It also bugged me that the system was not
working completely as intended. I lived with this secret for
12 years, until last winter the wipers decided not to stop
anymore, presumably because of wear somewhere preventing the
parking switch from being activated. I also found the old
fried solenoid in a box in the garage, and decided to
rebuild the system to original specification.
"I stripped off the old wire, and built up the melted
plastic core with epoxy filler, then filing it back to
shape.
"The solenoid is wound with 0.16mm (0.0063") copper
transformer wire. I didn't count the turns, but it does need
to be neatly layer wound, or you can not fit enough turns to
get the required magnetic pull.
"Anyway it works now, and I can look forward to rainy
days, safe in the knowledge that the wipers will park just
as their maker intended.
"Actually, the repaired system is inferior in respect of
the single wipe facility, as the system takes about half the
period of a normal stroke to move the the wipers through the
first 5 degrees, and you need to hold the switch for that
period of time."
If you're interested in upgrading an earlier car with the
later wiper motor, Scott Horner describes "the little Lucas
blue box modification - This plugs into the original wiring
loom and fits into any tight spot under the dashboard. This
was offered by Jaguar to make the windsheild wipers park on
Pre-H.E. cars, when used in conjuction with an H.E. wiper
motor."
WINDSHIELD WIPER ARM MOUNT: The wiper arms are
mounted on the shafts with a taper fit, held tight with a
nut that is covered with a plastic clip. However, the base
portion of the arm is made of aluminum, and a slight growth
or wallowing of the tapered hole is an occasional problem.
Contrary to expectations, this cannot be dealt with by
merely tightening the nut further. The nut bottoms on a
shoulder above the taper, and the arm remains loose.
This problem can be easily corrected. Cut a piece from
thin sheet aluminum (old real estate signs work great!) and
roll it into a conical shim. Installed between the shaft and
the arm, it will provide a tight fit.
Directly under this joint is supposed to be a piece of
rubber that looks like it might keep dirt and water out of
the bearing. If this seal is rotten or missing, you probably
won't wanna pay Jaguar for a new one. Reportedly, a visit to
a hardware store should provide choices for substitutes;
there are many parts shaped more or less like this, notably
in the plumbing stuff - valve parts and seals, etc. You
might have to do a little cutting.
WINDSHIELD WASHER: The windshield washer pump is
attached to the bottom of the washer fluid tank itself.
Believe it or not, it actually screws onto the tank. The
opening in the tank has a rubber grommet in it, and there's
a plastic nut on the inside held in place by three rubber
tangs on the grommet itself. The pump has a threaded inlet
end and is installed by rotating the entire pump, screwing
it into that nut and compressing the grommet.
This pump isn't all that unusual. Alex Dorne says, "It is
VDO part number V246 003, also found on:
Audi 100, '77-'92
BMW 3 series, '80-85
BMW 5 series, '82 - '87
Saab 99, '78 - '84
Saab 900, '78-'84
Volvo 300 Series (European) '82-'89
Volvo 400 Series (European) '87-96
VW Golf / Rabbit '81-'86
Most of these are prime wrecking yard material."
Another option: there are aftermarket washer pumps
available everywhere for just a few bucks. The one sold by
Wal-Mart, Wiper Mates #5101, actually has the same
electrical connector layout so the connector on the Jag
wiring harness will plug right on. Polarity is important,
but it is correct. Perhaps there is some sort of standard
here.
The only problem with these aftermarket pumps: The
recommended method of plumbing is to leave the original
toasted pump in place and just tee this new pump into the
line from it. Fine and dandy -- except that the primary
failure on my pump was the shaft seal between the pump and
motor, which allowed the fluid to drain through the motor
and out the electrical connectors. Leaving it in place was
therefore not an option, unless I could find a way to seal
it. Didn't like that option anyway, so I removed all that
junk and worked on connecting a pickup hose to the opening
in the tank.
A suitable grommet can be found at the auto parts store
on the rack of "PCV valve grommets". The one that fits a
1970-84 Toyota fits just fine. Next challenge: something to
fit into this grommet. My choice was a PCV valve!
They're cheap, so I just selected a plastic one, drilled the
big end open and let the guts drop out, and plugged it in;
it proved watertight. A 1/2" nylon tubing fitting would
probably work too. Of course, the fitting on the other end
is still pretty large, so stepping the hose size down to the
1/8" for the inlet of the aftermarket pump is still
necessary.
WASHER NOZZLES: According to Richard Mansell, the
single-post windshield sprayer in the center of the air
intake grille was replaced by two separate sprayers in
mid-1987. Unfortunately, Jaguar didn't see fit to change the
casting of the grille itself, so it retained a boss location
in the center even though it wasn't drilled and had nothing
installed in it.
Light
Bulbs
LIGHT BULBS: If you have WWW browsing capability
and a credit card, you can order whatever bulbs you're ever
likely to need from: http://www.stelcom.com/lamptech/auto.html
Thanks to Richard King for this tip.
BULB NUMBERING SCHEMES: Europe and the US use
different schemes to number automotive bulbs, but a lot of
the bulbs have equivalents. In Europe -- and in the Jaguar
manuals -- light bulbs (and fuses) are specified by a
three-digit number. Often, the manufacturer will be
indicated by letters preceding the number; for example, a
Unipart bulb may be number GLB 233, but it could be replaced
by any bulb number 233. While the Jag manuals often indicate
GLB numbers, I will endeavor to indicate only the three
digit number in this book.
Here in the US, automotive light bulbs are typically
packaged on cards in parts stores, clearly labelled by the
US number and "12V" -- but no clue at all about what
amperage or wattage they are. Sometimes, if you're real
lucky, you'll find the candlepower -- but that's only
loosely related to wattage. However, the parts stores will
usually have a book behind the counter that gives complete
data on the various bulbs available: voltage, wattage, life
rating, candlepower, filament shape, etc. The only thing the
books won't tell you is the European equivalent.
Of course, I try to actually be helpful in this book, so
I will endeavor to give US equivalents to the European
numbers where I have been able to figure them out. Note that
some of the data below includes the wattage as listed on a
specification sheet, often to two decimal places; rounding
is definitely in order for general use, especially since the
Jag bulb charts usually don't specify wattage closer than to
an even watt.
The specification sheets also give rated voltages for
automotive bulbs generally between 12.5V and 14.4V. On the
cards, these are all called "12V".
MINIATURE BAYONET BULBS: Miniature bayonet bulbs
are the flashlight-size bulbs with a cylindrical base with
two pins on the sides. They are sometimes simply referred to
as "bayonet" bulbs -- including in the Jaguar bulb charts --
but this is technically incorrect, since "bayonet" actually
refers to the larger bulbs of similar design such as most
taillight bulbs. 13-14.4V miniature bayonet bulbs available
in the US include:
|
NUMBER
|
WATTAGE
|
|
756
|
1.12W
|
|
1813
|
1.44W
|
|
1892
|
1.73W
|
|
1815
|
2.8W
|
|
1891
|
3.36W
|
|
1889
|
3.78W
|
|
1816
|
4.29W
|
|
1893
|
4.62W
|
All of the above bulbs are bullet-shaped; the glass
capsule is about the same diameter as the base. For places
where space isn't a problem, there are also the following
miniature bayonet bulbs with a larger spherical glass
capsule:
|
NUMBER
|
WATTAGE
|
|
57
|
3.36W
|
|
257
|
3.78W
|
|
1895
|
3.78W
|
|
293
|
4.62W
|
The 1895's are sometimes available in colored
versions.
If you visit a marine supply store, you will find an
assortment of high-power miniature bayonet bulbs. In
addition to reasonably-priced 12V5W bulbs, there are some
atrociously high wattage bulbs with proportionately large
glass capsules, up to 20 watts. There are also some halogen
bulbs in 5W, 10W, 15W and 20W, some of which are a little
odd-looking but they are all about the same physical size as
the tiny bullet-shaped bulbs. Some of them aren't even
labelled halogen, but rather labelled only for some
particular application, a depth finder or something. Of
course, you can tell they're halogen by the price. As a
bonus, all of the bulbs sold at a marine supply store are
corrosion-resistant for marine use.
FIBREOPTIC SOURCE BULB: This bulb is a miniature
bayonet type. The bulb charts in the Jag manuals list a 254
or 989, depending on which book you look at, and describe it
as 5 or 6 watt, again depending on which chart you believe.
254 is a festoon bulb, so that's wrong.
Note that 5 or 6 watts is high wattage indeed for a
miniature bayonet; the 6 watt is higher than any in the
chart above. Clearly, this particular application requires
some serious light. Either the 1893 or 293 listed above
probably fits the bill as 5 watts, meaning you'll get
satisfactory light. If the various things lit by the
fiberoptic source have always been too dim for you, though,
a visit to the marine supply store may be in order; one of
those 5W halogen bulbs might be just the ticket to liven up
that dash. Going to much higher wattage than recommended
would probably melt the fibreoptic unit housing, so don't
get carried away.
SIDE MARKER BULB: The side
marker is the light just forward of the front wheel on each
side, and the socket takes a miniature bayonet type bulb.
The bulb charts in the Jag manuals list a 207 or 233,
depending on which chart you look at, and describe it as 5
watt. This author's '83 was fitted with bulbs labelled 233
and 12V4W.
Several of the bulbs listed above would make suitable
substitutes. If you don't really care how bright your side
markers are, you can replace these bulbs with different
wattage bulbs; however, you need to be concerned about
whether the bulb failure sensors work properly -- see below.
These side marker lamps are monitored by the same bulb
failure sensors as the front parking lamps, and reduced
wattage bulbs may result in bulb failure indications on the
dash. If you wish, the sensors can be adjusted for the new
current level.
Judging from the typical condition of the original bulbs,
the corrosion resistance of marine bulbs might be helpful in
these side markers.
By the way, a piece of 5/16" hose may be helpful in
getting the side marker bulbs in and out.
CIGAR LIGHTER BULB: One bulb chart in the Jaguar
repair manual says the miniature bayonet bulb for the cigar
lighter (643) is 22 watt. I don't think so -- it should say
2.2 watt.
TURN SIGNAL BULB REPLACEMENT:
All the bulbs in the pre-1991 taillights and front turn
signal housings are bayonet type, although some are
single-filament and some are dual-filament. On the
dual-filament bulbs, one pin on the base is positioned
differently than the other to ensure you install it
correctly. For the single-filament bulb 382 (rear turn
signals and brake lights), use the US 1156 -- very common.
For the dual-filament 380 (front turn signals), use the US
1157 -- perhaps the most common taillight bulb there is. For
the taillights (smaller bulb on the outer corner of the
taillight housing), use US number 89 even though it's
slightly more powerful (8W) than the 5W number 207 specified
in the charts.
Another common -- and very similar-looking --
dual-filament taillight bulb is the US 1034. If you try to
use 1034 bulbs in the XJ-S, the indicator on the dashboard
may only light the first blink, or not at all, when you
operate the turn signals. This is the bulb failure
indication for the turn signals. Since the 1034 bulbs are
lower wattage, the reduced current causes a bulb failure
indication.
If you want brighter turn signals, J. C. Whitney
offers a 30/8W halogen 1157 bulb, catalog number 81xx0439B,
that they claim is 50% brighter than the standard 1157.
I was unfortunate in that the turn signal bulbs in my
front bumper had not burnt out in a long time. I say
unfortunate because the screws that hold the lenses on had
corroded and seized so badly they had to be drilled out --
four out of four, 100%. These screws were plain steel; since
it is probable that Jaguar originally fitted stainless steel
screws to these lenses, I may have been a victim of a
previous repair. If your screws are still removable, I
highly recommend you check to make sure they are stainless,
and if not to purchase four 10-32 x 1-º" Phillips drive
oval head stainless steel screws to replace them with. Even
with stainless steel screws, be sure to apply some
anti-seize compound when reinstalling -- the clip nuts are
not stainless.
Here in Bubbaland, 10-32 stainless steel screws are
difficult to find, so I replaced the elaborate clip nuts on
the bumper with conventional #10 clip nuts (available at
auto parts stores) and bought some #10 x 1º" stainless
steel Phillips drive oval head sheet metal screws at a
marine supply store. I never have to worry again about
getting them out.
BULB FAILURE SENSORS: There are bulb failure
sensors in the trunk up behind the lip on both sides, as
well as under the right side dashboard. The Supplement to
the Repair Operation Manual says there is only one under the
dash to serve the lights on the front of the car, but it
lies; there are two, one serving the front right and one
serving the front left. They all look the same: a small
metal box with three terminals. The current to a light goes
in one terminal and out another, heating up a conductor
inside. When it gets hot enough, a bimetal strip bends
enough to break the third connection to the dash indicator.
This is why it takes a few seconds for the indicator to go
out when you turn on the lights. If a bulb burns out, the
reduced current doesn't heat the bimetal strip enough, so
the indicator stays on.
If your dash indicator is staying lit for unknown
reasons, the first thing to do is check that all the lights
on the car are of the correct wattage; a lower-current bulb
can fool the units. Then, find each unit and disconnect the
indicator wires (WS) one by one until you find which unit is
keeping the indicator on.
If one of the units isn't working right, they can be
adjusted. There is a tiny screw on the box near the
terminals, sealed with a drop of glue. When you're
absolutely sure all the bulbs are working right, leave the
lights on for a couple minutes. Turn the screw clockwise
until the dash light comes on, then counterclockwise just
until it turns off. Be careful not to touch ground with the
tool used to adjust the screw.
There is a different type of failure sensor on the brake
lights, but it operates the same dash indicator. With the
ignition on, headlights off, handbrake applied, and the
brake pedal pressed, the indicator should come on; if it
does not, there's a bad circuit or bulb in the brake
lights.
The indication that a turn signal bulb has failed is that
the turn signal dash indicator just blinks once, or not at
all, while the functional bulbs on the outside of the car
continue to blink properly.
FESTOON BULBS: Festoon bulbs are the tubular bulbs
with a pointed connector at each end. Here in the US, they
are described as "SV8.5mm", 8.5mm being the diameter of the
connector at the end. In addition to the wattage, you need
to pay attention to the overall length measured from point
to point. There are at least two different length festoon
bulbs used in the XJ-S, 1.45" and 1.75". Sometimes festoon
bulbs are clamped at the ends, while other times they are
held by the points; in some cases below, I mention which
method is used.
BOOT LAMPS: According to the SICP catalog, the
XJ-S used miniature bayonet bulb number 989 in the trunk up
to 1982. From 1982 on it used festoon bulb number 239 (5W).
The overall length of this bulb is 1.45". The US 11004 is a
perfect replacement.
Note that the 1982-87 Hella boot lamp assemblies are not
symmetrical, although they appear to be at first; the bulb
itself is held closer to one side of the lens than the
other. The lamp should be installed so that the bulb is held
farthest away from the center of the trunk. This fixture
holds the bulb by the points.
The SICP catalog also seems to indicate that from 1987
on, the same lamp assemblies were used in the boot as in the
interior.
INTERIOR LAMPS: The Jag bulb charts say the
interior lights are either number 272 (10W) for early cars
and 254 (6W) for later cars. The SICP catalog, on the other
hand, offers 265 for cars up to VIN 100349 and 239 for VIN
100350 onward, corresponding to a change in the fixture
itself. 265 is apparently 1.75" long, while 239 (the same
bulbs as the boot lights ë82-on) is a 5W bulb 1.45"
long.
If you have an earlier car with 1.75" bulbs and want 10W
replacements, you can buy GE bulb number DE7576. There are
also bulb numbers 211 or 212 that will physically fit, but
the wattage is unknown. 211 bulbs are also available in
pretty colors, if you want to get tricky. 10W 1.75" festoon
bulbs are also available in marine supply stores.
If you have the later fixtures and a 5W bulb will do, the
11004 will work. If you want to try a 10W, there is also a
11005 available -- but you might want to keep an eye on them
that they don't melt the fixture.
The later lamps (all four corners of the interior use the
same fixture) clamp onto the ends of the bulbs.
ROOF LAMP: The bulb in the roof lamp is supposed
to be 10W, and is 1.75" long. The Jag bulb charts seem to
leave the number column blank, but SICP offers number 265
here. This atrociously expensive Hella fixture holds the
bulb by the points. The GE bulb number DE7576 is a perfect
replacement.
BACK-UP LAMPS: The books say the bulbs in the
back-up lights are number 273, 21W. You can also find
similar bulbs in 18W; close enough, especially if you
replace both together. These festoon bulbs have a total
length of 1.75". The glass portion itself is also much
larger in diameter than the connectors, giving it a bulged
look.
Either the 18W or 21W bulbs are hard to find in the US;
you will probably need to find a place that specializes in
import light bulbs. One alternative is the marine supply
stores, which carry a 15W bulb the same shape and size. Or,
you could substitute the non-bulged 10W 1.75" bulbs commonly
available and call it a day.
LICENSE PLATE LAMPS: The license plate lights
require festoon bulbs 1.45" long. The Jag bulb charts call
for a 254 (6W), but SICP offers the 239 (5W) for this
application. If 5W is acceptable, the 11004 bulb will serve.
You can go up to the 10W 11005, but I'm betting you'll melt
the lens.
CAPLESS BULBS: What the Europeans call a capless
bulb is called a wedge bulb in the US. Capless bulbs have no
base at all; the bottom of the glass capsule itself is
formed into a flat edge and the conductors coming out of the
capsule are wrapped around the edge.
The following is a chart of some US wedge bulbs,
13-14.4V:
|
NUMBER
|
WATTAGE
|
|
658
|
1.12W
|
|
160
|
2.66W (long life)
|
|
161
|
2.66W
|
|
158
|
3.36W
|
|
184
|
3.46W
|
|
124
|
3.78W
|
|
194
|
3.78W
|
|
196
|
3.78W
|
|
558
|
4.29W
|
|
192
|
4.29W
|
|
193
|
4.62W
|
|
168
|
4.90W
|
|
175
|
8.12W
|
Numbers 168 and 194 seem to be the most readily
available.
The auto parts stores also carry a halogen capless bulb
that will fit into the same socket. The number is 2040, but
as usual there's no clue about the wattage on the
package.
PUDDLE LIGHTS: The door edge lamps, also known as
puddle lamps, are a 5W capless. They're not even listed in
the bulb charts in the Jag books, but the Haynes manual says
it's number 501. US number 168 is perfect.
The access is kinda neat; you remove one screw from the
bottom, then slide the lens off rearward.
DASHBOARD LIGHTING: The instrument illumination
lamps are supposed to be a capless 2.2W, number 987. Finding
the US 161 would be good, 160 would be better. Or, you could
try something with higher wattage and hope nothing melts or
burns up in there.
THIRD BRAKE LIGHT BULB REPLACEMENT: It may not be
obvious at first, so John Himes sends this description for
getting to the bulbs: "Feel or look on the underside of the
cover; there are 2 black indentations on each side of the
cover. Place your fingers on each of these, or you can also
do one at a time. Press up on the indentation which is a
sprung black square button that keeps the cover from
rattling off. After your remove the cover, you have access
to the bulbs. They are in gray plastic holders that you turn
1/2 turn to release."
INDICATOR LIGHT BULBS: The tiny bulbs used in the
row of indicator lights at the top of the dashboard are
"miniature capless", similar to capless but a bunch smaller.
14V versions are available at auto parts stores in the US in
several different wattages:
|
NUMBER
|
WATTAGE
|
|
18
|
0.56W
|
|
73
|
1.12W
|
|
37
|
1.26W
|
|
74
|
1.4W
|
|
70
|
2.1W
|
Since the Jaguar bulb chart calls for a 1.2W, numbers 37
or 74 should make good substitutes -- but you also might
consider varying the wattage bulb for your own preferences,
like making the oil warning light real bright, less
important lights dimmer, and the turn signals real bright so
you can see them at all!
To get these bulbs in and out, it helps to have a pair of
hemostats (a "roach clip" to you 70's potheads) with
electrical tape wrapped around the jaws.
Headlights
HEADLIGHT BRIGHTNESS: Jon Jackson and others point
out that dim headlights may be the result of bad grounds.
"On my '87 there is a ground under the hood to the left side
of the radiator. There are several ground wires that go to
this same point. Cleaned it up a bit and all is great."
HEADLIGHT TYPES & BULBS: If you need to
replace a headlight bulb, the Jaguar repair manual and the
Haynes manual are both worthless; their bulb charts are all
screwed up on headlights. So, we'll try to provide a little
guidance here. First, if you have the US four-headlight
system (LHD), the outer units (sealed beam 5æ" round
halogen main/dip 35/35 watt) are H5006, and the inner
(sealed beam 5æ" round halogen main 50 watt) are
H5001. And yes, I have listed the correct wattages for these
commonly available sealed beam halogen units, despite the
various Jaguar literature listing the outers as 37.5/50 or
37.5/60. The non-halogen equivalents ("tungsten", number
4000) are 60/37.5 watt, but aren't recommended for anybody;
you only find them in dark corners of auto parts shelves
covered with dust. The corresponding tungsten inner bulbs
are number 4001, 37.5 watt, also not recommended.
If you have a single oblong "composite" headlight
assembly on each side of the car, you will need to identify
exactly which oblong headlight assembly you have.
There are at least three different oblong headlight
assemblies -- not counting the fact that there may be LHD
and RHD versions of each. The early non-US XJ-S has Cibie
headlights with glass lenses and metal reflectors and uses
two H1 halogen bulbs plus one "pilot" bulb on each side.
This is the assembly shown in the Haynes manual, but John
Goodman points out "The drawing of the XJ-S headlight bulb
on page 198 (actually 197 in my book) looks like it was
taken from a 1980 <UK> owner's handbook. But,
it's been edited to fit the page and you only have
half the picture!!! What you are looking at here is a
1980 or earlier headlight, the bulb shown is a main beam
single filament H1. What is not shown is an identical
bulb which installs in an identical hole immediately
underneath for the dipped beam."
Mike Morrin calls this early unit a "biode": "It is the
term (probably trademark of Cibie) for headlight units with
separate reflectors and bulbs for high and low beams. I
think it is a condensation of "bi-reflector iodine". The
term was widely used in europe back in the 70s, but I
suppose not in the US as they were illegal there then. Back
in the 70s, the British always called Quartz Halogen
"Quartz Iodine"."
Morrin describes the early unit in more detail: "Low beam
uses the back of the headlight shell (as per the later
units). The high beam reflector is in front of this in the
lower half of the unit. There is actually an adjusting screw
which allows the vertical angle of high beam to be adjusted
relative to low beam. The glass has CIBIE IODE in the centre
of the casting. Most of the bottom half of the lense is
clear, with fluting only directly in front of the high beam
bulb. It is interesting that Cibie used Iode in the
trademark on the lamp. I am sure that their after-market
dual-reflector lamps of the same vintage were known as
Biodes."
"The high beam has quite a narrow vertical spread, and
really needs the low beam to be simultaneously lit up for
close-in lighting. The early (pre-HE?) cars came already
wired this way. The wiring diagram in my manual shows a
dotted link across the low beam contacts on the relay.
"These are actually very good lights, except that they
are very prone to oxidising of the reflectors."
H1 bulbs are typically 55W and have a small circular
metal base with one straight side at a 45† angle to the
single spade terminal pointing straight off the bottom. The
socket must have a suitable ground connection, since there
is none on the bulb itself. H1 bulbs are readily available
in auto parts stores. In Europe, the bulb number is 411.
Note that the illustrations in the manuals seem to indicate
that H1 bulbs have an external conductor around the outside
of the capsule itself and entering in the front of the
glass, but the bulbs actually for sale in the stores don't
have this; all conductors are inside the glass.
Later non-US cars used Cibie headlights with a single H4
bulb and two pilot light bulbs on each side. Allan Charlton
says the lights on his '78 have the circle-E symbol
indicating E-code
specification. "It's E2 in a circle. The E2 also appears
in a smaller circle with an A above, and in a small square
with an A above (Actually, the A is so small that, in the
poor light in my garage, it could be an R, but I think it's
an A)."
H4 bulbs have a large circular metal base with three
alignment tangs, one larger than the other two, and a
3-prong plug that will fit the same socket as a US-spec
sealed beam -- three large (5/16") spade terminals arranged
as three sides of a square. If your lights use H4 bulbs,
they are readily available -- or you can use HB2 or 9003
bulbs, which are exactly the same. In Europe, these bulbs
are called 472. The French cars use a 476 for the yellow
color.
Composite headlights -- as opposed to sealed beams --
were finally legalized in the US in the name of energy
conservation via improved aerodynamics, but that doesn't
mean the European headlights are now legal. After all, the
US DOT couldn't possibly accept headlights that have proven
excellent in Europe for decades. So, the 1990-on North
American XJ-S has a new type of oblong headlights that say
DOT on the lens. Emile A. DesRoches says the lights are made
by Carello, and have plastic lenses with three little bumps
for aiming. "The Carello light housings appear to be
completely polycarbonate with reflectors of the same
material plated and apparently epoxied to the lens in order
to provide a leak free seal (no apparent O-ring, but it
appears there's a ridge where the parts join). These things
are very strong/resistant to scratching,etc. I've taken
several stones without mishap and what appeared to be a nut
or bolt at high speed (yes, I got to the track late and
stupidly neglected to tape the headlights -- this from an
SCCA tech inspector, yet). I expect it would be possible to
separate the sections with use of the proper solvent."
According to a Sylvania application guide, these
headlights are fitted with 9004 bulbs. These bulbs have a
large plastic base with a fat O-ring and a D-shaped
3-terminal socket, and are 65/45W.
Keep your grimy paws off those halogen bulbs. The oil
from your fingers on the surface of the quartz capsule
insulates it and prevents it from dissipating heat as it
should. The result is that the bulb burns out very quickly,
whereas normally an H4 bulb will last considerably longer
than a sealed beam. If you accidentally finger the glass,
clean the surface with some alcohol before installing.
There is one significant concern of headlight assemblies
with replaceable bulbs: the owner may simply replace the
bulb whenever it burns out, and neglect to notice when the
housing itself is deteriorating, the reflector gets all
rusty, or the lens gets broken. Since the reflector and the
lens are critical to proper illumination, the conscientious
owner will replace the housings whenever the performance is
adversely affected.
Before simply replacing burnt-out headlight bulbs, you
might wanna read the suggestions on improving
the headlights.
PILOT LIGHTS: "Pilot" is
UK-speak for the small bulbs within the headlight assemblies
that are used to make the headlights glow when the
headlights are not on. In the US, old VW's used to have
them, and many cars with the new composite headlamps have
something similar. Daniel Stern says, "In most of the world,
they're called "city lights". In the UK, they're referred to
as "sidelights" (which is confusing, because they face
front, not to the side.) This is the European
equivalent of the US "parking" lamp. European-specs vehicles
do not use amber parking lamps, but rather use white city
lights."
The Jaguar repair manual variously describes their pilot
bulbs as no. 15602, 4 watt, Osram miniature bayonet, or 223,
or 233, depending on whose misprint you believe. This sounds
the same as the side marker bulbs
233, but I haven't seen them personally and don't trust any
of this literature any more, check the actual bulb itself
before buying.
Vince Chrzanowski (who is using the Euro-spec Cibie
headlights in North America) says "The pilot lamps I use are
#1893. I use them in all my radio 12-volt applications
because of their long-life rating."
PROTECTING HEADLIGHT LENSES: If you have the Cibie
headlights and don't like the idea of paying Jaguar for new
ones, Griot's Garage offers a way to protect them. It's a
clear layer of vinyl that you peel-and-stick to the front of
the lens and then trim around the edges. This is likely to
be very effective, since even the slightest cushioning is
likely to prevent most stones and the like from damaging the
glass.
Griot's also sells a thinner version for fog lights and
turn signal lenses, but claims the product is not for use on
polycarbonate lenses. That leaves owners of the Carello
lights out in the cold.
FOG/DRIVING LIGHT BULBS: The auxiliary lamps,
either fog lamps or driving lamps, may be fitted with either
H2 or H3 bulbs. H2 bulbs appear to be mounted on a metal
blade while H3 bulbs have a circular metal base with two
notches, one rectangular and one semicircular, and a short
wire attached with spade terminal at the end. Both are
typically 55W.
See the notes above on handling halogen bulbs and
concerns about deteriorating or damaged housings, as well as
the suggestions for boosting
headlight power.
HEADLIGHT WIRING: The headlight and fog light
wiring diagram in the Supplement to the Repair Operation
Manual, copyright 1982, is too screwed up to follow.
Figure
20 is a replacement for the diagram, based on an
actual 1983 H.E.; note that if your wiring matches this
schematic it is impossible to operate the fog lights (see
Fog Light Wiring, below).
The headlight switch in the US-spec
1983 H.E. has five positions, three above and one below the
off position. To get into the top or bottom position
requires pushing the knob in while turning. The connections
made in the positions are as follows:
3: 1-2-3-5
2: 1-2-3-4
1: 1-2-3
0: No connection
-1: 1-2
The -1 position, connecting only the dash lights and
right side parking lights, apparently serves no intended
purpose; as wired, all the parking lights come on due to
backfeed through the bulb failure sensors. After a few
seconds for the bulb failure sensors to warm up, the left
side parking lights dim. If an owner wished, however, it
would be a simple matter to rewire the right side parking
lights to terminal 3 and use the -1 position to operate the
dash lights only.
Other headlight switches are different, however. John
Himes says that on his '88 the positions are:
Off
Parking lights only
Headlights
Headlights & fogs
Fogs only
John Goodman reports "On UK cars the fog/driving lights
are operated on the rotary dash light switch.
1= side/park
2= headlights
3= head & fog/driving lights
4= side/park & only fog/driving lights
...and there is a push facility that works when in
position 2-4 for the rear fog warning lights fitted in the
rear bumpers."
FOG LIGHT WIRING: If your fog lights don't work,
you may not be alone; some don't work because they were
wired incorrectly from the factory. Apparently, in some
countries Jaguars are fitted with "fog warning lamps" at the
rear of the car; the top position on the headlight switch
turns these rear fog lights on. The front fog lights are
operated by a "fog lamp switch". The '83 XJ-S (American
version) has no rear fog lights, and no fog lamp switch. The
top position on the headlight switch sends power to unused
connectors at the rear of the car, and there is no way to
turn on the front fog lamps.
The fog light wiring can be corrected by simply
reconnecting a wire from fuse 1 to fuse 6 -- see Figure
21. Be sure to leave the existing wire on fuse 6
connected to operate the dash indicator. With this system,
the top position of the headlight switch will operate the
fog lights and the low beams; high beams are inoperable to
avoid conflict with some state laws.
If you have genuine fog lights (yellow lenses), it
usually makes sense to wire them so that the fog lights can
be operated without any headlights. This would optimize
visibility in foggy conditions, where the headlights simply
cause glare. The disconnection at the inhibit relay shown in
Figure
21 causes the fog lights only to operate on
the top position of the headlight switch. Although the
inhibit relay is shown disconnected, it would be just as
well to remove it entirely in this scheme, as it serves no
function.
HEADLIGHT SWITCH KNOB REMOVAL: To remove the
headlight switch knob, you must depress a button in the
shaft that is behind the surface of the dashboard and points
down. To reinstall, you merely need to push the knob on,
because it is shaped to slide over the shaft button and snap
in place.
HIGH/LOW BEAM RELAY: Also known as the main/dip
relay. In some manuals, the schematics of the high/low beam
relay (Jaguar part no. C38616) show the components between
connections 56, 56a, and 56b to be a normal set of relay
contacts. This is not actually the case. This device
is an electrically-operated rocker switch; when the coil is
energized, the contact is switched from one side to the
other, and remains there when the coil is de-energized.
Jaguar wants some serious $$$ for that relay.
Roger Homer reports that other cars use a similar relay.
"The Headlight Relay is the same as the one on an early
model Torana (General Motors Aust). They used the same
high/low switching system, the relay I found is made by SWF
(Germany?) part no stamped on relay is R200.867."
Ray Reynolds provides another
report: "I found a compatible unit that dropped right in. I
had to drill an extra mounting hole in the fenderwell to
bolt the new relay in, but all the connectors plugged right
in, and it all fit under the stock relay housing (with a
little bending around of the headlight wires). The relay
itself looks like a Potter & Brumfield, and was part#
PBS89R from Micro Alarm (in Vernon, CA). It has 2
microswitches on top that do the actual power switching."
Reynolds notes that this relay does not provide the
pull-to-flash feature the stock relay does, but it would be
easy enough to add a normal relay with the coils wired in
parallel to provide this function. "Since the plunger is
visible, you might be able to bolt another microswitch to
the bottom of the relay so that it is activated when the
relay is tripped for the flash feature."
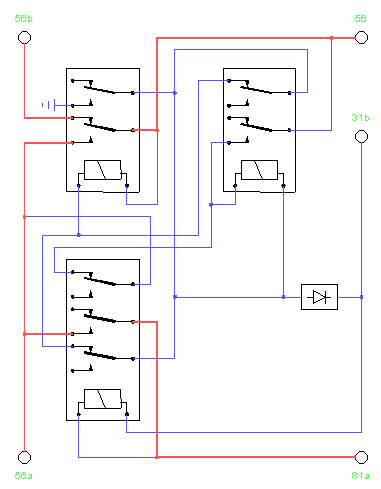
If your high/low relay has given up the ghost and you
can't find a reasonably-priced replacement, an alternate
scheme using three conventional relays and a diode is shown
in Figure 22. Note
that wiring (and related contacts) indicated by heavy (red)
lines must be suitable for headlight current, 30 amps or so.
All other circuits are less than 3 amp. For the diode, a
Radio Shack cat. no. 276-1661 will do nicely. Of course, you
will need to figure out where to mount these relays; perhaps
in the space behind the left headlights.
As with any such circuit, a single multi-contact relay
may be replaced by multiple single-contact relays by simply
wiring the coils together. This may make sense here,
allowing the use of SPDT 30-amp relays along with tiny "ice
cube" DPDT relays instead of trying to locate DPDT or 3PDT
30-amp relays.
The only functional difference with this circuit from the
original is that your headlights will always be on low beam
when you first turn them on.
DAYTIME RUNNING LIGHTS: There is a circuit in the
mid-80's-on UK cars only that operates the low beams at
reduced power to provide a running light-type illumination,
apparently as a result of some law. Richard Mansell quotes
"my owners manual which states: In the UK the headlamps are
automatically switched ON in a dimmed dipped beam mode when
the side lights are switched ON and ignition switch is in
position ë2'. This prevents the vehicle being driven
with side and tail lamps only." John Goodman says it is
"Controlled by a relay thingy by the headlamp fusebox (this
on UK cars came in around '86 '87)."
FOG LIGHT SHORTS: Jim McGuinn reports that he had
an intermittent short circuit in the fog lights that he
found was the rear of the bulb socket assembly arcing to the
housing. A bit of electrical tape solved the problem.
DRIVING LIGHTS: If you wish to replace your fog
lights with driving lights, or have destroyed your original
driving lights, J. C. Whitney catalog number 14xx9739Y is a
good choice. These lights look good, have a similar
appearance to the originals, have a rustproof black plastic
housing -- and the box they come in has an illustration of
an XJ-S on it!
There are many excellent driving light kits on the
market, and almost any of the rectangular style can be
fitted to the XJ-S and will look proper. It's a good idea to
check on the availability of replacement lenses, since they
are prone to damage. You might also check to see if the
lenses are thick and substantial to resist all but the most
powerful impacts. And you might check the availability of
covers.
You might also wanna check the quality of the light and
the pattern. As with most things, you get what you pay for;
a cheap light will pretty much throw light everywhere,
causing considerable glare in rain and the like, while the
better lights should have better focus and less "light
leakage" off in oblique directions.
If cheap is what you're looking for, Wal-Mart and
AutoZone offer "Blazer" driving/fog light kits. These sets
are amazingly cheap -- barely more than the value of the H3
bulbs included -- and are available in either black plastic
or chrome plated steel versions and with either yellow fog
lenses or clear driving lenses. The housings are a little
smaller than most -- "less clunky looking," according to my
wife. I personally didn't care for the lack of a distinct
ground wire connection, so I added one; a little screw used
to retain the bulb itself proved a suitable place to attach
a ground. If you break a lens -- or would like to convert
your driving lights to fog lights or vice versa -- the
replacement lenses are for sale right next to the light kits
on the rack! If the chrome doesn't hold up, just buy a new
set every coupla years.
Most driving lights sold in the US use an H3 bulb;
standard wattage H3 bulbs as well as high-power bulbs are
readily available.
One more note: while fog/driving lights were standard
equipment on most XJ-S's, Bill Kubida reports that somewhere
around '93 they became an option -- and therefore Jaguar
started offering an official fog light kit. "The addition of
the front fog lights requires the addition of a suitable
switch to the array of existing switches. For reasons known
but to God and Jaguar, the addition of the single additional
switch requires the following:
a) removal of the switch block to the left of
the trip computer which has a button for the rear screen
heater and another for the rear fog lights. This switch
block is then replaced by a new one having a front fog
light switch and a rear fog light switch;
b) removal of the switch block to the lower left of
the steering column which has a button for the hazard
warning lights and a blank-out plate. This is then
replaced by a second switch block having a hazard warning
light switch and another for the rear screen
heater.
"I am certain that if we put a Cray IV to work on it for
a couple of years a more complex system could be figured
out, but personally, I doubt it."
HEADLIGHT BUZZER: The XJ-S doesn't come with one!
What a cheap car. To add one is easy. You need a 12 volt
buzzer such as catalog no. 273-055 from Radio Shack, and a
rectifier (or diode) such as catalog no. 276-1661. For the
buzzer you can also use any buzzer you've ripped out of a
car, such as those pesky seat belt buzzers.
Connect one of the headlight wires to one end of the
rectifier. Connect the other end of the rectifier to one
lead of the buzzer. Connect the other lead of the buzzer to
one of the ignition wires. Both of these wires are near each
other under the dashboard -- from the headlight switch and
the ignition switch.
A rectifier allows current to flow in only one direction.
If you have wired it correctly, when both the ignition and
the headlights are on, there is no current flow because both
wires are at 12 volts. When the ignition alone is on, there
is no flow because the rectifier stops it from flowing that
way. When the headlights are on but the ignition is off,
current flows and the buzzer buzzes. If the buzzer buzzes
when the ignition is on and the headlights are off, reverse
the rectifier.
Jan Wikström did it a different way: "Pulling the
key out also operates the switch that controls seat belt
warning etc. As my car doesn't have those, I've used it to
operate a "headlights on" warning buzzer."
Connie Vloutely says, "I have been wanting to do this for
a long time but could not find chime element suitable for
automotive use. One that works on 12 Volt DC. I hate
buzzers. I found one in the local radio shack store P/N
RS-273-071."
GAUGES READING LOW: Brian W. Rice writes: "All
gauges in my 85 XJ-S read low by 25% when I acquired the car
several years ago. I did some tests by lifting No. 4 fuse
and applying a variable voltage to the dead end from a power
supply, making sure not to exceed 15 volts. With precisely
12 volts applied the voltmeter showed about 9V. The fuel
gauge also only indicated 3/4 with a full tank of
petrol.
"Removed the instrumentation panel, quite an easy job,
and investigated on the bench. All gauges showed corrosion
at the rear terminal nuts and washers where they contact the
flexible printed wiring assembly. I was able to repair by
soldering tinned copper wire to the flexible circuit board
tracks being careful not to melt the plastic flexible board
and fashioning the wire into circular washers to go under
the terminal nuts thus establishing good contacts again.
Gauges now work as designed."
If you're not sure to trust your voltmeter, Michael
Minglin suggests "Pick up a cheap cigar lighter adapter,
clip the leads and connect to a voltmeter. This will allow
you to monitor the voltage, with reasonable accuracy, under
different driving conditions."
RADIO INTERCHANGEABILITY: Greg Meboe says, "During
the 70's and 80's, the sedans and XJ-S's used the same
radio, exactly. Until 1988 of course, when the radio in the
sedan had a curved faceplate to match the new
dashboard."
RADIO WIRING DIAGRAM: Greg Meboe adds, "On the top
of my '84 cassette player which I removed to install the DIN
radio, there was printed a nice wiring diagram for the color
codes of the Jag radio circuit. I haven't been able to find
this in the general manuals, and it's valuable information
for anyone who is installing an aftermarket radio in their
Jag."
RADIO REMOVAL: Steve Broady, regarding the
late-80's radio: "Assuming your radio is a Blaupunkt made in
Korea, you will need to cut a coat hanger into 2 pieces like
a pair of U's to push into the front plate holes to remove
radio from bracket. When you pull the radio out of the dash
watch for ground strap on left side as bolt protrudes into
bracket. Once out you will find 2 live input wires with
fuses; one is for clock and code function, the other for
radio, tape, antenna."
RADIO SECURITY -- REMOVABLE FACEPLATES: According
to Greg Meboe: "The 86 Jags came with the removable-face
tape deck, a design which has made radio repair/replacement
outfits a lot of money due to its low service life. The face
comes off to ward against theft, but the connectors for the
face don't seem to cut the mustard."
Vince Chrzanowski, who repairs and restores old car
radios, says, "The faceplates can't be repaired by ordinary
mortals. The commonest failures are not in the LEDs, but in
the surface-mounted integrated circuits which are hidden
under mounds of epoxy. Additionally, the slide controls are
among the most failure-ridden we've ever seen. But the
faceplates can be purchased in repaired form. Our
source for rebuilt faceplates is Southern Autotronics in
Virginia (1-800-446-2880, usual disclaimers apply). The last
time I purchased one, the technician indicated that they
were in short supply. That was about two years ago.
"The 9500 series radio was, in my opinion, not nearly as
reliable a radio as the so-called lesser 8600 series.
After struggling for a few years to keep the 9500 alive in
my '85 XJ-S (faceplate, tape deck and pc board failures), I
opted for the 8600 and have been perfectly happy ever since.
Actually, the 8600 is much easier to use and much safer to
operate on the road."
RADIO SECURITY -- CODES: Somewhere around 1986,
Jaguars came with a radio that had another security feature:
if the power was disconnected, the radio would never work
again unless the correct security code is entered.
Presumably, people who steal radios won't steal one they
can't use.
Of course, you can choose any repair procedure in the
manual, and chances are the first step is to disconnect the
battery. If you already went through this and your radio is
now nonfunctional (or you have stolen such a radio), you
apparently will need to contact your friendly dealer to
obtain the security code. You may also need to provide a
serial number that begins with "B" that is on the case of
the radio.
If you would like to avoid the grief, reportedly there is
a product on the market that can be plugged into the
cigarette lighter. It uses a 9V battery, and will keep a
small amount of power on the system while the battery is
disconnected. It will supposedly keep the radio operational,
stations programmed, etc.
CONDENSATION DEFLECTOR
SHIELD: Apparently, either plugged condensate drains in
the A/C system or leaking heater cores have a tendency to
dump water on the stereo -- and some of those stereos ain't
cheap! So, Technical Service Bulletin #8685 says essentially
that a "condensation deflector shield" must be
installed on all XJ-S vehicles prior to VIN 163790 whenever
the mechanic is working in the area. The part number for the
deflector is CBC 9193, and it appears to be very easy
to install, requiring only 0.10 hours.
BRAKE FLUID LEVEL SWITCH:
The switch in the cover for the brake fluid reservoir is
supposed to light an indicator on the dashboard when the
level is low. The rubber cover over the connectors has a
bump in the center. Pressing the bump forces the float
downwards and closes the contacts, providing a circuit and
bulb test.
Unfortunately, the switch is garbage and the indicator
may never come on, or may stay on all the time. The float
for the switch is a piece of cork, which rots, soaks up
fluid and sinks, etc. The protective metal cover over the
cork float gets full of junk and jams the float. The
contacts within the switch, despite evidently being silver
plated, get corroded and fail to make a connection.
The cork is easily replaced with one from a wine bottle,
and the metal cover's problems are solved by removing it and
throwing it away. The contacts themselves can be serviced by
using a tiny screwdriver to pry the switch assembly out of
the top of the reservoir cover; don't lose the little metal
sleeves that keep the contact screws from tightening down
onto the plastic.
But this switch needs to be ultra-reliable, since it is
rarely tested and failure to work when needed can be
disastrous. While it's easy enough to get it working with
the procedures above, there's no apparent way to get it to
keep working. The switch is crap, pure and
simple.
The only truly safe solution is to replace it, lock,
stock, and barrel, with something reliable. Finding
something reliable is no problem; most Japanese cars use a
type of switch that consists of a magnetic reed switch
within a vertical plastic shaft surrounded by a
doughnut-shaped float with a magnet in it. This type switch
is so reliable that you can pick one up in a junkyard that
has been exposed to rain, sun, and hamhanded mechanics for
years and you can bet that it will still work.
Unfortunately, fitting such a switch to the XJ-S poses
several problems.
There are two tactics that can be used to replace the
fluid level switch. The first would be to replace the entire
remote reservoir with one from some other type car with a
reliable switch in it. Finding cars that use remote
reservoirs is difficult, but if you find one that'll fit
under the hood on the XJ-S make sure that the level of fluid
in the reservoir that results in the warning light coming on
is above the fittings on top of the master
cylinder.
The other tactic would be to keep the Jaguar reservoir
and cap and fit a decent switch to it. While this job is a
fairly straightforward process of finding a suitable switch
and improvising a way to mount it in the Jaguar reservoir,
there are several issues to consider.
First, on the Japanese brake fluid reservoirs, the cap or
switch itself installs with a half-turn or less. The Jaguar
reservoir cap turns several complete turns when
opening/closing. If a switch replacement scheme does not
duplicate the original feature that the switch cover on the
top can turn on the cap -- or, conversely, can remain
stationary while the cap is rotated on or off -- the wires
will get twisted big time. There are ways to deal with this,
of course, the most obvious being providing a connector
right next to the cap so you can unplug the wire before
unscrewing the cap. Or you can just make the wires long
enough that they can get all twisted up without hurting
them.
Another concern is the venting of the reservoir. It is
customary to provide a convoluted vent scheme, so that fluid
won't likely be able to find its way all the way out; it
will only make it part way, and then drain back into the
reservoir. Also, you don't want to vent the reservoir
too well, because air flowing freely in and out will
introduce too much moisture into the brake fluid. The stock
XJ-S cap assembly vents the reservoir through the
switch assembly. There is an off-center vent hole in the cap
itself, but it leads into the switch assembly, and
apparently the only vent from there to outside is via the
hole in the switch cover around the float shaft and then
through the wire openings in the rubber boot on top. Of
course, the switch cover probably leaks everywhere, so
venting is not a problem with the stock assembly. It is
worthy of note, however, that any fluid that makes it up
into the switch housing through the vent hole will have to
drain out the lower float shaft opening, the one in the
cover itself. It appears they could have omitted the small
off-center hole altogether. Whatever the contorted logic of
the original vent scheme was, proper venting must be
considered when devising a replacement switch scheme.
Yet another thing to watch for is what level will cause
the sensor to turn on the warning light. The sensor found in
Nissans is really neat, not being part of the cap but rather
a separate snap-in assembly on top of the reservoir. It
looks really tempting, except that it is remarkably short;
if used on the XJ-S reservoir, the owner might have to keep
the fluid level quite near full to avoid the switch giving a
low-fluid signal. At the other extreme, if a switch is too
long it will jam into the bottom screen within the XJ-S
reservoir when the cap is screwed on.
A typical junkyard won't sell you a reservoir cap or
switch by itself, you must pay for the entire master
cylinder. This is especially interesting considering the
fact that, if you buy a master cylinder from an auto parts
store, you do not get the cap or switch.
Nevertheless, their position is understandable; when you
remove the cap, the rain is gonna get into the master
cylinder and ruin it. Still, the cost of the whole master
cylinder is usually reasonable, probably less than just the
switch from a car dealer.
Note that on the typical Japanese switch, it is possible
to pry off a little clip at the end of the switch assembly
and slide the magnetic float off. This is important for
being able to install the switch through a hole.
If you wish, you can try to configure your assembly to
use the original switch cover, wiring connectors, and rubber
boot to maintain a stock appearance. The bump on the center
of the rubber boot will be non-functional, since the
Japanese magnetic float switches do not provide for such a
test -- nor do they need to be tested.
Remember that brake fluid affects some materials, so if
you use rubber seals or plastic parts in your assembly it
would be a good idea to soak them in brake fluid for a while
to make sure they don't deteriorate. If screws are used,
stainless steel is recommended; you don't want particles
from rusty screws falling into the fluid.
Whatever arrangement you work out, make sure that it
doesn't stick up so far above the reservoir cap that the
hood hits it. And make sure that the level of fluid that
causes the light to come on is above the fittings on
the master cylinder.
Despite all this knowledge, there still hasn't been found
a nice, easy snap-in fix for this brake fluid level switch.
Although it remains an involved task to install a reliable
replacement switch, it is highly recommended that every XJ-S
owner do so. The Jaguar repair manuals indicate that either
this switch or the pressure differential sensor will turn on
the warning light, but somewhere before 1983 the
differential pressure sensor was deleted and replaced with a
couple of simple fittings on the brake lines, so the fluid
level switch provides the only warning you are likely
to get prior to complete brake failure.
BRAKE WARNING LIGHT: Mike Morrin warns of another
reason the brake warning light may seem to have failed in
the "on" mode: "When I got my car, the warning light was on,
but the handbrake adjusters (on the rear calipers) were
seized. Fixing the adjusters put some extra tension on the
cable,bleod hits it. And make sure that the level of fluid
that causes the light to come on is above the
fittings on the master cylinder.
Despite all this knowledge, there still hasn't been found
a nile light fixture at your favorite auto parts joint, and
install it in the top of the compartment just behind the
latch. Wire it into the interior light switch just to the
left, so when the switch is operated it will turn on both
the right front interior light and the glovebox light.
CIGARETTE LIGHTER: Apparently, some XJ-S's were
equipped with some sort of non-standard cigarette lighter.
This causes two problems: first, when the element in the
lighter quits working, it's hard to find a replacement; and
second, it may prove difficult to plug non-cigarette-lighter
accessories into the cigarette lighter hole. If you are
having either of these troubles, the easiest solution is to
drop by any auto parts store and buy a generic cigarette
lighter and install it, and throw that hokey Jaguar one
out.
Antenna
ANTENNA: Richard Mansell says "I have a feeling
the XJ40 uses the same electric aerial as the later XJ-S's.
When you have a boot spoiler it's a bit if a problem as the
mast goes through a small hole in the spoiler!"
John Goodman adds: "On the boot spoiler equipped cars
there is an additional relay wired into the boot light
switch. The idea is that when the aerial is extended, radio
and ignition on, lifting the lid very slightly causes the
boot light to come on and the aerial to retract (after the
stupid 4 second delay)."
ANTENNA MAST LUBRICATION: Michael Minglin says,
"Porsche dealers sell a small foil packet with an oil soaked
swab inside. This is to lubricate the antenna shaft." Hal
Rogers adds, "Jaguar also sells a similar lubricating pack
as well. A number of Jaguar specialists (like myself) carry
it. It is very inexpensive." Considering the wealth of
information listed below on repairing the antenna, maybe
this lubrication is a good idea.
ANTENNA CLUTCH ADJUSTMENT: Steve Leamy sends
instructions on adjusting the drive clutch: "This repair
covers ant that just won't quite make it up or down and
still makes a clicking noise before stopping.
"You want to get to the side of the unit that looks like
a cup and has a screw in the middle of it. Remove the screw
and the cover and you will have now exposed the clutch drive
for the ant. On the shaft in center you will find a locking
nut which you will now back off 1 or 2 turns, now grip the
metal clutch and tighten 1/2 turn. Retighten locking nut and
prop unit up so you can test it. Turn key on and radio and
ant will raise in 15 to 20 seconds, once ant reaches full
height you should hear 3 bumps and ant motor should shut
off. Turn key off and ant should go down completely and 3
bumps and motor will cut off. If ant still does not go full
up or down adjust clutch in quarter turns until a full
stroke is attained.
"On 88 and above XJ's I have found three different
manufacturers of ant in the cars I have serviced the but all
of them use some type of clutch system and can be fixed by
resetting of the tension on it."
ANTENNA DRIVE WIRE REPLACEMENT: Steve Leamy
continues: "Some models use a plastic drive wire instead of
metal; you can repair these with weed eater line but you
have to remove the motor base and ant to service it."
Dan Jensen tried using 0.080" grass cutter line, and it
didn't work. "The main problem was it was stiff enough when
coiled into the tight end of the coil guide that it popped
out between the guides and jammed. I think having a material
that (a) is reasonably flexible, (b) is tough enough to
stand repeated uncoiling and coiling, and (c) has an o.d.
near 0.125 are all important. I see no reason why grass
cutter string would not work, but the o.d. needs to be close
to 0.125 in. Note that the original extend/retract cable has
a small hole in the center, i.e., it is very
thick-walled tubing vs. flexible rod."
"I also tried PTFE (Teflon), but it quickly failed due to
the repeated flexing. Ultimately, I used 0.125 inch flexible
polyethylene rod purchased from a local valve supply
company. This has worked without problems."
ANTENNA MAST REPLACEMENT: A repair kit is
available for some Jaguar antennas, including the mast and
the plastic gear rack. According to Hal Rogers of H. D.
Rogers & Sons: "It depends on which Jaguar... i.e.,
which antenna assembly that you have. A replaceable mast is
available for the Hirschman brand antennas...the mast is the
same for some German cars. The Jaguar equivalent part number
is DBC2200. Mostly late 80s-up cars...
"Next, if you have an older Jaguar, they had a Japanese
manufactured antenna. It does not have a replaceable mast,
never did. The unit that we sell which is a replacement
unit, not exactly the original, and you may need a fitting
kit as well...It replaces DAC3542 or DAC4090 Jaguar part
number.
"There is not a real easy aftermarket replacement for the
late Hirschman...though you can change the mast."
Also, see Jaguar All-Parts.
John Goodman suggests: "Replace the mast the easy way!!!
(may only work with the older models with serrated nylon
drive cable).
"1. Undo mast securing nut on top of
wing/fender(leave unit intact in car).
"2. Get helper to switch radio on, while you pull up
on the mast, the motor will extend the mast right out of
the car complete with nylon cable.
"3. Put new mast into hole, get helper to turn radio
off, motor will pull new mast into hole, tighten securing
nut.
"Again, can't confirm this will work on these Hirschman
types but it does on the older ones provided the mast is not
seized solid."
For newer models, Richard Mansell sends the following
procedure: "The following is for an '89 XJ-S:
"With the aerial on the workbench, use a
screwdriver to pop all of the plastic catches. You should
now be staring at the guts of the aerial.
"Retrieve the three top damping rubbers.
"You may be able to slip the drive belt off of the
worm wheel and ignore the next 4 steps but I was making
it up (I also like taking things apart anyway).
"Slip the c-clip off of the gear drive shaft.
"Pull off the metal mounting bracket that goes between
the motor and the gear wheels.
"Undo the two screws that hold in the motor and lift
it out of the way.
"You should be able to lever out the two gear wheels
in one piece. If you do split them you will hear an
expensive ping. This is just a spring that acts as a
clutch between the two gear wheels. It is actually a good
design as it takes the stress away from the gears if the
mast sticks a bit. Don't worry, it is easy to put back
together.
"Unscrew the retaining collar from the top of
mast/wing (it helps if the mast is slightly extended to
allow room for the collar to unscrew). The mast should
now pull free from the aerial body.
"At this point you will either be putting in a newly
purchased mast or be trying to free the old one. I found
pouring 3-in-1 oil inside and down the outside of the mast
along with raising and lowering the mast continuously
eventually freed it up.
"To get the white mast lead back into the case you will
need to remove the mast housing attached to the aerial body.
Undo the small screw that holds this housing in place then
simply unscrew it.
"You can now feed the white cord through this housing and
back through the small hole this housing slots into on the
aerial body.
"I think if you are replacing the mast then you probably
can just pop it out and slip a new one in. I have only done
one but because the body of the cog housing is narrower than
the base of the mast housing where they meet, I found it
impossible to push the old cord back in without further
dismantling. I assume the cord becomes coiled due to living
inside the spool for long periods of time, it therefore hits
the lip and will not go any further. If the aerial is
already out it takes seconds to unscrew the mast base to
enable the cord to be poked through.
"The mast is certainly available in the UK for around 20
pounds but hopefully unless it is bent (or ëwashed') or
the cord snapped it should be salvageable. The rest of the
aerial seems well designed.
"The rest of the reassembly is very straight forward so I
won't bore you with the details."
ANTENNA -- OTHER REPAIRS: Samuel J. Louw shares
his experience on his '89 XJ-S with the Hirschmann antenna:
"I tested it with the cover off and saw that the motor was
driving the gear, but that the second gear driving the
antenna was not turning. I took the two gears apart and
found the plastic pin transferring the driving force from
the drive gear via the internal spring to the antenna gear
broken off. The first glue attempt was unsuccessful, but on
second attempt I enlarged the hole, which the plastic pin
already has, a bit and fitted a small selftapping screw,
together with some steel epoxy. Antenna is working fine now.
Glue and screw just needs to be flush with the gears."
ANTENNA REPLACEMENT: The original Jaguar antenna
is incredibly expensive, even when the mail order shops put
it on sale. If you're not real concerned about maintaining
the appearance of the inside of the trunk, you can replace
the antenna and its delay relay with any of several antennas
from J. C. Whitney, such as catalog number 03-xx9579A for
around $40. This antenna has the motor right on the bottom
of the antenna itself rather than remotely connected, so
it's in plain view within the trunk -- but it's a really
small motor, not a huge mass like the original. It doesn't
have that 10-second delay before going down, but nobody's
ever figured out what that's for anyway.
If you are installing the antenna described above,
connect the green wire from the antenna to the white/pink
wire in the car. Connect the red wire from the antenna to
the brown wire in the car (brown wires are the generic
Jaguar 12V power wires). Make sure the housing of the
antenna motor is grounded to the car, either by the mounting
scheme or by connecting the black wire to it. Also, this
antenna has a drain tube to dispose of rain water that runs
down the antenna into the housing; route the drain tube
somewhere outside the car.
The antenna installation instructions also direct you to
adjust the antenna trimmer on the radio. However, if your
radio has an electronic tuner (digital display instead of
mechanical needle), it probably has no such adjustment.
These are not the only antennas available that can be
made to fit this car, and in fact a suitable replacement can
probably be found at most auto sound system shops. When
selecting an antenna, always insist on one that is "fully
automatic," meaning it raises or lowers automatically when
the radio is switched on or off; the "semi-automatic"
antennas are electric motor driven, but you must control
them manually from a rocker switch installed somewhere.
Also note that the ideal extended length for an FM
antenna is about 31." Any shorter or longer will give
less-than-optimum FM reception.
(A part of the document is missing here -- VB) xperience
on his '89 XJ-S with the Hirschmann antenna: "I tested it
with the cover off and saw that the motor was driving the
gear, but that the second gear driving the antenna was not
turning.e delay retraction.
"As compared the Jag unit which has the telescoping
tubing in the fender well and the motor in the trunk, the RS
unit is all one unit. Thus it all must fit into the same
fender area as the Jag's telescope unit.
"Start by taking out the Jag unit. When you pull out the
Jag motor assembly it has three electrical connections. The
ground strap is obvious. A blue/white wire runs to the motor
relay and a blue/red wire runs to the motor relay. We will
use the relay connection for the blue/red wire to control
the RS antenna.
"The electrical connections are relatively easy. The RS
unit has three electrical wires, one black, one orange, one
red (and the antenna). The black wire is ground. The orange
wire controls the antenna motor thus making the antenna go
up or down. That is, when the orange wire has voltage on it,
the antenna raises. When voltage drops off of the orange
wire, the antenna retracts. Connect this orange wire to the
original Jag antenna motor relay, where the Jag wire
blue/red was. Do you remember where the blue/red wire was on
the relay - it is in the middle of all the connectors
(not the top outside one, that was the blue/white
wire). However, my Jag "electrical schematic" shows
these wires reversed. Better check yours. The Jag relay
spade connector we want will have voltage (battery) on it
when the radio is on. Check this with a volt meter to
chassis ground. Then turn the radio off, the voltage will
drop off in about 15 seconds (this is how the delay works).
Connect the RS orange wire to that relay spade connector.
The RS red wire is for power to the antenna motor, it comes
with a 5 amp inline fuse. Connect this red wire to the
(brown) wire. This completes the electrical wiring of the RS
unit. You will note with pleasure that the antenna still has
the delayed retracting feature of the Jag."
It appears that the Radio Shack and J. C. Whitney power
antennas, and probably most of the other ones on the market,
work pretty much the same way; there is a ground wire, a
power wire, and a signal wire. Simply select one that will
fit in the space. The major difference between the two
installations described is that Graham chose to keep the
original Jaguar antenna relay in the circuit to maintain the
delay, and this method would probably work just as well with
any other aftermarket power antenna.
Note that, for a little more money (but still a lot less
than the replacement Jaguar antenna), J. C. Whitney also
offers an automatic antenna with a remote motor. This could
presumably be installed essentially the same way the Jaguar
original antenna was.
ROLLER MICROSWITCHES: The
microswitches on the throttle linkage and on the shifter
look tricky with their little rollers and all. However, they
are in fact a standard item, and are readily available at
your local electronics store -- complete with identical
rollers.
TRIP COMPUTER FUEL MILEAGE: The CATALOGUE reports
that erratic fuel mileage readings can be caused by a poor
connection at the fuel injector resistor pack. The fuel
gauge readings are unaffected.
SPEEDOMETER/CRUISE CONTROL/TRIP COMPUTER SENDING UNIT:
Peter Morris provides some suggested tests for this
sending unit: "check the transducer by getting under the car
and pulling the unit, spinning the drive while someone
verifies speedometer movement. This is not a conclusive
test, however. If the there is no movement, another check,
also performed under the car, is to disconnect the
transducer, and connect a pair of clip-leads to the
chassis-side connections. Clip one clip-lead to a heavy
screwdriver and the other to a file. Drag the screwdriver
across the file while someone watches the speedo. If there
is speedometer indicator movement, then you can reasonably
assume the wiring and connections to the speedo (and trip
computer) are good. The next logical step would be to
replace the transducer."
SPEEDOMETER SENDING UNIT 90 Degree ADAPTER: John
Shuck sends this report: "I've actually repaired these
little expensive jobbies. Take apart the crimps and inside
is a small square piece of metal that actually does the
drive and is probably sheared. Now go to a speedo shop and
have them square you a piece of speedo cable about 2 inches
long. They put the round cable in a die.. hit it with a big
hammer..bingo..square. Cut this to length with a die grinder
and reassemble."
JDS: Later Jaguars are fitted with connections for
an electronic diagnostic system. A knowledgeable mechanic,
who shall remain nameless here, sends the following
words:
"JDS stands for Jaguar Diagnostic System. Basically it is
a processor that ties into the serial ports in the car
wiring. However good this may sound, it is no more than a
glorified wiring diagram. It sends you down the circuit you
are checking and you end up more often with a car that is
torn apart and not fixed. All Jaguar dealers in the US were
forcibly recommended to purchase one of these $23,000 units
back in the late 80's."
"The new P.D.U. diagnostic unit which is supposed to be
the new JDS is a self-contained unit that can be taken on
road tests. Gen Rad is the manufacturer of both of these
machines. The P.D.U., already dubbed as "Pretty Damn
Useless", is a very complex unit. It uses CD-ROMs instead of
3.5 floppies. The screen is about 4" square, green display.
It is a very difficult unit to use. The techs that have been
to school for the P.D.U. still have very little
understanding of it."
SEAT HEATER: Later XJ-S's come with a seat heater,
and apparently it lacks reliability. Stefan Schulz sends a
description of the repair of this unit:
"The seat is connected to the car electrics through three
different connectors, one for the seat belt logic (cable
runs under centre console, pull carefully to expose
connector), one for the lumbar pump, and one for the seat
heater. The latter two are under the seat and can be
accessed most easily by moving the seat as far to the rear
as possible.
"Having disconnected the seat heater connector, check
with a voltmeter whether it delivers power when the seat
heater is switched on. If it does, the problem is somewhere
in the seat. Remove seat.
"Turn seat upside down in a clean area. Locate the
connector that connects the bottom seat heater in series
with the one in the backrest. Pull it apart. Use an ohmmeter
to figure out whether the bottom or the backrest heater is
faulty.
"If the bottom heater is faulty, remove the black rubber
cover from the bottom of the seat. See where the heater
power supply wiring enters the bottom cushion ? Good.
Carefully pull it apart at that point, exposing the top of a
cheap and nasty heater element.
"Cut the top covering of the heater element to one side
of the thermostat and flip it over to the other side to
expose the thermostat element. Don't cut it away, you'll
need to put it back later.
"There are three joints within the seat heater element.
Orange/slate wire to thermostat, thermostat to heater
element, heater element to black wire. Examine all three
joints. Note that they get hot (hey, they're part of a
heater) and are moved and flexed constantly. Solder joints
should never be used in areas that get hot or which are
under mechanical stress like the one these wires are
experiencing. So what did the cheapskate Jaguar designers
use? Exactly. The thermostat is cheap too, and its
connection lugs will be badly oxidized.
"Take out the thermostat and subject it to the usual
boiling water/ice water routine to test it. Check with an
ohmmeter that it opens when in hot water and closes when in
cold. Being more precise with a cheap part like that is a
waste of time. If you find that the thermostat is faulty,
you'll see that it is not a Jaguar part. Jaguar wants you to
replace the entire heater and cushion assembly. But this
ëstat doesn't do anything any other
45degreesC/12V/10Amp bimetallic ëstat wont do, so get a
replacement from an electronics shop if necessary.
"Solder the thermostat back in, using weapons-grade
solder wire with a high silver content and consequently high
melting point. You did remember to dry and clean the
connection lugs first, of course. Re-solder the third
connection (heater to black wire) as a matter of course.
"Squeeze the thermostat back into the cushion, make sure
that none of the heater wires touch it. Put back the top
covering using solvent-free glue and a staple at the
end. If you use glue containing solvent, you will find that
that works the same way as the naturally occurring rot of
the seat foam, only a lot faster - seconds instead of years.
Use an ohmmeter to check the resistance offered across the
seat heater connector now - it should be about 1.8 ohms.
"Refit all the other components by reversing the removal
sequence. Put the seat back in the car and connect it
(remember the seat belt logic connector!)"
BOOT LOCK: According to Mike Cogswell, electric
boot locks were introduced in 1989 models. According to his
dealer, they cannot be retrofitted to earlier models.
DOOR LOCKS: There have been a couple reports of
people getting out of their Jags while leaving the engine
running, and when they closed the door they could hear the
click as the car locked them out. The cause is unknown, but
be forewarned. Also, see "Breaking In" on page *.
KEY FOB LOCK: According to Mike Cogswell, the key
fob security systems were introduced in 1989 as a
dealer-installed option. Apparently these cannot be fitted
to earlier models.
ALARM SYSTEM RESET: Victor Naumann provides a
resetting procedure: "Each year is different; try
disconnecting the battery, wait 1 minute. Reconnect the
battery. If the lights flash and sounder beeps every few
seconds you are halfway home. Have all your remotes,
security looks for five signals. You must press each remote
at least once and all of them for a total of five presses.
The security should work then. If the sounder does not sound
, you may need to disconnect the security backup battery
next to the security ECU and the do the process."
WHERE IS LUCAS TODAY? REMANKING@aol.com "Lucas
merged with the Varity corp in Sept. '96. Varity is what was
left of Massey-Ferguson after it was chewed up along with
Kelsey-Hays. The president of Varity is now in control of
the new LucasVarity and it seems that he has no love for
Lucas or the name. US automotive operations will cease in
the next few months for Lucas and will only be represented
by a company called AutoSpecialty which was just recently
acquired and based in LA CA. which will market no Lucas
product but will be owned by LucasVarity. AutoSpecialty
supplies undercar and braking products. LucasVarity will
continue for a while in Europe but a team is taking surveys
at present for a new name for the merged company, and it
won't be Lucas."
On to the
Cruise
Control
|


